
| 일 | 월 | 화 | 수 | 목 | 금 | 토 |
|---|---|---|---|---|---|---|
| 1 | 2 | 3 | 4 | 5 | 6 | |
| 7 | 8 | 9 | 10 | 11 | 12 | 13 |
| 14 | 15 | 16 | 17 | 18 | 19 | 20 |
| 21 | 22 | 23 | 24 | 25 | 26 | 27 |
| 28 | 29 | 30 | 31 |
- 쿠버네티스
- 묘공단
- HPA
- ansible
- WSL
- Timeout
- AutoScaling
- Object Storage
- gateway api
- EKS
- 컨테이너
- windows
- ipam
- aws
- KEDA
- vscode
- upgrade
- curl
- ubuntu
- directpv
- minIO
- go
- kubernetes
- cilium
- AKS
- 업그레이드
- VPA
- Karpenter
- Azure
- calico
- Today
- Total
a story
[9] EKS GPU 리소스 활용 본문
이번 포스트에서는 AI/ML 워크로드를 EKS에서 사용하기 위해 GPU 리소스를 활용하는 방안을 살펴보겠습니다.
또한 AWS에서 제공하는 Build GenAI & ML for Performance and Scale, using Amazon EKS, Amazon FSx and AWS Inferentia 워크샵을 따라 실습을 진행하였습니다.
목차
- AI 워크로드의 컨테이너 사용 여정
- EKS 워크샵 실습
2.1 실습 환경 구성
2.2 스토리지 구성
2.3 생성형 AI Chat 애플리케이션 배포
1. AI 워크로드의 컨테이너 사용 여정
전통적으로 ML 엔지니어들은 베어메탈 서버에 직접 GPU드라이버와 라이브러리를 설치하여 작업을 하였습니다. 다만 이러한 접근 방식은 아래와 같은 문제점을 가지고 있습니다.
- 환경 구성의 복잡성: CUDA, cuDNN 등 복잡한 드라이버 스택 설치 및 관리가 필요. 특히 버전 호환성 문제로 인해 특정 프레임워크(TensorFlow, PyTorch)가 특정 CUDA/cuDNN 버전만 지원하는 경우가 많았음.
- 재현성 부족: 동일한 실험 환경을 다른 시스템에서 재현하기 어려움. 환경의 차이로 인해 동일한 워크로드가 다른 환경에서 실패하는 문제 발생.
- 리소스 비효율성: 고가의 GPU 리소스가 특정 사용자나 프로젝트에 고정되어 활용도가 저하. (베어메탈 GPU 서버의 활용률은 30% 미만인 경우가 많았음)
- 확장성 제한: 대규모 분산 학습을 위한 인프라 확장이 어려웠음. 새로운 GPU 서버를 추가할 때마다 동일한 환경 구성 과정을 반복 필요.
몇 가지 문제점은 일반적인 애플리케이션의 컨테이너화의 이유와 유사한 양상을 가지고 있고, GPU의 컨테이너 사용을 고려할 수 있지만, 이 또한 여러 가지 제약사항을 가지고 있었습니다.
- 물리적으로 분할하기 어려운 GPU: CPU 코어나 메모리와 달리, 초기 GPU는 물리적으로 분할하여 여러 컨테이너에 할당하기 어려웠음 (최근에는 MIG 기술로 개선됨 - Nvidia GPU A100에서 새롭게 생긴 기능, 2020년 등장)
- GPU 드라이버 복잡성: GPU 접근은 복잡한 사용자 공간 라이브러리와 커널 드라이버를 통해 이루어짐
- 장치 파일 접근 제어: /dev/nvidia* 과 같은 장치 파일에 대한 접근을 안전하게 관리 필요
여러가지 제약사항을 극복하고자 컨테이너 환경의 리소스 사용은 아래와 같은 방향으로 진화하였습니다. 또한 이러한 흐름에서 GPU도 발전하여 단일 GPU에서 멀티 GPU 환경으로 변화하기도 합니다.
1) 초기 단계(2016-2018)
초기에는 GPU 장치 파일을 컨테이너에 직접 마운트하고 필요한 라이브러리를 볼륨으로 공유해야 했습니다.
Docker 명령어를 수동으로 실행하는 예시를 살펴보면, Tensorflow에서 CUDA를 통해 NVIDIA GPU 장치에 액세스하도록 직접 맵핑을 해주는 방식입니다.
docker run --device=/dev/nvidia0:/dev/nvidia0 \
           --device=/dev/nvidiactl:/dev/nvidiactl \
           -v /usr/local/cuda:/usr/local/cuda \
           tensorflow/tensorflow:latest-gpu
이러한 접근 방식은 아래와 같은 문제점을 가지고 있습니다.
- 모든 장치 파일을 수동으로 지정해야 함
- 호스트와 컨테이너 간 라이브러리 버전 충돌 가능성
- 여러 컨테이너 간 GPU 공유 메커니즘 부재
- 오케스트레이션 환경에서 자동화하기 어려움
2) NVIDIA Container Runtime 활용 (2018-2020)
NVIDIA는 이러한 문제를 해결하기 위해 NVIDIA Container Runtime을 개발하였습니다. NVIDIA Container Runtime은 OCI(Open Containers Initiative) 스펙과 호환되는 GPU 인식 컨테이너 런타임입니다.
이를 통해 다음과 같은 기능을 자동화하게 됩니다.
- GPU 장치 파일 마운트
- NVIDIA 드라이버 라이브러리 주입
- CUDA 호환성 검사
- GPU 기능 감지 및 노출
아래와 같은 방식으로 실행할 수 있습니다.
# Docker 19.03 이전 버전 사용
docker run --runtime=nvidia nvidia/cuda:11.0-base nvidia-smi

# Docker 19.03 이후부터는 더 간단하게 --gpus 플래그를 사용
docker run --gpus '"device=0,1"' nvidia/cuda:11.0-base nvidia-smi
NVIDIA container runtime을 통해서 GPU를 검출하고 설정하며, 호스트와 컨테이너간 드라이버 호환성을 자동 관리할 수 있게 되었습니다. 또한 컨테이너 이미지를 활용해 이식성이 향상되는 개선점이 있습니다.
3) Device Plugin 등장 (2020-Now)
Kubernetes 오픈 소스에 Device Plugin에 대한 제안이 2017년 9월 처음으로 이루어졌습니다.
Device Plugin은 쿠버네티스 환경에서 GPU 리소스를 발견하고 이를 리소스로 노출해주는 플러그인입니다.
아래 그림과 같이 GPU 디바이스를 발견하면 드라이버를 설치하고 이를 Kubelet Registry gRPC server로 등록을 요청합니다. 이를 통해 GPU 리소스가 해당 노드의 리소스로 노출됩니다.

이후 NVIDIA도 device plugin을 통해서 쿠버네티스 환경에서 손 쉽게 NVIDIA GPU를 활용할 수 있게 되었습니다.
https://github.com/NVIDIA/k8s-device-plugin
다만 여전히 여러 가지 드라이버나 Container Runtime 그리고 각종 라이브러리를 설치하는 것은 여전히 쉬운 일이 아닙니다.
최근에는 NVIDIA GPU를 보다 효율적으로 활용하기 위해서 NVIDIA GPU Operator를 제공하고 있으며, Device Plugin을 통한 드라이버 설치와 CUDA, NVIDIA Container Toolkit에 GFD, DCGM와 같은 모니터링 컴포넌트까지 오퍼레이터를 통해서 설치할 수 있도록 제공하고 있습니다.

출처: https://docs.nvidia.com/datacenter/cloud-native/gpu-operator/latest/getting-started.html
한편 과거의 단일 GPU에서의 동시성을 제공하려던 시도에서 지금은 멀티 GPU로 발전하고 있습니다. 먼저 단일 GPU 동시성의 고민을 아래 그림에서 살펴볼 수 있습니다.
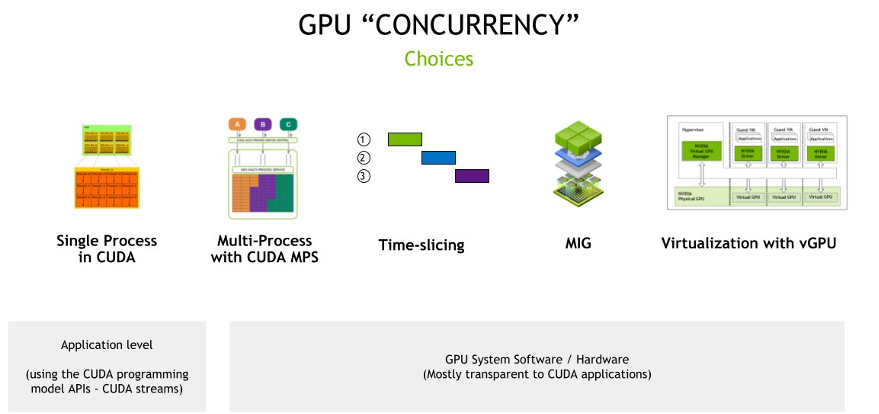
이를 조금 더 살펴보겠습니다.
CUDA의 단일 프로세스
이는 GPU 활용의 가장 기본적인 형태로, 단일 프로세스가 계산적 필요 사항을 충족하기 위해 CUDA(Compute Unified Device Architecture)를 사용하여 GPU에 액세스합니다.
독립형 애플리케이션이나 GPU의 전체 성능이 필요한 작업에 이상적이며, GPU가 특정 고성능 컴퓨팅 작업에만 독점적으로 할당되어 공유할 필요가 없는 경우입니다.
CUDA MPS(Multi-Process Service)를 사용한 다중 프로세스
CUDA MPS는 여러 프로세스가 단일 GPU 컨텍스트를 공유할 수 있도록 하는 CUDA의 기능입니다. 즉, 여러 작업이 상당한 컨텍스트 전환 오버헤드 없이 동시에 GPU에 액세스할 수 있습니다.
여러 애플리케이션이나 작업이 GPU에 동시에 액세스해야 하는 경우나 작업의 GPU 요구 사항이 다양하고 큰 오버헤드 없이 GPU 활용도를 극대화하려는 시나리오에 이상적입니다.
참고: https://docs.nvidia.com/deploy/mps/index.html
Time Slicing
타임 슬라이싱은 GPU 접근을 작은 시간 간격으로 나누어 여러 작업이 미리 정의된 시간 간격으로 GPU를 사용할 수 있도록 하는 것입니다. 이는 CPU가 여러 프로세스 간에 타임 슬라이싱을 하는 방식과 유사합니다.
간헐적으로 GPU에 접근해야 하는 여러 작업이 있는 환경에 적합한 방식입니다.
아래는 EKS에서 Time Slicing을 적용하는 방식으로 NVIDIA device plugin에 아래와 같이 ConfigMap을 추가로 지정하여 사용할 수 있습니다.
# time-slicing 적용 전: GPU 1개
$ kubectl get nodes -o json | jq -r '.items[] | select(.status.capacity."nvidia.com/gpu" != null) | {name: .metadata.name, capacity: .status.capacity}'
{
  "name": "i-0af783eca345807e8.us-west-2.compute.internal",
  "capacity": {
    "cpu": "32",
    "ephemeral-storage": "83873772Ki",
    "hugepages-1Gi": "0",
    "hugepages-2Mi": "0",
    "memory": "130502176Ki",
    "nvidia.com/gpu": "1",
    "pods": "234"
  }
}

# Time-slicing 적용하기
$ cat << EOF > nvidia-device-plugin.yaml
apiVersion: v1
kind: ConfigMap
metadata:
  name: nvidia-device-plugin
  namespace: kube-system
data:
  any: |-
    version: v1
    flags:
      migStrategy: none
    sharing:
      timeSlicing:
        resources:
        - name: nvidia.com/gpu
          replicas: 10
EOF
$ kubectl apply -f nvidia-device-plugin.yaml

# 새로운 ConfigMap 기반으로 반영하기
$ helm upgrade -i nvdp nvdp/nvidia-device-plugin \
  --namespace kube-system \
  -f nvdp-values.yaml \
  --version 0.14.0 \
  --set config.name=nvidia-device-plugin \
  --force

# TimeSlicing 적용 후: GPU 10개로 증가함
$ kubectl get nodes -o json | jq -r '.items[] | select(.status.capacity."nvidia.com/gpu" != null) | {name: .metadata.name, capacity: .status.capacity}'
{
  "name": "i-0af783eca345807e8.us-west-2.compute.internal",
  "capacity": {
    "cpu": "32",
    "ephemeral-storage": "83873772Ki",
    "hugepages-1Gi": "0",
    "hugepages-2Mi": "0",
    "memory": "130502176Ki",
    "nvidia.com/gpu": "10",
    "pods": "234"
  }
}
해당 실습은 아래 문서를 참고하실 수 있습니다.
멀티 인스턴스 GPU(MIG, Multi-Instance GPU)
NVIDIA A100 GPU와 같이 MIG를 지원하는 HW를 사용해야 하며, 단일 GPU를 각각 별도의 메모리, 캐시 및 컴퓨팅 코어를 가진 여러 인스턴스로 분할할 수 있도록 합니다. 이를 통해 각 인스턴스의 성능이 보장됩니다.
엄격한 격리를 보장하는 것이 목표인 다중 테넌트 환경에서 GPU 활용도를 극대화할 수 있는 솔루션입니다.
참고: https://www.nvidia.com/en-us/technologies/multi-instance-gpu/
가상 GPU(vGPU)를 통한 GPU 가상화
NVIDIA vGPU 기술은 여러 가상 머신(VM)이 하나의 물리적 GPU 성능을 공유할 수 있도록 합니다. GPU 리소스를 가상화하여 각 VM이 전용 GPU 슬라이스를 가질 수 있도록 합니다.
가상화된 환경에서 목표는 GPU 기능을 여러 가상 머신으로 확장하여, 클라우드 서비스 제공업체나 기업의 목표는 클라이언트에게 서비스로 GPU 기능을 제공하는 것입니다.
참고: https://www.nvidia.com/en-us/data-center/virtual-solutions/
다만 최근에는 LLM의 발전과 같이 단일 GPU만으로는 대량의 학습과 추론을 감당할 수 없게 되고, 이에 멀티 GPU를 지원하기 위해 AI/ML 인프라가 발전하고 있습니다.
멀티 GPU 활용을 위해서 분산 학습에서 발생하는 네트워크 병목 현상을 효과적으로 지원해 줄 필요가 있으며, 이를 위해서 NVIDIDA의 NCCL(NVIDIA Collective Communications Library)과 같은 라이브러리가 개발되었습니다.

출처: https://developer.nvidia.com/nccl
또한 AWS에서는 EFA(Elastic Fabric Adater)라는 GPU 병목 문제를 해결하기 위한 별도의 네트워크 인터페이스를 제공하고 있습니다.

출처: https://docs.aws.amazon.com/ko_kr/AWSEC2/latest/UserGuide/efa.html
AI 워크로드 활용을 위해 컨테이너 및 인프라의 발전 과정을 짧게 살펴보았습니다.
이제 EKS 환경에서 AI 워크로드를 실행하는 실습을 워크샵을 통해서 살펴보겠습니다.
2. EKS 워크샵 실습
먼저 AWS에서 지원하는 GPU 인스턴스 타입을 살펴보겠습니다.
AWS에서는 가속화된 컴퓨팅(Accelerated Computing, XC) 유형에서 다양한 GPU 인스턴스를 제공하고 있습니다. 아래 문서를 살펴볼 수 있습니다.
https://aws.amazon.com/ko/ec2/instance-types/#Accelerated_Computing
이 중 Trn은 AWS Trainium칩을 Inf은 AWS Inferentia 칩을 탑재한 AWS 자체 인스턴스 유형입니다. 이름에서 유추할 수 있는데, Trainium은 딥러닝의 학습(Training)을 Inferentia은 딥러닝 Inference(추론)용으로 특별히 구축된 인스턴스입니다.
Build GenAI & ML for Performance and Scale, using Amazon EKS, Amazon FSx and AWS Inferentia 워크샵에서는 AWS Inferentia를 통해 노드그룹을 구성하여 vLLM 및 WebUI 파드를 EKS에 실행해보고자 합니다.
아래는 간략한 실습 구성입니다.
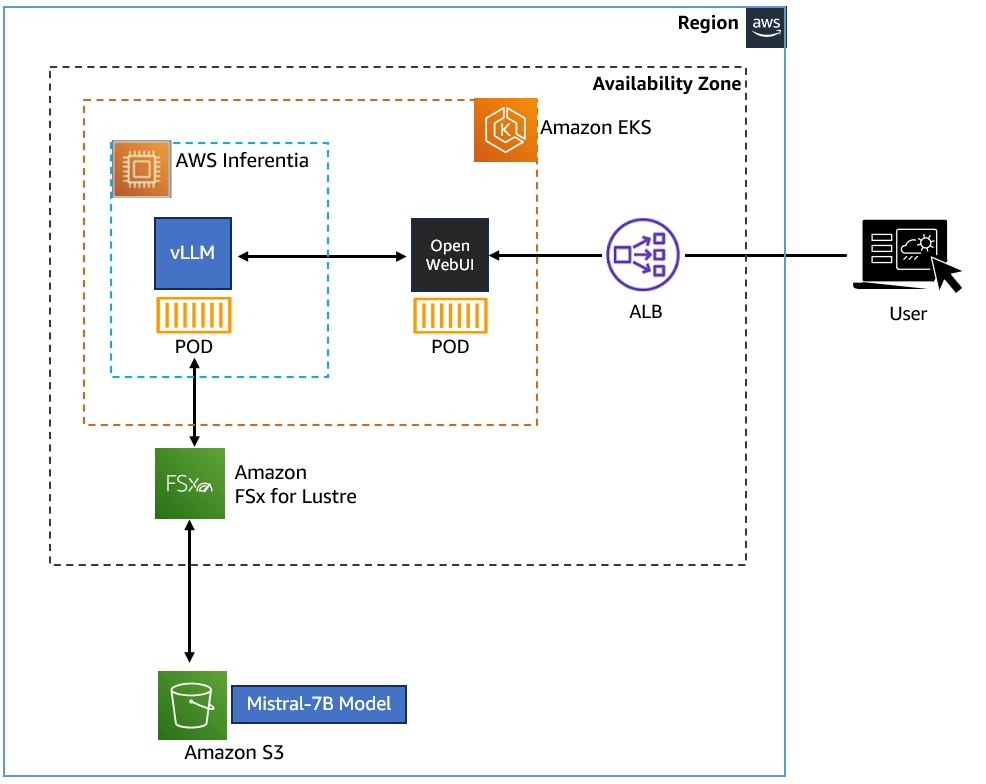
- EKS 클러스터에 vLLM 및 WebUI Pod를 배포하여 Kubernetes에 Gen AI Chatbot 애플리케이션을 배포
- Amazon FSx for Lustre 및 Amazon S3를 사용하여 Mistral-7B 모델을 저장 및 액세스
- vLLM은 AWS Inferentia 노드 그룹을 사용하여 AI 워크로드에 Accelerate Compute를 활용
사전에 몇 가지 용어와 구성 요소들을 살펴보겠습니다.
LLM(Large Language Models): LLM은 자연어의 패턴과 구조를 학습하기 위해 방대한 양의 텍스트 데이터에 대해 학습된 기계 학습 모델의 한 유형입니다. 이러한 모델을 텍스트 생성, 질문 답변 및 언어 번역과 같은 광범위한 자연어 처리 작업에 사용할 수 있습니다. 워크샵에서는 70억 개의 매개변수가 있는 오픈 소스 LLM 모델인 Mistral-7B-Instruct 모델을 사용할 것입니다
vLLM(Virtual Large Language Model): vLLM은 추론 및 제공을 위한 LLM 사용하기 쉬운 오픈 소스 라이브러리입니다. Mistral-7B-Instruct와 같은 LLM 모델을 배포하여 텍스트 생성 추론을 제공할 수 있는 프레임워크를 제공합니다. vLLM은 OpenAI API와 호환되는 API를 제공하여 LLM 애플리케이션을 쉽게 통합할 수 있습니다.
Amazon FSx for Lustre: 속도가 중요한 워크로드를 위해 확장 가능한 고성능 파일 시스템을 제공하고, 밀리초 미만의 지연 시간을 제공하며, TB/s의 처리량과 수백만 IOPS로 확장할 수 있는 스토리지 서비스입니다. 이 워크숍에서 Mistral-7B-Instruct 모델은 Amazon FSx for Lustre 파일 시스템에 연결된 Amazon S3 버킷에 저장됩니다. vLLM 컨테이너에서 Amazon FSx for Lustre 인스턴스를 통해 마운트 된 Mistral 모델 데이터를 사용합니다.
AWS Inferentia: 딥 러닝(DL) 및 생성형 AI 추론 애플리케이션을 위해 Amazon EC2에서 가장 저렴한 비용으로 고성능을 제공하도록 AWS에서 설계했으며, Inferentia2 기반 Amazon EC2 Inf2 인스턴스는 LLM과 같이 복잡한 모델을 실행하는데 최적화되어 있습니다.
2.1 실습 환경 확인
워크샵 환경은 AWS Cloud9을 통해서 접근이 가능합니다.
먼저 Cloud9의 터미널에서 EKS 클러스터에 대한 kubeconfig를 얻어와 노드를 조회해 봅니다.
TOKEN=`curl -s -X PUT "http://169.254.169.254/latest/api/token" -H "X-aws-ec2-metadata-token-ttl-seconds: 21600"`
export AWS_REGION=$(curl -s -H "X-aws-ec2-metadata-token: $TOKEN" http://169.254.169.254/latest/meta-data/placement/region)
export CLUSTER_NAME=eksworkshop

aws eks update-kubeconfig --name $CLUSTER_NAME --region $AWS_REGION
Added new context arn:aws:eks:us-west-2:771943767300:cluster/eksworkshop to /home/ec2-user/.kube/config

kubectl get nodes
NAME                                         STATUS   ROLES    AGE     VERSION
ip-10-0-104-229.us-west-2.compute.internal   Ready    <none>   2d10h   v1.30.9-eks-5d632ec
ip-10-0-40-187.us-west-2.compute.internal    Ready    <none>   2d10h   v1.30.9-eks-5d632ec

kubectl get po -A
NAMESPACE               NAME                                                              READY   STATUS    RESTARTS        AGE
default                 kube-ops-view-5d9d967b77-499j6                                    1/1     Running   0               2d11h
karpenter               karpenter-7db6458b6b-9kz4w                                        1/1     Running   1 (2d11h ago)   2d11h
karpenter               karpenter-7db6458b6b-f48n8                                        1/1     Running   1 (2d11h ago)   2d11h
kube-prometheus-stack   kube-prometheus-stack-grafana-74cdb96ddf-kgtbd                    3/3     Running   0               2d11h
kube-prometheus-stack   kube-prometheus-stack-kube-state-metrics-6b7844d7f7-m8swx         1/1     Running   0               2d11h
kube-prometheus-stack   kube-prometheus-stack-operator-86f8df994b-x495m                   1/1     Running   0               2d11h
kube-prometheus-stack   kube-prometheus-stack-prometheus-node-exporter-dqdld              1/1     Running   0               2d11h
kube-prometheus-stack   kube-prometheus-stack-prometheus-node-exporter-ksnt4              1/1     Running   0               2d11h
kube-prometheus-stack   prometheus-kube-prometheus-stack-prometheus-0                     2/2     Running   0               2d11h
kube-system             aws-load-balancer-controller-594fbfbbc6-m486q                     1/1     Running   0               2d11h
kube-system             aws-load-balancer-controller-594fbfbbc6-nz6wc                     1/1     Running   0               2d11h
kube-system             aws-node-crfs7                                                    2/2     Running   0               2d11h
kube-system             aws-node-kmqtx                                                    2/2     Running   0               2d11h
kube-system             coredns-86f597cb5-6q9b8                                           1/1     Running   0               2d11h
kube-system             coredns-86f597cb5-h55sz                                           1/1     Running   0               2d11h
kube-system             ebs-csi-controller-7b5dc8b6c7-fxzkm                               6/6     Running   0               2d11h
kube-system             ebs-csi-controller-7b5dc8b6c7-v645l                               6/6     Running   0               2d11h
kube-system             ebs-csi-node-5xl2v                                                3/3     Running   0               2d11h
kube-system             ebs-csi-node-wd5vs                                                3/3     Running   0               2d11h
kube-system             eks-pod-identity-agent-p27dw                                      1/1     Running   0               2d11h
kube-system             eks-pod-identity-agent-w8gv2                                      1/1     Running   0               2d11h
kube-system             kube-proxy-5wj24                                                  1/1     Running   0               2d11h
kube-system             kube-proxy-9gf2j                                                  1/1     Running   0               2d11h
kube-system             metrics-server-7577444cf8-k626n                                   1/1     Running   0               2d11h
nvidia-device-plugin    nvidia-device-plugin-node-feature-discovery-master-695f7b9bk5h8   1/1     Running   0               2d11h
nvidia-device-plugin    nvidia-device-plugin-node-feature-discovery-worker-62zgr          1/1     Running   1 (2d11h ago)   2d11h
nvidia-device-plugin    nvidia-device-plugin-node-feature-discovery-worker-tfvlk          1/1     Running   0               2d11h
해당 워크샵은 Terraform과 EKS Blueprints for Terraform에서 제공되는 코드를 통해서 구성되었습니다.
참고: https://github.com/aws-ia/terraform-aws-eks-blueprints
설치된 EKS 클러스터에는 Karpenter가 이미 구성되어 있습니다.
kubectl get pods --namespace karpenter
NAME                         READY   STATUS    RESTARTS        AGE
karpenter-7db6458b6b-9kz4w   1/1     Running   1 (2d10h ago)   2d10h
karpenter-7db6458b6b-f48n8   1/1     Running   1 (2d10h ago)   2d10h
2.2 스토리지 구성 (모델 데이터를 Amazon FSx for Lustre로 호스트)
이 워크샵에서 사용되는 Mistral-7B-Instruct 모델은 Amazon S3 버킷에 저장되며, Amazon FSx for Lustre 파일시스템으로 연결되어 파드들에서 사용하게 됩니다.

이번 장에서는 FSx For Lustre 인스턴스를 EKS 클러스터에 배포하고 이를 통해 CSI Driver, PV, StorageClass와 같은 스토리지 개념을 살펴보겠습니다.
FSx for Lustre CSI Driver는 Amazon EKS 클러스터가 FSx for Lustre 파일 시스템을 기반으로 하는 영구 볼륨의 수명 주기를 관리할 수 있도록 하는 CSI 인터페이스를 제공합니다. FSx for Lustre CSI 드라이버를 사용하면 컨테이너 워크로드를 위한 지연 시간이 짧은 고성능 영구 스토리지를 빠르고 쉽게 통합할 수 있습니다.
[Note] FSx For Lustre를 CSI Driver로 사용해 파일시스템을 제공하고, 실제 데이터는 Amazon S3에 저장됨
먼저 CSI 드라이버를 배포하는 과정을 살펴보겠습니다.
실습에서 활용하기 위해서 환경변수를 선언합니다.
ACCOUNT_ID=$(aws sts get-caller-identity --query "Account" --output text)
이후 CSI 드라이버가 사용자를 대신하여 AWS API를 호출할 수 있도록 허용하는 IAM 정책 및 서비스 계정 생성합니다.
cat << EOF >  fsx-csi-driver.json
{
    "Version":"2012-10-17",
    "Statement":[
        {
            "Effect":"Allow",
            "Action":[
                "iam:CreateServiceLinkedRole",
                "iam:AttachRolePolicy",
                "iam:PutRolePolicy"
            ],
            "Resource":"arn:aws:iam::*:role/aws-service-role/s3.data-source.lustre.fsx.amazonaws.com/*"
        },
        {
            "Action":"iam:CreateServiceLinkedRole",
            "Effect":"Allow",
            "Resource":"*",
            "Condition":{
                "StringLike":{
                    "iam:AWSServiceName":[
                        "fsx.amazonaws.com"
                    ]
                }
            }
        },
        {
            "Effect":"Allow",
            "Action":[
                "s3:ListBucket",
                "fsx:CreateFileSystem",
                "fsx:DeleteFileSystem",
                "fsx:DescribeFileSystems",
                "fsx:TagResource"
            ],
            "Resource":[
                "*"
            ]
        }
    ]
}
EOF

aws iam create-policy \
        --policy-name Amazon_FSx_Lustre_CSI_Driver \
        --policy-document file://fsx-csi-driver.json
{
    "Policy": {
        "PolicyName": "Amazon_FSx_Lustre_CSI_Driver",
        "PolicyId": "ANPA3HO3PDUCJUZ5O6GGM",
        "Arn": "arn:aws:iam::771943767300:policy/Amazon_FSx_Lustre_CSI_Driver",
        "Path": "/",
        "DefaultVersionId": "v1",
        "AttachmentCount": 0,
        "PermissionsBoundaryUsageCount": 0,
        "IsAttachable": true,
        "CreateDate": "2025-04-19T13:16:10+00:00",
        "UpdateDate": "2025-04-19T13:16:10+00:00"
    }
}
이제 CSI Driver에 대한 쿠버네티스의 Service Account를 만들고 Service Account에 IAM Policy를 연결합니다.
eksctl create iamserviceaccount \
    --region $AWS_REGION \
    --name fsx-csi-controller-sa \
    --namespace kube-system \
    --cluster $CLUSTER_NAME \
    --attach-policy-arn arn:aws:iam::$ACCOUNT_ID:policy/Amazon_FSx_Lustre_CSI_Driver \
    --approve
2025-04-19 13:17:50 [ℹ]  1 iamserviceaccount (kube-system/fsx-csi-controller-sa) was included (based on the include/exclude rules)
2025-04-19 13:17:50 [!]  serviceaccounts that exist in Kubernetes will be excluded, use --override-existing-serviceaccounts to override
2025-04-19 13:17:50 [ℹ]  1 task: {
    2 sequential sub-tasks: {
        create IAM role for serviceaccount "kube-system/fsx-csi-controller-sa",
        create serviceaccount "kube-system/fsx-csi-controller-sa",
    } }2025-04-19 13:17:50 [ℹ]  building iamserviceaccount stack "eksctl-eksworkshop-addon-iamserviceaccount-kube-system-fsx-csi-controller-sa"
2025-04-19 13:17:50 [ℹ]  deploying stack "eksctl-eksworkshop-addon-iamserviceaccount-kube-system-fsx-csi-controller-sa"
2025-04-19 13:17:50 [ℹ]  waiting for CloudFormation stack "eksctl-eksworkshop-addon-iamserviceaccount-kube-system-fsx-csi-controller-sa"
2025-04-19 13:18:20 [ℹ]  waiting for CloudFormation stack "eksctl-eksworkshop-addon-iamserviceaccount-kube-system-fsx-csi-controller-sa"
2025-04-19 13:18:20 [ℹ]  created serviceaccount "kube-system/fsx-csi-controller-sa"
FSx for Lustre CSI Driver를 배포합니다.
kubectl apply -k "github.com/kubernetes-sigs/aws-fsx-csi-driver/deploy/kubernetes/overlays/stable/?ref=release-1.2"
# Warning: 'bases' is deprecated. Please use 'resources' instead. Run 'kustomize edit fix' to update your Kustomization automatically.
Warning: resource serviceaccounts/fsx-csi-controller-sa is missing the kubectl.kubernetes.io/last-applied-configuration annotation which is required by kubectl apply. kubectl apply should only be used on resources created declaratively by either kubectl create --save-config or kubectl apply. The missing annotation will be patched automatically.
serviceaccount/fsx-csi-controller-sa configured
serviceaccount/fsx-csi-node-sa created
clusterrole.rbac.authorization.k8s.io/fsx-csi-external-provisioner-role created
clusterrole.rbac.authorization.k8s.io/fsx-csi-node-role created
clusterrole.rbac.authorization.k8s.io/fsx-external-resizer-role created
clusterrolebinding.rbac.authorization.k8s.io/fsx-csi-external-provisioner-binding created
clusterrolebinding.rbac.authorization.k8s.io/fsx-csi-node-getter-binding created
clusterrolebinding.rbac.authorization.k8s.io/fsx-csi-resizer-binding created
deployment.apps/fsx-csi-controller created
daemonset.apps/fsx-csi-node created
csidriver.storage.k8s.io/fsx.csi.aws.com created
이후 생성된 파드를 살펴보면, 컨트롤러에 해당하는 디플로이먼트와 fsx-csi-node가 데몬셋으로 실행 중입니다.
kube-system             fsx-csi-controller-6f4c577bd4-hfrgq                               4/4     Running   0               11s
kube-system             fsx-csi-controller-6f4c577bd4-ptvrb                               4/4     Running   0               11s
kube-system             fsx-csi-node-77jff                                                3/3     Running   0               11s
kube-system             fsx-csi-node-xbqfb                                                3/3     Running   0               11s
앞서 생성된 Role의 ARN을 변수에 저장하고, FSx for Lustre CSI Driver를 설치하면서 생성된 Service Account에 ARN을 annotation으로 입력합니다.
export ROLE_ARN=$(aws cloudformation describe-stacks --stack-name "eksctl-${CLUSTER_NAME}-addon-iamserviceaccount-kube-system-fsx-csi-controller-sa" --query "Stacks[0].Outputs[0].OutputValue"  --region $AWS_REGION --output text)

kubectl annotate serviceaccount -n kube-system fsx-csi-controller-sa \
 eks.amazonaws.com/role-arn=$ROLE_ARN --overwrite=true

# 확인
kubectl get sa/fsx-csi-controller-sa -n kube-system -o yaml
apiVersion: v1
kind: ServiceAccount
metadata:
  annotations:
    eks.amazonaws.com/role-arn: arn:aws:iam::771943767300:role/eksctl-eksworkshop-addon-iamserviceaccount-ku-Role1-XnHXsBDGvgbs
    kubectl.kubernetes.io/last-applied-configuration: |
      {"apiVersion":"v1","kind":"ServiceAccount","metadata":{"annotations":{},"labels":{"app.kubernetes.io/name":"aws-fsx-csi-driver"},"name":"fsx-csi-controller-sa","namespace":"kube-system"}}
  creationTimestamp: "2025-04-19T13:18:20Z"
  labels:
    app.kubernetes.io/managed-by: eksctl
    app.kubernetes.io/name: aws-fsx-csi-driver
  name: fsx-csi-controller-sa
  namespace: kube-system
  resourceVersion: "1085000"
  uid: dcfe09bc-921d-431f-9e3b-87c15e57aa64
이제 Persistent Volume을 사용하기 위해서 필요한 작업을 진행하겠습니다.
실습에서는 Amazon S3 버킷에 연결된 FSx For Lustre Instance를 이용해 정적 프로비저닝 방식을 사용합니다.
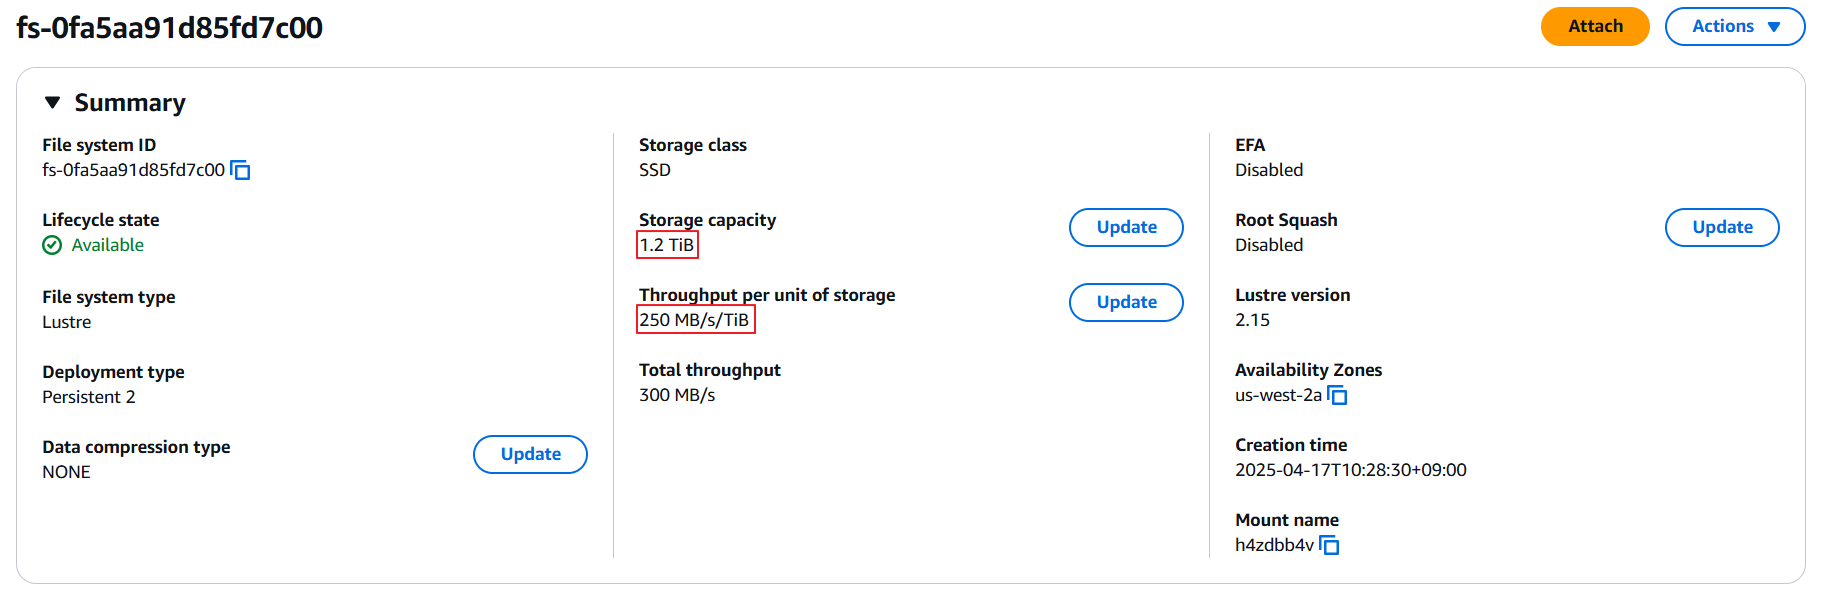
콘솔에서 살펴보면 이미 Amazon S3와 FSx Filesystem이 생성되어 있습니다.
Amazon S3 Bucket:

FSx File system:

해당 파일시스템을 살펴보면 1.2 TiB 용량에 250 MB/s의 Throughput을 가진 것을 확인할 수 있습니다.
Cloud9에서 실습 폴더로 이동하면 워크샵에 이미 각 yaml이 준비되어 있습니다.
cd /home/ec2-user/environment/eks/FSxL
ls
fsxL-claim.yaml  fsxL-dynamic-claim.yaml  fsxL-persistent-volume.yaml  fsxL-storage-class.yaml  pod.yaml  pod_performance.yaml
생성된 FSx를 활용하기 위해 환경 변수를 사전에 정의하고 실습을 이어 가겠습니다.
FSXL_VOLUME_ID=$(aws fsx describe-file-systems --query 'FileSystems[].FileSystemId' --output text)
DNS_NAME=$(aws fsx describe-file-systems --query 'FileSystems[].DNSName' --output text)
MOUNT_NAME=$(aws fsx describe-file-systems --query 'FileSystems[].LustreConfiguration.MountName' --output text)
아래 파일을 위에서 선언한 변수들로 변경합니다.
# fsxL-persistent-volume.yaml
apiVersion: v1
kind: PersistentVolume
metadata:
  name: fsx-pv
spec:
  persistentVolumeReclaimPolicy: Retain
  capacity:
    storage: 1200Gi
  volumeMode: Filesystem
  accessModes:
    - ReadWriteMany
  mountOptions:
    - flock
  csi:
    driver: fsx.csi.aws.com
    volumeHandle: FSXL_VOLUME_ID
    volumeAttributes:
      dnsname: DNS_NAME
      mountname: MOUNT_NAME

sed -i'' -e "s/FSXL_VOLUME_ID/$FSXL_VOLUME_ID/g" fsxL-persistent-volume.yaml
sed -i'' -e "s/DNS_NAME/$DNS_NAME/g" fsxL-persistent-volume.yaml
sed -i'' -e "s/MOUNT_NAME/$MOUNT_NAME/g" fsxL-persistent-volume.yaml

cat fsxL-persistent-volume.yaml
apiVersion: v1
kind: PersistentVolume
metadata:
  name: fsx-pv
spec:
  persistentVolumeReclaimPolicy: Retain
  capacity:
    storage: 1200Gi
  volumeMode: Filesystem
  accessModes:
    - ReadWriteMany
  mountOptions:
    - flock
  csi:
    driver: fsx.csi.aws.com
    volumeHandle: fs-0fa5aa91d85fd7c00
    volumeAttributes:
      dnsname: fs-0fa5aa91d85fd7c00.fsx.us-west-2.amazonaws.com
      mountname: h4zdbb4v
PV를 배포합니다.
kubectl apply -f fsxL-persistent-volume.yaml
persistentvolume/fsx-pv created

kubectl get pv
NAME                                       CAPACITY   ACCESS MODES   RECLAIM POLICY   STATUS      CLAIM                                                                      STORAGECLASS   VOLUMEATTRIBUTESCLASS   REASON   AGE
fsx-pv                                     1200Gi     RWX            Retain           Available                                                                                             <unset>                          6s
pvc-b15cf809-3b71-449c-aaa1-c0c7a33996ba   50Gi       RWO            Delete           Bound       kube-prometheus-stack/data-prometheus-kube-prometheus-stack-prometheus-0   gp3            <unset>                          2d12h
생성된 PV를 참조하는 PVC를 배포합니다.
cat fsxL-claim.yaml
apiVersion: v1
kind: PersistentVolumeClaim
metadata:
  name: fsx-lustre-claim
spec:
  accessModes:
    - ReadWriteMany
  storageClassName: ""
  resources:
    requests:
      storage: 1200Gi
  volumeName: fsx-pvWSParticipantRole:~/environment/eks/FSxL $

kubectl apply -f fsxL-claim.yaml
persistentvolumeclaim/fsx-lustre-claim created

kubectl get pvc
NAME               STATUS   VOLUME   CAPACITY   ACCESS MODES   STORAGECLASS   VOLUMEATTRIBUTESCLASS   AGE
fsx-lustre-claim   Bound    fsx-pv   1200Gi     RWX                           <unset>                 3s
2.3 생성형 AI Chat 애플리케이션 배포
앞서 살펴본 내용과 같이 EKS 클러스터에는 Karpenter가 설치가 되어 있습니다. 이제 vLLM 파드를 AWS Inferentia 노드에 배포하기 위해서 사전에 AWS Inferentia용 Karpenter NodePool 및 EC2 NodeClass 생성하겠습니다.
애플리케이션 yaml이 위치한 실습 폴더로 이동하면, NodePool과 EC2NodeClass의 정의도 같이 존재합니다.
cd /home/ec2-user/environment/eks/genai

ls
inferentia_nodepool.yaml  mistral-fsxl.yaml  open-webui.yaml
해당 정의를 확인해 보고 kubectl로 배포합니다.
cat inferentia_nodepool.yaml
apiVersion: karpenter.sh/v1
kind: NodePool
metadata:
  name: inferentia
  labels:
    intent: genai-apps
    NodeGroupType: inf2-neuron-karpenter
spec:
  template:
    spec:
      taints:
        - key: aws.amazon.com/neuron
          value: "true"
          effect: "NoSchedule"
      requirements:
        - key: "karpenter.k8s.aws/instance-family"
          operator: In
          values: ["inf2"]
        - key: "karpenter.k8s.aws/instance-size"
          operator: In
          values: [ "xlarge", "2xlarge", "8xlarge", "24xlarge", "48xlarge"]
        - key: "kubernetes.io/arch"
          operator: In
          values: ["amd64"]
        - key: "karpenter.sh/capacity-type"
          operator: In
          values: ["spot", "on-demand"]
      nodeClassRef:
        group: karpenter.k8s.aws
        kind: EC2NodeClass
        name: inferentia
  limits:
    cpu: 1000
    memory: 1000Gi
  disruption:
    consolidationPolicy: WhenEmpty
    # expireAfter: 720h # 30 * 24h = 720h
    consolidateAfter: 180s
  weight: 100
---
apiVersion: karpenter.k8s.aws/v1
kind: EC2NodeClass
metadata:
  name: inferentia
spec:
  amiFamily: AL2
  amiSelectorTerms:
  - alias: al2@v20240917
  blockDeviceMappings:
    - deviceName: /dev/xvda
      ebs:
        deleteOnTermination: true
        volumeSize: 100Gi
        volumeType: gp3
  role: "Karpenter-eksworkshop"
  subnetSelectorTerms:
    - tags:
        karpenter.sh/discovery: "eksworkshop"
  securityGroupSelectorTerms:
    - tags:
        karpenter.sh/discovery: "eksworkshop"
  tags:
    intent: apps
    managed-by: karpenter

kubectl apply -f inferentia_nodepool.yaml
nodepool.karpenter.sh/inferentia created
ec2nodeclass.karpenter.k8s.aws/inferentia created

kubectl get nodepool,ec2nodeclass inferentia
NAME                               NODECLASS    NODES   READY   AGE
nodepool.karpenter.sh/inferentia   inferentia   0       True    6s

NAME                                        READY   AGE
ec2nodeclass.karpenter.k8s.aws/inferentia   True    6s
NodePool 정의를 살펴보면 AWS Inferentia INF2로 지정된 것을 알 수 있습니다.
      requirements:
        - key: "karpenter.k8s.aws/instance-family"
          operator: In
          values: ["inf2"]
이로써 GPU 리소스에 대한 요청이 있는 경우 해당 NodePool을 바탕으로 Karpenter가 노드 확장이 준비되었습니다.
앞서 살펴본 내용과 같이 GPU 노드를 초기화하기 위해서 device plugin이 필요합니다. 이를 위해서 Neuron Device Plugin과 Neuron Scheduler를 설치하겠습니다.
Neuron Device Plugin은 Neuron 코어와 디바이스를 쿠버네티스에 리소스로 노출합니다.
kubectl apply -f https://raw.githubusercontent.com/aws-neuron/aws-neuron-sdk/master/src/k8/k8s-neuron-device-plugin-rbac.yml
kubectl apply -f https://raw.githubusercontent.com/aws-neuron/aws-neuron-sdk/master/src/k8/k8s-neuron-device-plugin.yml
Neuron Scheduler extension은 둘 이상의 Neuron 코어나 디바이스 리소스가 필요한 Pod를 예약하는 데 필요합니다. Neuron 스케줄러 확장은 인접하지 않은 코어(non-contiguous Core)/Device ID가 있는 노드를 필터링하고, 이를 필요로 하는 파드에게 대해 연속적인 코어(contiguous core)/Device ID를 할당합니다.
kubectl apply -f https://raw.githubusercontent.com/aws-neuron/aws-neuron-sdk/master/src/k8/k8s-neuron-scheduler-eks.yml
kubectl apply -f https://raw.githubusercontent.com/aws-neuron/aws-neuron-sdk/master/src/k8/my-scheduler.yml
이제 준비가 다되었습니다. vLLM 애플리케이션을 배포합니다.
cat mistral-fsxl.yaml
apiVersion: apps/v1
kind: Deployment
metadata:
  name: vllm-mistral-inf2-deployment
spec:
  replicas: 1
  selector:
    matchLabels:
      app: vllm-mistral-inf2-server
  template:
    metadata:
      labels:
        app: vllm-mistral-inf2-server
    spec:
      tolerations:
      - key: "aws.amazon.com/neuron"
        operator: "Exists"
        effect: "NoSchedule"
      containers:
      - name: inference-server
        image: public.ecr.aws/u3r1l1j7/eks-genai:neuronrayvllm-100G-root
        resources:
          requests:
            aws.amazon.com/neuron: 1
          limits:
            aws.amazon.com/neuron: 1
        args:
        - --model=$(MODEL_ID)
        - --enforce-eager
        - --gpu-memory-utilization=0.96
        - --device=neuron
        - --max-num-seqs=4
        - --tensor-parallel-size=2
        - --max-model-len=10240
        - --served-model-name=mistralai/Mistral-7B-Instruct-v0.2-neuron
        env:
        - name: MODEL_ID
          value: /work-dir/Mistral-7B-Instruct-v0.2/
        - name: NEURON_COMPILE_CACHE_URL
          value: /work-dir/Mistral-7B-Instruct-v0.2/neuron-cache/
        - name: PORT
          value: "8000"
        volumeMounts:
        - name: persistent-storage
          mountPath: "/work-dir"
      volumes:
      - name: persistent-storage
        persistentVolumeClaim:
          claimName: fsx-lustre-claim
---
apiVersion: v1
kind: Service
metadata:
  name: vllm-mistral7b-service
spec:
  selector:
    app: vllm-mistral-inf2-server
  ports:
  - protocol: TCP
    port: 80
    targetPort: 8000

kubectl apply -f mistral-fsxl.yaml
deployment.apps/vllm-mistral-inf2-deployment created
service/vllm-mistral7b-service created
해당 컨테이너는 neuron 코어를 1개 요청하고 있습니다.
      - name: inference-server
        image: public.ecr.aws/u3r1l1j7/eks-genai:neuronrayvllm-100G-root
        resources:
          requests:
            aws.amazon.com/neuron: 1
          limits:
            aws.amazon.com/neuron: 1
현재는 만족하는 노드가 없기 때문에 파드가 잠시 Pending으로 확인되다가, 노드가 생성된 이후 ContainerCreating 단계로 진행됩니다.
kubectl get po
NAME                                            READY   STATUS    RESTARTS   AGE
kube-ops-view-5d9d967b77-499j6                  1/1     Running   0          2d13h
vllm-mistral-inf2-deployment-7d886c8cc8-65ddn   0/1     Pending   0          29s

kubectl get no -owide
NAME                                         STATUS   ROLES    AGE     VERSION               INTERNAL-IP    EXTERNAL-IP   OS-IMAGE                       KERNEL-VERSION                    CONTAINER-RUNTIME
ip-10-0-104-229.us-west-2.compute.internal   Ready    <none>   2d13h   v1.30.9-eks-5d632ec   10.0.104.229   <none>        Amazon Linux 2023.7.20250331   6.1.131-143.221.amzn2023.x86_64   containerd://1.7.27
ip-10-0-40-187.us-west-2.compute.internal    Ready    <none>   2d13h   v1.30.9-eks-5d632ec   10.0.40.187    <none>        Amazon Linux 2023.7.20250331   6.1.131-143.221.amzn2023.x86_64   containerd://1.7.27
ip-10-0-69-233.us-west-2.compute.internal    Ready    <none>   55s     v1.30.4-eks-a737599   10.0.69.233    <none>        Amazon Linux 2                 5.10.224-212.876.amzn2.x86_64     containerd://1.7.11

kubectl get po
NAME                                            READY   STATUS              RESTARTS   AGE
kube-ops-view-5d9d967b77-499j6                  1/1     Running             0          2d13h
vllm-mistral-inf2-deployment-7d886c8cc8-65ddn   0/1     ContainerCreating   0          61skubectl get po
NAME                                            READY   STATUS              RESTARTS   AGE
kube-ops-view-5d9d967b77-499j6                  1/1     Running             0          2d13h
vllm-mistral-inf2-deployment-7d886c8cc8-65ddn   0/1     ContainerCreating   0          102s
Karpenter에서도 Node가 생성되는 로그를 확인할 수 있습니다.
kubectl -n karpenter logs -l app.kubernetes.io/name=karpenter --all-containers=true -f --tail=20
...
{"level":"INFO","time":"2025-04-19T14:51:45.919Z","logger":"controller","message":"found provisionable pod(s)","commit":"62a726c","controller":"provisioner","namespace":"","name":"","reconcileID":"e18e71e7-dc58-4aab-8556-1bccaeca3ff9","Pods":"default/vllm-mistral-inf2-deployment-7d886c8cc8-65ddn","duration":"60.151148ms"}
{"level":"INFO","time":"2025-04-19T14:51:45.919Z","logger":"controller","message":"computed new nodeclaim(s) to fit pod(s)","commit":"62a726c","controller":"provisioner","namespace":"","name":"","reconcileID":"e18e71e7-dc58-4aab-8556-1bccaeca3ff9","nodeclaims":1,"pods":1}
{"level":"INFO","time":"2025-04-19T14:51:45.929Z","logger":"controller","message":"created nodeclaim","commit":"62a726c","controller":"provisioner","namespace":"","name":"","reconcileID":"e18e71e7-dc58-4aab-8556-1bccaeca3ff9","NodePool":{"name":"inferentia"},"NodeClaim":{"name":"inferentia-ht4ms"},"requests":{"aws.amazon.com/neuron":"1","cpu":"210m","memory":"240Mi","pods":"11"},"instance-types":"inf2.24xlarge, inf2.48xlarge, inf2.8xlarge, inf2.xlarge"}
{"level":"INFO","time":"2025-04-19T14:51:48.323Z","logger":"controller","message":"launched nodeclaim","commit":"62a726c","controller":"nodeclaim.lifecycle","controllerGroup":"karpenter.sh","controllerKind":"NodeClaim","NodeClaim":{"name":"inferentia-ht4ms"},"namespace":"","name":"inferentia-ht4ms","reconcileID":"5f90ead5-d4f2-43fa-a9a7-2bc0ad466878","provider-id":"aws:///us-west-2b/i-0c4f2fac2f6fd8d90","instance-type":"inf2.xlarge","zone":"us-west-2b","capacity-type":"spot","allocatable":{"aws.amazon.com/neuron":"1","cpu":"3920m","ephemeral-storage":"89Gi","memory":"14162Mi","pods":"58","vpc.amazonaws.com/pod-eni":"18"}}
{"level":"INFO","time":"2025-04-19T14:52:08.417Z","logger":"controller","message":"registered nodeclaim","commit":"62a726c","controller":"nodeclaim.lifecycle","controllerGroup":"karpenter.sh","controllerKind":"NodeClaim","NodeClaim":{"name":"inferentia-ht4ms"},"namespace":"","name":"inferentia-ht4ms","reconcileID":"bce3cedc-2ccc-4daf-a85b-d07300c00468","provider-id":"aws:///us-west-2b/i-0c4f2fac2f6fd8d90","Node":{"name":"ip-10-0-69-233.us-west-2.compute.internal"}}
{"level":"INFO","time":"2025-04-19T14:52:26.450Z","logger":"controller","message":"initialized nodeclaim","commit":"62a726c","controller":"nodeclaim.lifecycle","controllerGroup":"karpenter.sh","controllerKind":"NodeClaim","NodeClaim":{"name":"inferentia-ht4ms"},"namespace":"","name":"inferentia-ht4ms","reconcileID":"7cf15a5c-0afb-414e-af31-e22ea03b2714","provider-id":"aws:///us-west-2b/i-0c4f2fac2f6fd8d90","Node":{"name":"ip-10-0-69-233.us-west-2.compute.internal"},"allocatable":{"aws.amazon.com/neuron":"1","aws.amazon.com/neuroncore":"2","aws.amazon.com/neurondevice":"1","cpu":"3920m","ephemeral-storage":"95551679124","hugepages-1Gi":"0","hugepages-2Mi":"0","memory":"14992800Ki","pods":"58"}}
{"level":"INFO","time":"2025-04-17T01:41:44.291Z","logger":"controller.controller-runtime.metrics","message":"Starting metrics server","commit":"62a726c"}
{"level":"INFO","time":"2025-04-17T01:41:44.291Z","logger":"controller","message":"starting server","commit":"62a726c","name":"health probe","addr":"[::]:8081"}
{"level":"INFO","time":"2025-04-17T01:41:44.292Z","logger":"controller.controller-runtime.metrics","message":"Serving metrics server","commit":"62a726c","bindAddress":":8080","secure":false}
{"level":"INFO","time":"2025-04-17T01:41:44.393Z","logger":"controller","message":"attempting to acquire leader lease karpenter/karpenter-leader-election...","commit":"62a726c"}
생성된 노드에는 neuron-device-plugin이 실행 중이고, 노드를 describe 해보면 neuron 리소스가 확인됩니다.
 kubectl get po -A -owide |grep ip-10-0-69-233.us-west-2.compute.internal
default                 vllm-mistral-inf2-deployment-7d886c8cc8-65ddn                     1/1     Running   0               4m39s   10.0.80.165    ip-10-0-69-233.us-west-2.compute.internal    <none>           <none>
kube-prometheus-stack   kube-prometheus-stack-prometheus-node-exporter-b9vtq              1/1     Running   0               4m15s   10.0.69.233    ip-10-0-69-233.us-west-2.compute.internal    <none>           <none>
kube-system             aws-node-9np65                                                    2/2     Running   0               4m16s   10.0.69.233    ip-10-0-69-233.us-west-2.compute.internal    <none>           <none>
kube-system             ebs-csi-node-qbkkz                                                3/3     Running   0               4m16s   10.0.80.162    ip-10-0-69-233.us-west-2.compute.internal    <none>           <none>
kube-system             eks-pod-identity-agent-cmrp2                                      1/1     Running   0               4m16s   10.0.69.233    ip-10-0-69-233.us-west-2.compute.internal    <none>           <none>
kube-system             fsx-csi-node-h4tzg                                                3/3     Running   0               4m16s   10.0.80.163    ip-10-0-69-233.us-west-2.compute.internal    <none>           <none>
kube-system             kube-proxy-7gpfd                                                  1/1     Running   0               4m16s   10.0.69.233    ip-10-0-69-233.us-west-2.compute.internal    <none>           <none>
kube-system             neuron-device-plugin-4bmlz                                        1/1     Running   0               4m2s    10.0.80.160    ip-10-0-69-233.us-west-2.compute.internal    <none>           <none>
kube-system             neuron-device-plugin-daemonset-5tgll                              1/1     Running   0               4m2s    10.0.80.161    ip-10-0-69-233.us-west-2.compute.internal    <none>           <none>
nvidia-device-plugin    nvidia-device-plugin-node-feature-discovery-worker-zkqv4          1/1     Running   0               4m16s   10.0.80.164    ip-10-0-69-233.us-west-2.compute.internal    <none>           <none>

kubectl describe node ip-10-0-69-233.us-west-2.compute.internal |grep -A 10 Capacity:
Capacity:
  aws.amazon.com/neuron:        1
  aws.amazon.com/neuroncore:    2
  aws.amazon.com/neurondevice:  1
  cpu:                          4
  ephemeral-storage:            104845292Ki
  hugepages-1Gi:                0
  hugepages-2Mi:                0
  memory:                       16009632Ki
  pods:                         58
실제 vLLM 파드를 이용해 추론(Inference)을 하기 위해서 WebUI를 생성하도록 하겠습니다.
 cat open-webui.yaml
apiVersion: apps/v1
kind: Deployment
metadata:
  name: open-webui-deployment
spec:
  replicas: 1
  selector:
    matchLabels:
      app: open-webui-server
  template:
    metadata:
      labels:
        app: open-webui-server
    spec:
      containers:
      - name: open-webui
        image: kopi/openwebui
        env:
        - name: WEBUI_AUTH
          value: "False"
        - name: OPENAI_API_KEY
          value: "xxx"
        - name: OPENAI_API_BASE_URL
          value: "http://vllm-mistral7b-service/v1"
---
apiVersion: v1
kind: Service
metadata:
  name: open-webui-service
  annotations:
    service.beta.kubernetes.io/aws-load-balancer-type: external
    service.beta.kubernetes.io/aws-load-balancer-scheme: internet-facing
    service.beta.kubernetes.io/aws-load-balancer-nlb-target-type: instance
spec:
  selector:
    app: open-webui-server
  # type: LoadBalancer
  ports:
  - protocol: TCP
    port: 80
    targetPort: 8080
---
apiVersion: networking.k8s.io/v1
kind: Ingress
metadata:
  name: open-webui-ingress
  annotations:
    alb.ingress.kubernetes.io/scheme: internet-facing
    alb.ingress.kubernetes.io/target-type: ip
    alb.ingress.kubernetes.io/healthcheck-path: /
    alb.ingress.kubernetes.io/healthcheck-interval-seconds: '10'
    alb.ingress.kubernetes.io/healthcheck-timeout-seconds: '9'
    alb.ingress.kubernetes.io/healthy-threshold-count: '2'
    alb.ingress.kubernetes.io/unhealthy-threshold-count: '10'
    alb.ingress.kubernetes.io/success-codes: '200-302'
    alb.ingress.kubernetes.io/load-balancer-name: open-webui-ingress
  labels:
    app: open-webui-ingress
spec:
  ingressClassName: alb
  rules:
  - http:
      paths:
      - path: /
        pathType: Prefix
        backend:
          service:
            name: open-webui-service
            port:
              number: 80

kubectl apply -f open-webui.yaml
deployment.apps/open-webui-deployment created
service/open-webui-service created
ingress.networking.k8s.io/open-webui-ingress created
생성된 Ingress를 확인하여 웹 브라우저를 통해 접근합니다.
kubectl get ing
NAME                 CLASS   HOSTS   ADDRESS                                                     PORTS   AGE
open-webui-ingress   alb     *       open-webui-ingress-1559589477.us-west-2.elb.amazonaws.com   80      57s
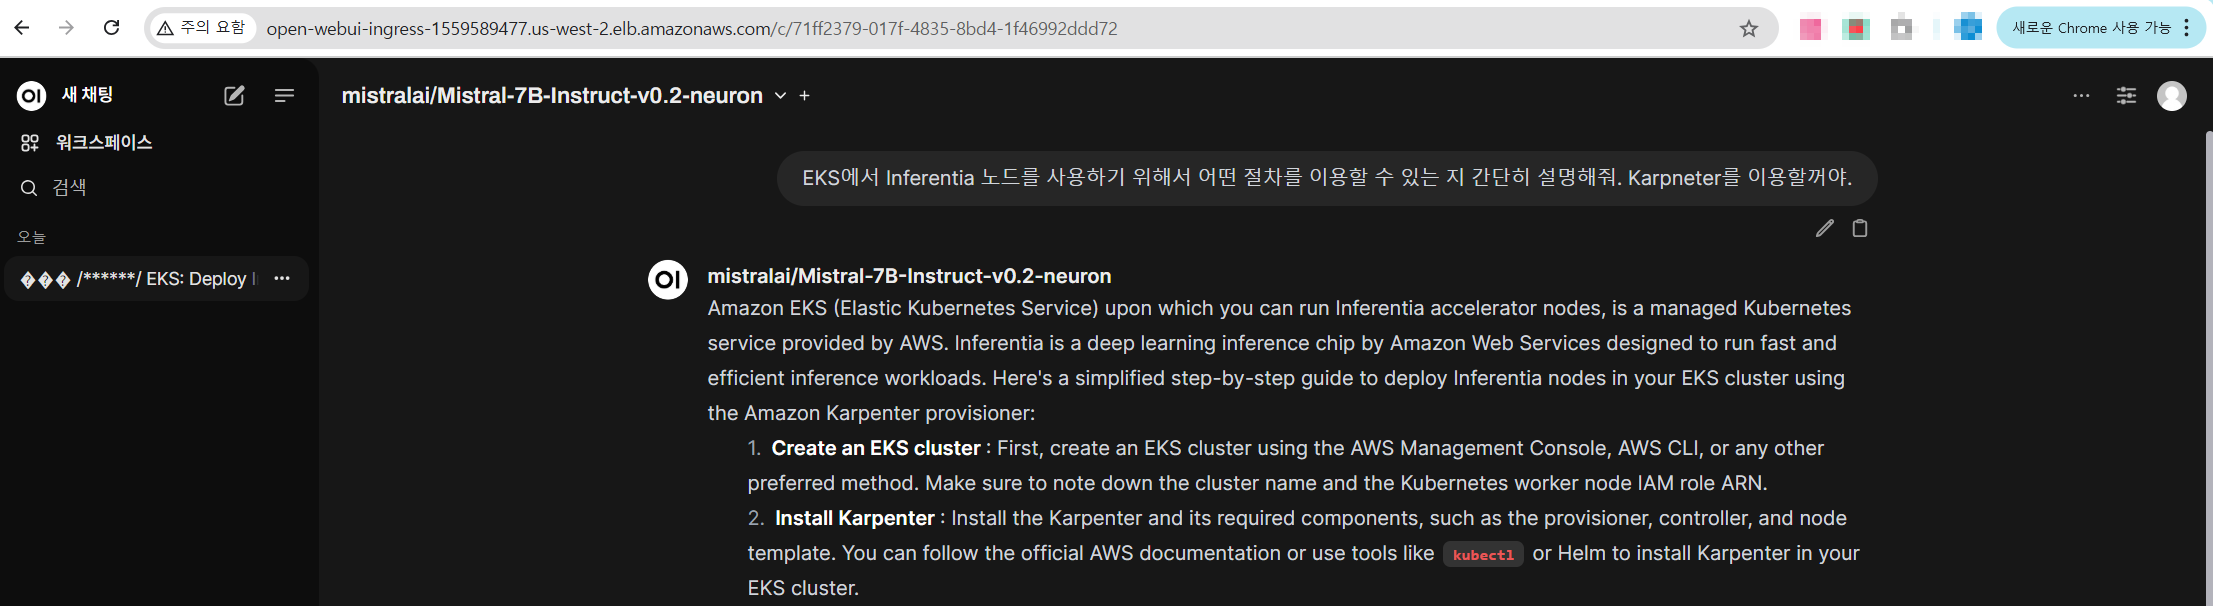
접속해 보면 Open WebUI의 화면을 확인할 수 있습니다.
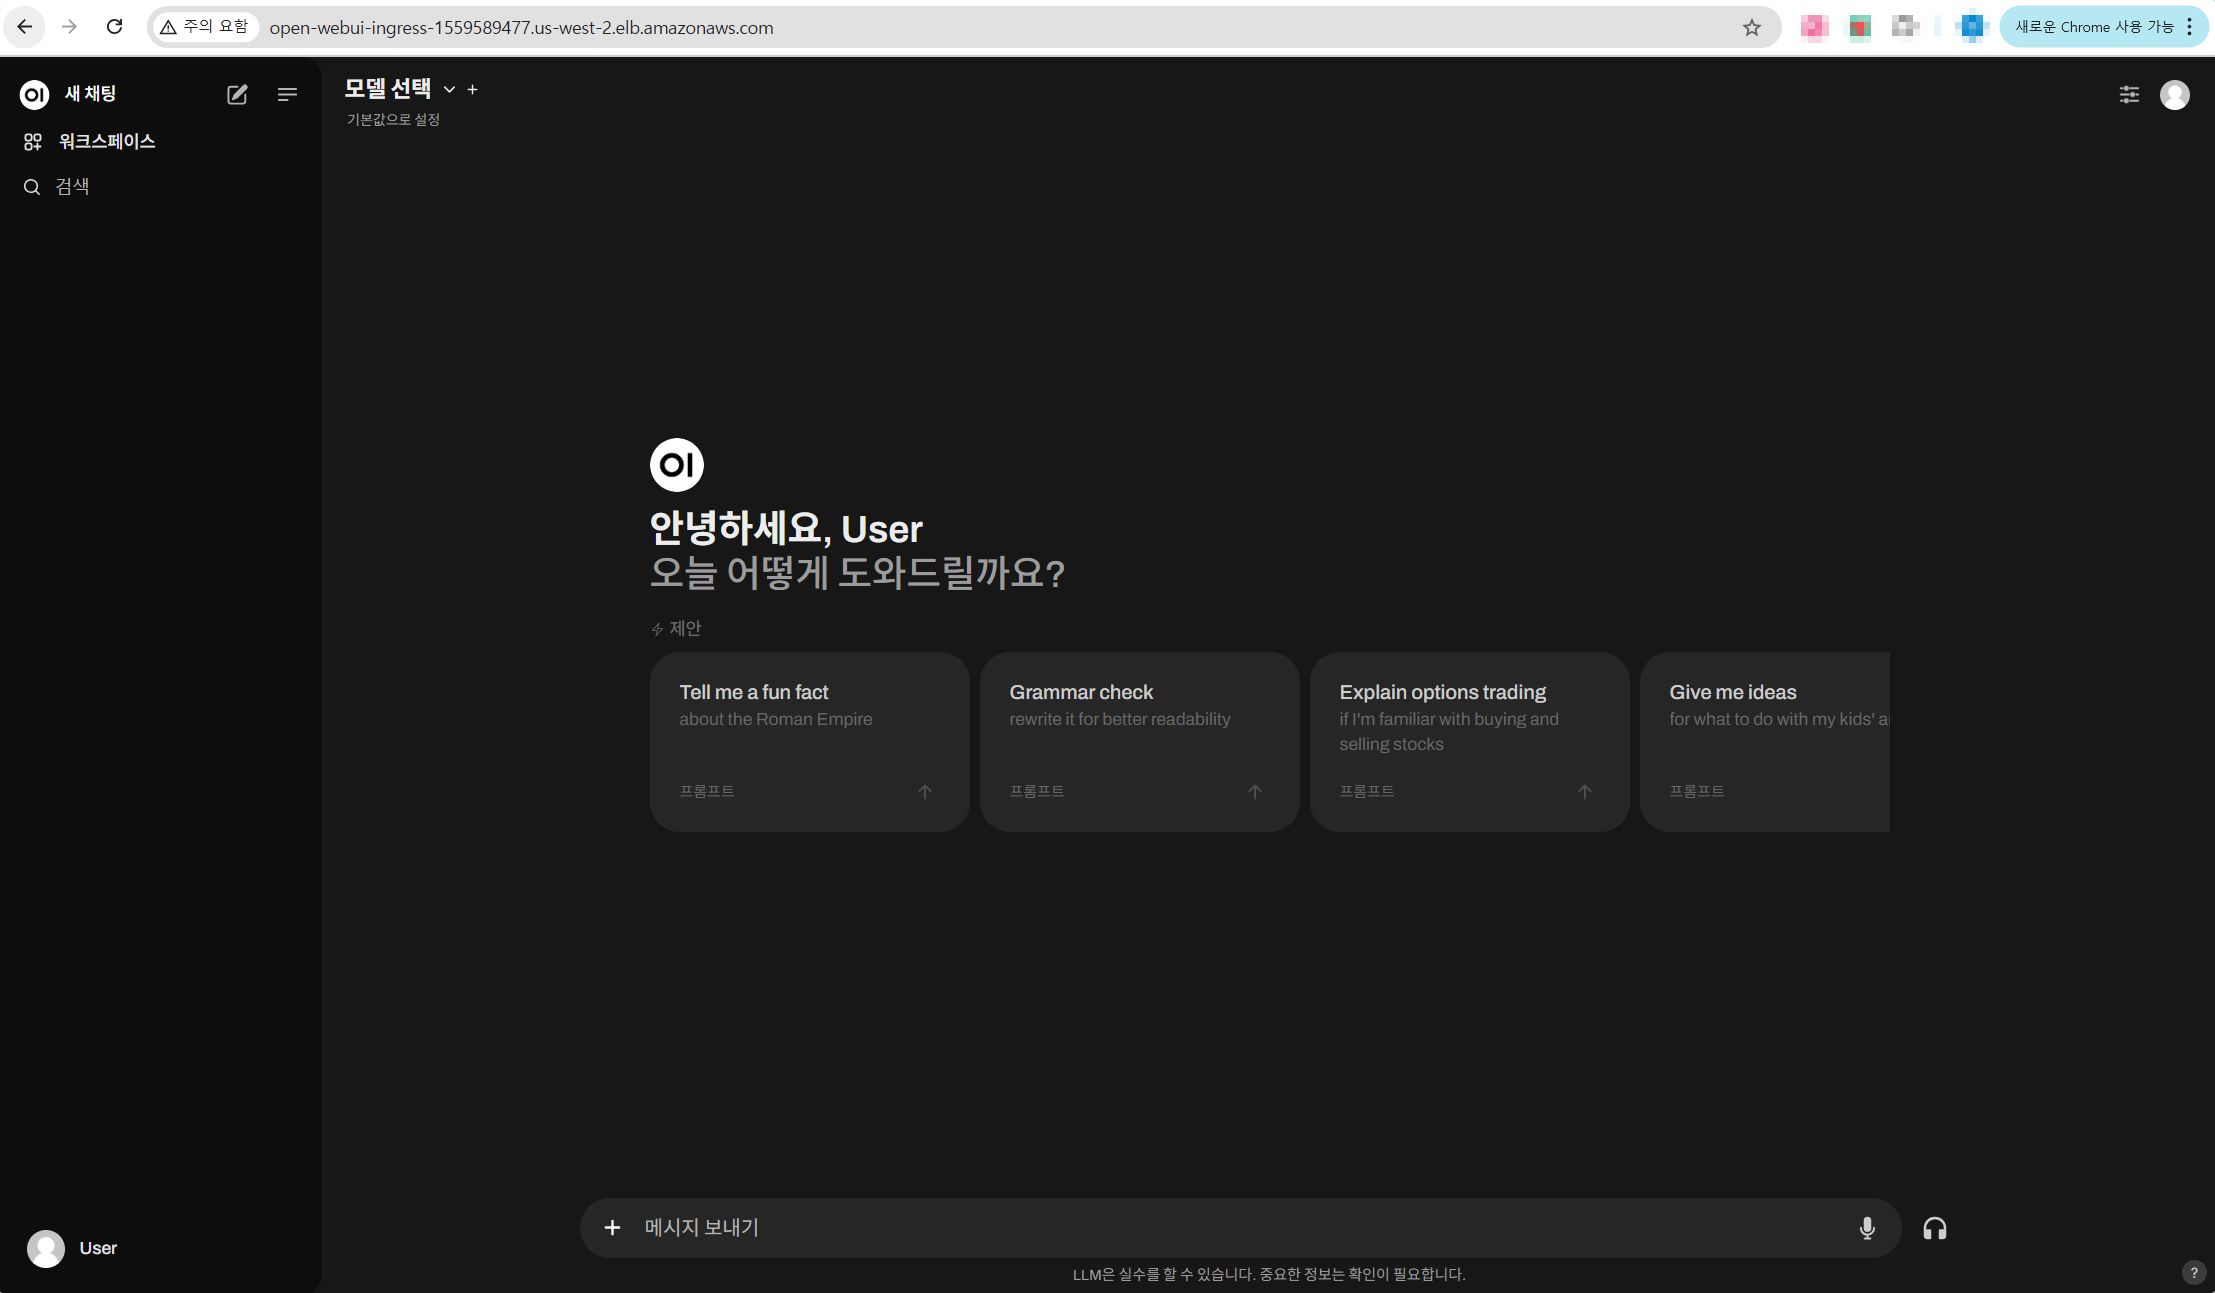
모델 선택을 통해서 vLLM 파드에서 서빙 중인 Mistral-7B 모델을 선택할 수 있습니다.

Chat을 사용해 보면 정상적으로 응답이 오는 것을 알 수 있습니다.
이상 Build GenAI & ML for Performance and Scale, using Amazon EKS, Amazon FSx and AWS Inferentia 워크샵을 활용한 실습을 마무리하겠습니다.
'EKS' 카테고리의 다른 글
| [10] EKS Gateway API와 Amazon VPC Lattice (0) | 2025.04.26 |
|---|---|
| [8] EKS Upgrade (0) | 2025.04.02 |
| [7] EKS Fargate (0) | 2025.03.23 |
| [6] EKS의 Security - EKS 인증/인가와 Pod IAM 권한 할당 (0) | 2025.03.16 |
| [5-2] EKS의 오토스케일링 Part2 (0) | 2025.03.07 |


