
| 일 | 월 | 화 | 수 | 목 | 금 | 토 |
|---|---|---|---|---|---|---|
| 1 | 2 | 3 | 4 | 5 | 6 | 7 |
| 8 | 9 | 10 | 11 | 12 | 13 | 14 |
| 15 | 16 | 17 | 18 | 19 | 20 | 21 |
| 22 | 23 | 24 | 25 | 26 | 27 | 28 |
- VPA
- 묘공단
- cilium
- EKS
- KEDA
- Karpenter
- go
- ubuntu
- ipam
- directpv
- 업그레이드
- calico
- aws
- 컨테이너
- AKS
- AutoScaling
- upgrade
- WSL
- vscode
- curl
- kubernetes
- ansible
- minIO
- windows
- Object Storage
- gateway api
- 쿠버네티스
- Timeout
- Azure
- HPA
- Today
- Total
a story
[7] Cilium - BGP Control Plane 본문
이번 게시물에서는 Cilium에서 BGP Control Plane을 사용하는 방식을 살펴보겠습니다. 네트워크 환경에 따라 Cilium이 가지고 있는 PodCIDR이나 External IP를 외부에서 접근해야 하는 경우가 있을 수 있습니다.
이러한 경우 Cilium에서 BGP Control Plane을 활용하여 외부 라우터와 BGP 연동을 할 수 있습니다.
실습을 통해서 Cilium의 PodCIDR과 External IP를 Advertise해 보도록 하겠습니다.
목차
- 실습 환경 구성
- BPG Control Plane 적용
- External IP에 대한 BGP Advertisement
실습 환경 구성
vagrant를 통해서 실습 환경을 구성하겠습니다.
mkdir cilium-lab && cd cilium-lab

curl -O https://raw.githubusercontent.com/gasida/vagrant-lab/refs/heads/main/cilium-study/5w/Vagrantfile

vagrant up
명령이 완료되면 vagrant status로 구성된 VM을 확인할 수 있습니다.
PS C:\cilium-lab\w5> vagrant status
Current machine states:

k8s-ctr                   running (virtualbox)
k8s-w1                    running (virtualbox)
router                    running (virtualbox)
k8s-w0                    running (virtualbox)

This environment represents multiple VMs. The VMs are all listed
above with their current state. For more information about a specific
VM, run `vagrant status NAME`.
컨트롤 플레인에 2대의 워커 노드와, 추가로 router라는 VM이 생성되어 있으며, 아래와 같이 각 네트워크에 연결되어 있습니다.
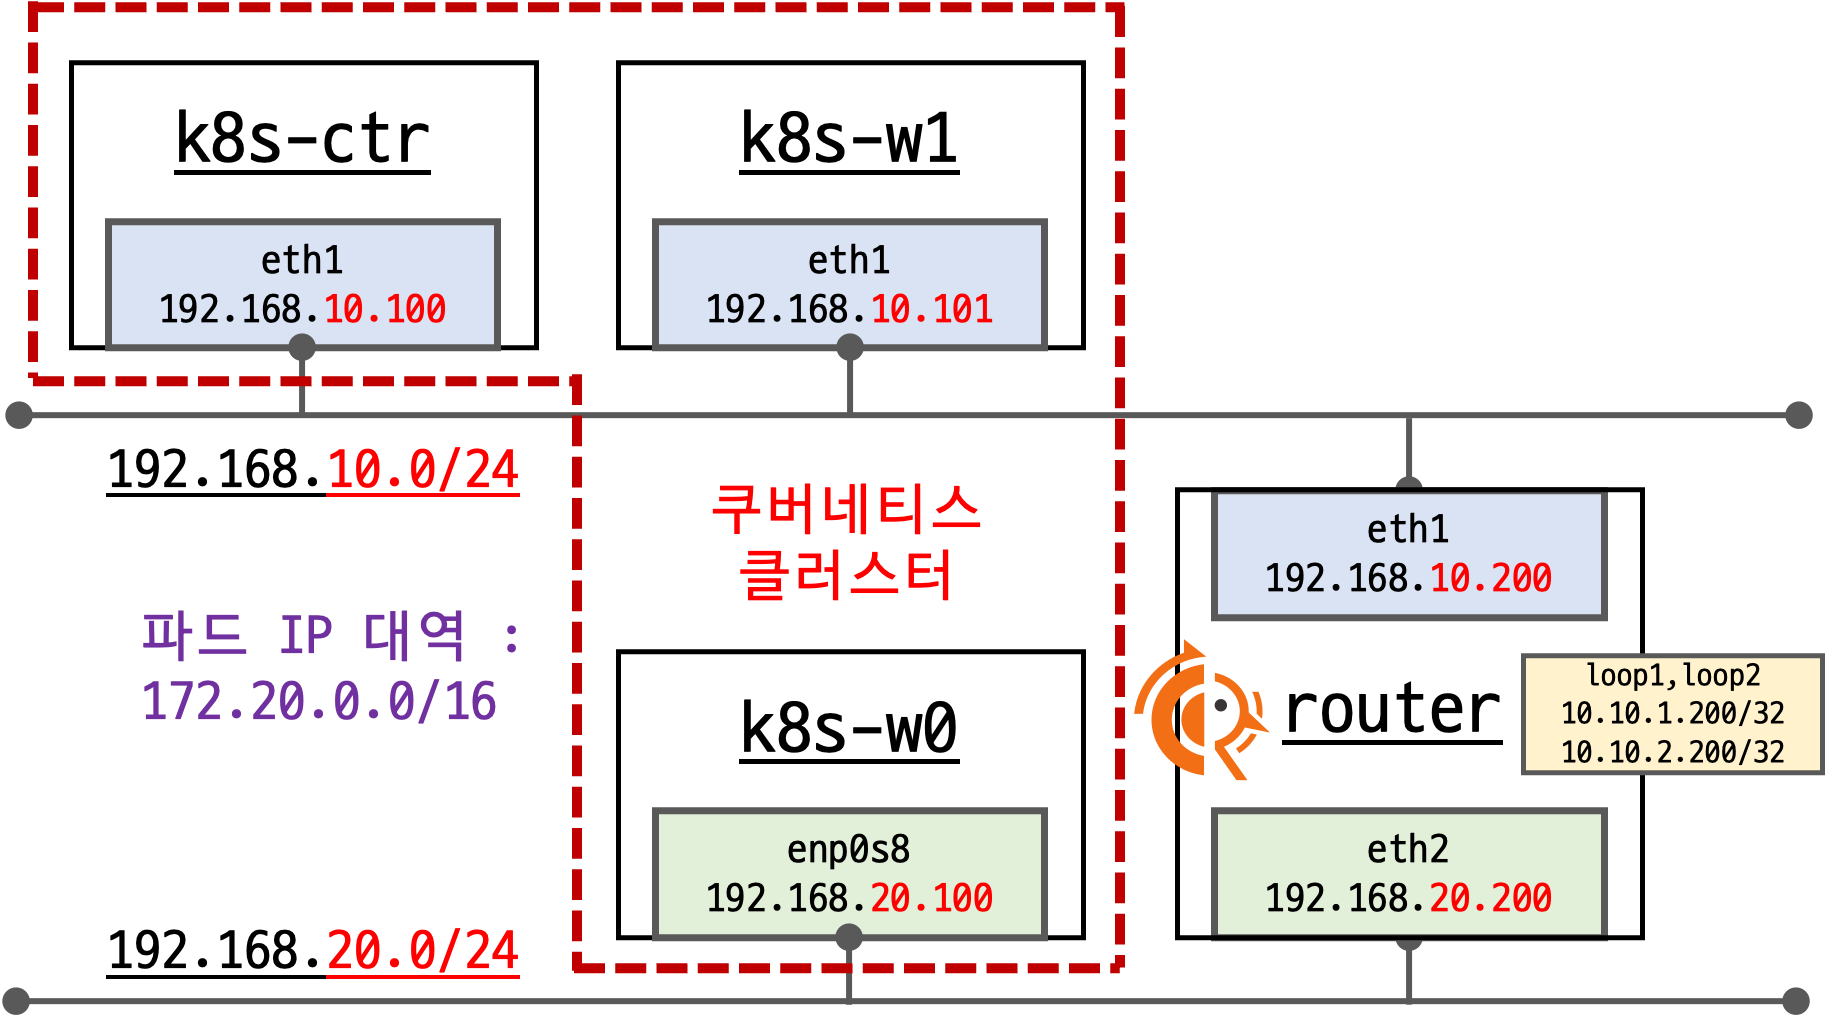
해당 실습 환경에서는 서로 다른 네트워크에 워커노드를 위치하고, router라는 VM을 통해서 서로 연결되도록 구성되어 있습니다. 각 네트워크에 위치한 VM들은 상태 네트워크에 대해서 라우팅을 router를 통해 처리하도록 static route가 적용되어 있습니다.
router는 192.168.10.0/24 대역과 192.168.20.0/24에 연결된 2개의 network Interface를 가지고, 각 네트워크에 대한 라우팅을 처리하는 역할을 합니다. 이번 실습에서 router라는 VM에는 FRR이라는 라우팅 서비스를 추가하였습니다.
컨트롤 플레인 노드를 vagrant ssh k8s-ctr로 접근하여 기본 정보를 확인하겠습니다.
(⎈|HomeLab:N/A) root@k8s-ctr:~# kubectl get no
NAME      STATUS   ROLES           AGE     VERSION
k8s-ctr   Ready    control-plane   21m     v1.33.2
k8s-w0    Ready    <none>          7m35s   v1.33.2
k8s-w1    Ready    <none>          15m     v1.33.2
(⎈|HomeLab:N/A) root@k8s-ctr:~# cilium config view | grep ^ipam
ipam                                              cluster-pool
ipam-cilium-node-update-rate                      15s
(⎈|HomeLab:N/A) root@k8s-ctr:~# cilium config view | grep ^routing
routing-mode                                      native
이번 실습에는 Cilium에서 --set bgpControlPlane.enabled=true를 사용하여 Cilium에서 BPG 연동이 가능하도록 구성하였습니다. 이를 아래와 같이 확인할 수 있습니다.
(⎈|HomeLab:N/A) root@k8s-ctr:~# cilium config view | grep -i bgp
bgp-router-id-allocation-ip-pool
bgp-router-id-allocation-mode                     default
bgp-secrets-namespace                             kube-system
enable-bgp-control-plane                          true
enable-bgp-control-plane-status-report            true
또한 해당 환경에서는 autoDirectNodeRoutes=false로 설정되어 PodCIDR에 대한 기본 라우팅이 적용되어 있지 않습니다.
autoDirectNodeRoutes=true가 설정되면 같은 네트워크에 있는 노드에 대해서 PodCidr에 대한 static routing이 추가됩니다.
(⎈|HomeLab:N/A) root@k8s-ctr:~# ip route
default via 10.0.2.2 dev eth0 proto dhcp src 10.0.2.15 metric 100
10.0.2.0/24 dev eth0 proto kernel scope link src 10.0.2.15 metric 100
10.0.2.2 dev eth0 proto dhcp scope link src 10.0.2.15 metric 100
10.0.2.3 dev eth0 proto dhcp scope link src 10.0.2.15 metric 100
172.20.0.0/24 via 172.20.0.66 dev cilium_host proto kernel src 172.20.0.66
172.20.0.66 dev cilium_host proto kernel scope link
192.168.10.0/24 dev eth1 proto kernel scope link src 192.168.10.100
192.168.20.0/24 via 192.168.10.200 dev eth1 proto static
(⎈|HomeLab:N/A) root@k8s-ctr:~# ip route |grep static
192.168.20.0/24 via 192.168.10.200 dev eth1 proto static
(⎈|HomeLab:N/A) root@k8s-ctr:~# kubectl get ciliumnode
NAME      CILIUMINTERNALIP   INTERNALIP       AGE
k8s-ctr   172.20.0.66        192.168.10.100   25m
k8s-w0    172.20.2.75        192.168.20.100   13m
k8s-w1    172.20.1.25        192.168.10.101   21m
샘플 애플리케이션을 배포하여 어떤 문제가 있는지 확인해보겠습니다.
# 샘플 애플리케이션 배포
cat << EOF | kubectl apply -f -
apiVersion: apps/v1
kind: Deployment
metadata:
  name: webpod
spec:
  replicas: 3
  selector:
    matchLabels:
      app: webpod
  template:
    metadata:
      labels:
        app: webpod
    spec:
      affinity:
        podAntiAffinity:
          requiredDuringSchedulingIgnoredDuringExecution:
          - labelSelector:
              matchExpressions:
              - key: app
                operator: In
                values:
                - sample-app
            topologyKey: "kubernetes.io/hostname"
      containers:
      - name: webpod
        image: traefik/whoami
        ports:
        - containerPort: 80
---
apiVersion: v1
kind: Service
metadata:
  name: webpod
  labels:
    app: webpod
spec:
  selector:
    app: webpod
  ports:
  - protocol: TCP
    port: 80
    targetPort: 80
  type: ClusterIP
EOF


# k8s-ctr 노드에 curl-pod 파드 배포
cat <<EOF | kubectl apply -f -
apiVersion: v1
kind: Pod
metadata:
  name: curl-pod
  labels:
    app: curl
spec:
  nodeName: k8s-ctr
  containers:
  - name: curl
    image: nicolaka/netshoot
    command: ["tail"]
    args: ["-f", "/dev/null"]
  terminationGracePeriodSeconds: 0
EOF
배포가 완료되었고, curl-pod에서 webpod로 호출은 하겠습니다.
(⎈|HomeLab:N/A) root@k8s-ctr:~# kubectl get po -owide
NAME                      READY   STATUS    RESTARTS   AGE   IP             NODE      NOMINATED NODE   READINESS GATES
curl-pod                  1/1     Running   0          11m   172.20.0.218   k8s-ctr   <none>           <none>
webpod-697b545f57-fgxbm   1/1     Running   0          11m   172.20.1.196   k8s-w1    <none>           <none>
webpod-697b545f57-rtmv9   1/1     Running   0          11m   172.20.0.145   k8s-ctr   <none>           <none>
webpod-697b545f57-wr4tf   1/1     Running   0          11m   172.20.2.246   k8s-w0    <none>           <none>
(⎈|HomeLab:N/A) root@k8s-ctr:~# kubectl exec -it curl-pod -- sh -c 'while true; do curl -s --connect-timeout 1 webpod | grep Hostname; echo "---" ; sleep 1; done'
---
Hostname: webpod-697b545f57-rtmv9
---
---
---
---
Hostname: webpod-697b545f57-rtmv9
---
---
반복 호출을 해보면 실제로 같은 노드에 위치한 파드인 webpod-697b545f57-rtmv9를 제외하면 제대로 호출이 되지 않는 것을 알 수 있습니다.
2. BPG Control Plane 적용
문제를 해결하기 위해서 Cilium의 BPG Control Plane을 살펴보겠습니다.
실습 환경에서 router는 frr이라는 라우팅 서비스를 제공하고 있습니다. 여기서는 BGP Control Plane의 Custom Resource를 구성하여 각 Cilium 노드를 frr과 BGP 연동 하도록 설정합니다.
먼저 router에 접속하여 frr을 설정을 확인하고 Cilium 노드를 Neigbor로 추가 하겠습니다.
# frr의 기존 설정 확인
vtysh -c 'show running'
root@router:~# vtysh -c 'show running'
Building configuration...

Current configuration:
!
frr version 8.4.4
frr defaults traditional
hostname router
log syslog informational
no ipv6 forwarding
service integrated-vtysh-config
!
router bgp 65000
 bgp router-id 192.168.10.200
 no bgp ebgp-requires-policy
 bgp graceful-restart
 bgp bestpath as-path multipath-relax
 !
 address-family ipv4 unicast
  network 10.10.1.0/24
  maximum-paths 4
 exit-address-family
exit
!
end

# frr 설정 파일
cat /etc/frr/frr.conf

root@router:~# cat /etc/frr/frr.conf
# default to using syslog. /etc/rsyslog.d/45-frr.conf places the log in
# /var/log/frr/frr.log
#
# Note:
# FRR's configuration shell, vtysh, dynamically edits the live, in-memory
# configuration while FRR is running. When instructed, vtysh will persist the
# live configuration to this file, overwriting its contents. If you want to
# avoid this, you can edit this file manually before starting FRR, or instruct
# vtysh to write configuration to a different file.
log syslog informational
!
router bgp 65000
  bgp router-id 192.168.10.200
  bgp graceful-restart
  no bgp ebgp-requires-policy
  bgp bestpath as-path multipath-relax
  maximum-paths 4
  network 10.10.1.0/24

# BPG 연동 정보 확인
vtysh -c 'show ip bgp summary'

root@router:~# vtysh -c 'show ip bgp summary'
% No BGP neighbors found in VRF default

# BGP 광고 정보 확인
vtysh -c 'show ip bgp'

root@router:~# vtysh -c 'show ip bgp'
BGP table version is 1, local router ID is 192.168.10.200, vrf id 0
Default local pref 100, local AS 65000
Status codes:  s suppressed, d damped, h history, * valid, > best, = multipath,
               i internal, r RIB-failure, S Stale, R Removed
Nexthop codes: @NNN nexthop's vrf id, < announce-nh-self
Origin codes:  i - IGP, e - EGP, ? - incomplete
RPKI validation codes: V valid, I invalid, N Not found

   Network          Next Hop            Metric LocPrf Weight Path
*> 10.10.1.0/24     0.0.0.0                  0         32768 i

Displayed  1 routes and 1 total paths
아래와 같이 frr의 설정 파일에 Cilium 노드를 Neighbor로 추가합니다.
# Cilium node 연동 설정 (각 노드를 neighbor로 추가함)
cat << EOF >> /etc/frr/frr.conf
  neighbor CILIUM peer-group
  neighbor CILIUM remote-as external
  neighbor 192.168.10.100 peer-group CILIUM
  neighbor 192.168.10.101 peer-group CILIUM
  neighbor 192.168.20.100 peer-group CILIUM
EOF

cat /etc/frr/frr.conf

root@router:~# cat /etc/frr/frr.conf
# default to using syslog. /etc/rsyslog.d/45-frr.conf places the log in
# /var/log/frr/frr.log
#
# Note:
# FRR's configuration shell, vtysh, dynamically edits the live, in-memory
# configuration while FRR is running. When instructed, vtysh will persist the
# live configuration to this file, overwriting its contents. If you want to
# avoid this, you can edit this file manually before starting FRR, or instruct
# vtysh to write configuration to a different file.
log syslog informational
!
router bgp 65000
  bgp router-id 192.168.10.200
  bgp graceful-restart
  no bgp ebgp-requires-policy
  bgp bestpath as-path multipath-relax
  maximum-paths 4
  network 10.10.1.0/24
  neighbor CILIUM peer-group
  neighbor CILIUM remote-as external
  neighbor 192.168.10.100 peer-group CILIUM
  neighbor 192.168.10.101 peer-group CILIUM
  neighbor 192.168.20.100 peer-group CILIUM


systemctl daemon-reexec && systemctl restart frr
systemctl status frr --no-pager --full

# 모니터링 걸어두기!
journalctl -u frr -f

root@router:~# journalctl -u frr -f
Aug 13 20:42:39 router watchfrr[6427]: [YFT0P-5Q5YX] Forked background command [pid 6428]: /usr/lib/frr/watchfrr.sh restart all
Aug 13 20:42:39 router zebra[6440]: [VTVCM-Y2NW3] Configuration Read in Took: 00:00:00
Aug 13 20:42:39 router staticd[6452]: [VTVCM-Y2NW3] Configuration Read in Took: 00:00:00
Aug 13 20:42:39 router bgpd[6445]: [VTVCM-Y2NW3] Configuration Read in Took: 00:00:00
Aug 13 20:42:39 router watchfrr[6427]: [QDG3Y-BY5TN] zebra state -> up : connect succeeded
Aug 13 20:42:39 router systemd[1]: Started frr.service - FRRouting.
Aug 13 20:42:39 router frrinit.sh[6417]:  * Started watchfrr
Aug 13 20:42:39 router watchfrr[6427]: [QDG3Y-BY5TN] bgpd state -> up : connect succeeded
Aug 13 20:42:39 router watchfrr[6427]: [QDG3Y-BY5TN] staticd state -> up : connect succeeded
Aug 13 20:42:39 router watchfrr[6427]: [KWE5Q-QNGFC] all daemons up, doing startup-complete notify
<대기>
이제 Cilium 쪽에서 BGP 설정을 이어서 진행하겠습니다.
먼저 상태가 변경되기 위해서 frr 로그와, curl pod에서 webpod에 대한 호출을 모니터링을 수행합니다.
# 신규 터미널 1 (router) : 모니터링 걸어두기!
journalctl -u frr -f

# 신규 터미널 2 (k8s-ctr) : 반복 호출
kubectl exec -it curl-pod -- sh -c 'while true; do curl -s --connect-timeout 1 webpod | grep Hostname; echo "---" ; sleep 1; done'

# BGP 동작할 노드를 위한 label 설정 (이후 BGP가 동작할 노드를 label로 지정)
kubectl label nodes k8s-ctr k8s-w0 k8s-w1 enable-bgp=true
kubectl get node -l enable-bgp=true

(⎈|HomeLab:N/A) root@k8s-ctr:~# kubectl get node -l enable-bgp=true
NAME      STATUS   ROLES           AGE   VERSION
k8s-ctr   Ready    control-plane   22h   v1.33.2
k8s-w0    Ready    <none>          22h   v1.33.2
k8s-w1    Ready    <none>          22h   v1.33.2
이후 Cilium에서 Custom Resource 를 생성합니다.
# Config Cilium BGP
cat << EOF | kubectl apply -f -
apiVersion: cilium.io/v2
kind: CiliumBGPAdvertisement
metadata:
  name: bgp-advertisements
  labels:
    advertise: bgp
spec:
  advertisements:
    - advertisementType: "PodCIDR" # PodCIDR를 BGP로 광고한다.
---
apiVersion: cilium.io/v2
kind: CiliumBGPPeerConfig
metadata:
  name: cilium-peer
spec:
  timers:
    holdTimeSeconds: 9
    keepAliveTimeSeconds: 3
  ebgpMultihop: 2
  gracefulRestart:
    enabled: true
    restartTimeSeconds: 15
  families:
    - afi: ipv4
      safi: unicast
      advertisements:
        matchLabels:
          advertise: "bgp" # CiliumBGPAdvertisement의 label과 일치
---
apiVersion: cilium.io/v2
kind: CiliumBGPClusterConfig
metadata:
  name: cilium-bgp
spec:
  nodeSelector: # nodeSelector로 이전에 지정한 노드 label을 사용
    matchLabels:
      "enable-bgp": "true"
  bgpInstances:
  - name: "instance-65001"
    localASN: 65001
    peers: # 해당 실습에서는 router에서 정의한 AS 정보를 입력
    - name: "tor-switch"
      peerASN: 65000
      peerAddress: 192.168.10.200  # router ip address
      peerConfigRef:
        name: "cilium-peer" # CiliumBGPPeerConfig 로 생성한 Object를 참조
EOF

# 확인
(⎈|HomeLab:N/A) root@k8s-ctr:~# kubectl get ciliumbgpadvertisements,ciliumbgppeerconfigs,ciliumbgpclusterconfigs
NAME                                                  AGE
ciliumbgpadvertisement.cilium.io/bgp-advertisements   19m

NAME                                        AGE
ciliumbgppeerconfig.cilium.io/cilium-peer   19m

NAME                                          AGE
ciliumbgpclusterconfig.cilium.io/cilium-bgp   19m
Cilium의 BGP Control Plane을 enable하면 이후 아래와 같은 Custom Resource를 통해서 BPG를 관리해줄 수 있습니다.
CiliumBGPClusterConfig: Defines BGP instances and peer configurations that are applied to multiple nodes. (Cilium의 BGP instance 정보와 Peer/PeerConfig를 정의)CiliumBGPPeerConfig: A common set of BGP peering setting. It can be used across multiple peers. (BGP Instance와 Peer간의 BGP 속성을 정의)CiliumBGPAdvertisement: Defines prefixes that are injected into the BGP routing table. (어떤 대상을 광고하는지 정의)CiliumBGPNodeConfigOverride: Defines node-specific BGP configuration to provide a finer control.
각 리소스의 참조 관계는 아래의 그림을 통해서 확인할 수 있습니다. CiliumBGPClusterConfig에서 BGP Instance는 CiliumBGPPeerConfig의 Peers를 Name으로 참조하고, Peers는 CiliumBGPAdvertisement의 Advertisement를 Label로 참조합니다.
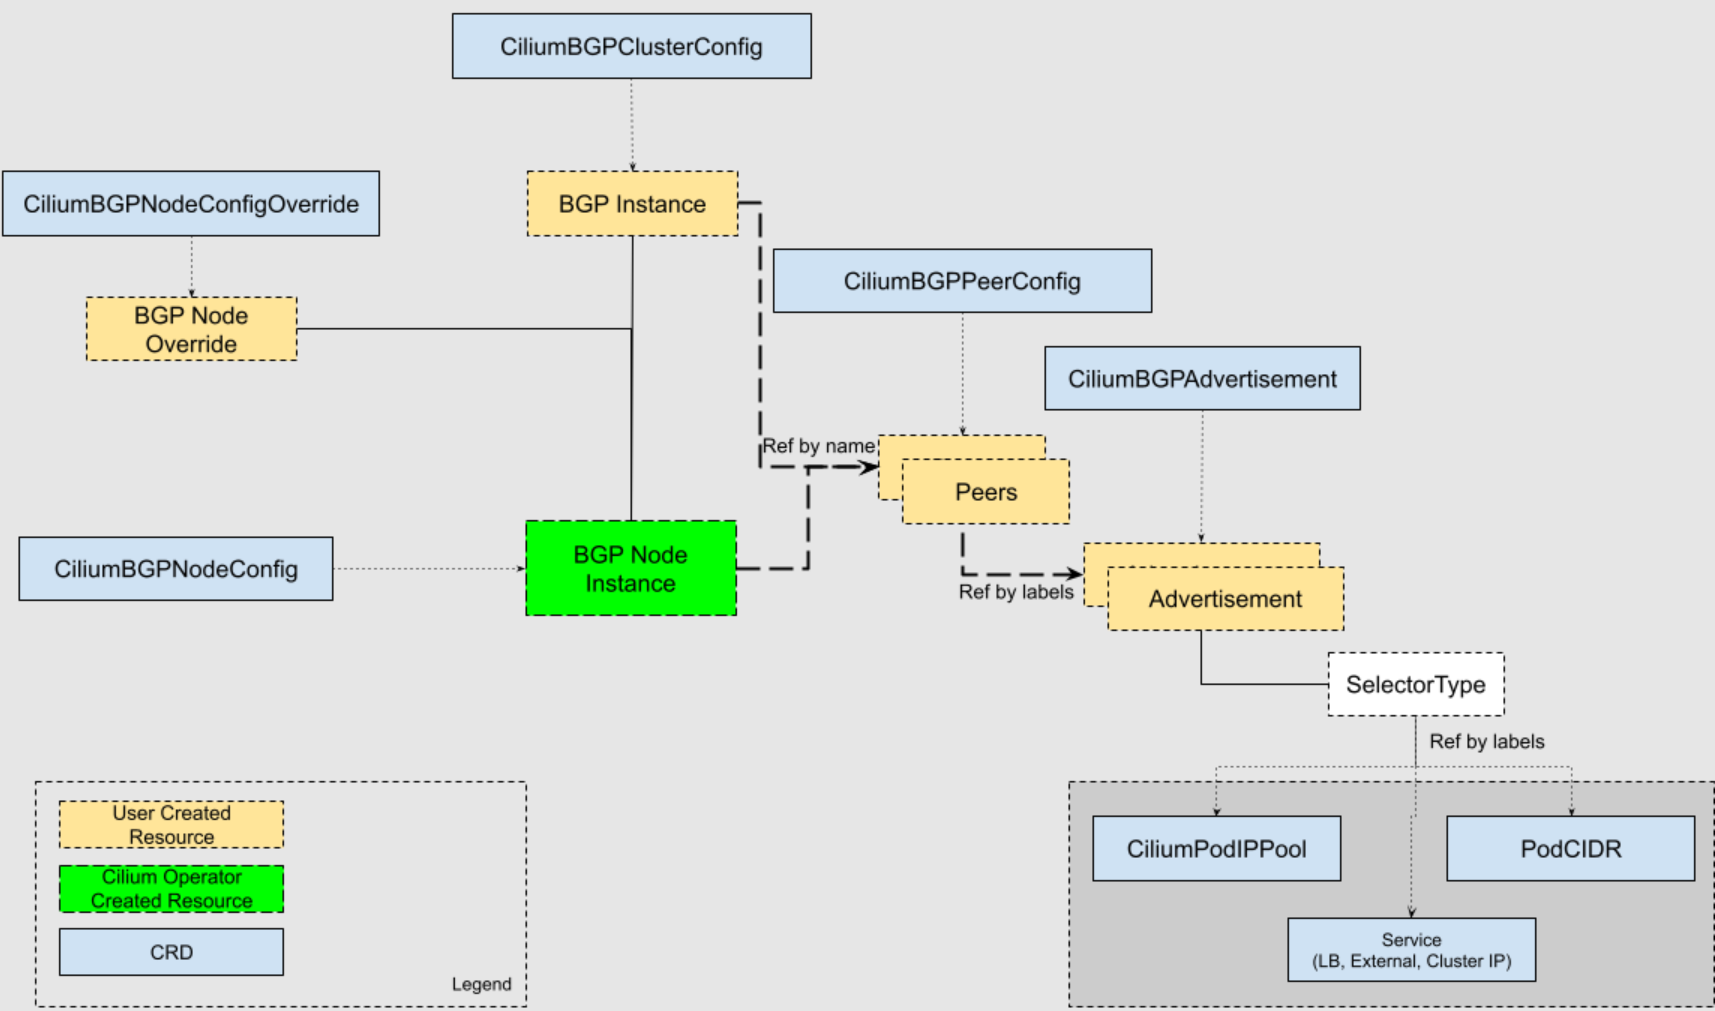
출처: https://docs.cilium.io/en/stable/network/bgp-control-plane/bgp-control-plane-v2/
해당 리소스를 생성하면 아래와 같이 frr에서 BGP Update를 받은 것을 알 수 있습니다.
root@router:~# journalctl -u frr -f
...
Aug 13 21:30:02 router bgpd[6445]: [M59KS-A3ZXZ] bgp_update_receive: rcvd End-of-RIB for IPv4 Unicast from 192.168.20.100 in vrf default
Aug 13 21:30:02 router bgpd[6445]: [M59KS-A3ZXZ] bgp_update_receive: rcvd End-of-RIB for IPv4 Unicast from 192.168.10.101 in vrf default
Aug 13 21:30:03 router bgpd[6445]: [M59KS-A3ZXZ] bgp_update_receive: rcvd End-of-RIB for IPv4 Unicast from 192.168.10.100 in vrf default
노드에서 살펴보면 179 포트를 Listen하는 것은 아니며, cilium-agent에서 router의 179 포트로 연결하고 있는 것을 알 수 있습니다.
# BGP 연결 확인
ss -tnlp | grep 179
ss -tnp | grep 179

(⎈|HomeLab:N/A) root@k8s-ctr:~# ss -tnlp | grep 179
(⎈|HomeLab:N/A) root@k8s-ctr:~# ss -tnp | grep 179
ESTAB 0      0               192.168.10.100:49941          192.168.10.200:179   users:(("cilium-agent",pid=5626,fd=57))

# cilium bgp 정보 확인
cilium bgp peers
cilium bgp routes available ipv4 unicast

# 각 노드가 router와 정상적으로 연결된 것을 확인할 수 있음
(⎈|HomeLab:N/A) root@k8s-ctr:~# cilium bgp peers
Node      Local AS   Peer AS   Peer Address     Session State   Uptime   Family         Received   Advertised
k8s-ctr   65001      65000     192.168.10.200   established     17m41s   ipv4/unicast   4          2
k8s-w0    65001      65000     192.168.10.200   established     17m41s   ipv4/unicast   4          2
k8s-w1    65001      65000     192.168.10.200   established     17m40s   ipv4/unicast   4          2

# 각 노드가 PodCIDR를 광고하고 있음
(⎈|HomeLab:N/A) root@k8s-ctr:~# cilium bgp routes available ipv4 unicast
Node      VRouter   Prefix          NextHop   Age      Attrs
k8s-ctr   65001     172.20.0.0/24   0.0.0.0   17m48s   [{Origin: i} {Nexthop: 0.0.0.0}]
k8s-w0    65001     172.20.2.0/24   0.0.0.0   17m48s   [{Origin: i} {Nexthop: 0.0.0.0}]
k8s-w1    65001     172.20.1.0/24   0.0.0.0   17m48s   [{Origin: i} {Nexthop: 0.0.0.0}]


# BGP 상태 정보를 확인할 수 있음
kubectl get ciliumbgpnodeconfigs -o yaml | yq

(⎈|HomeLab:N/A) root@k8s-ctr:~# kubectl get ciliumbgpnodeconfigs -o yaml | yq
{
  "apiVersion": "v1",
  "items": [
    {
      "apiVersion": "cilium.io/v2",
      "kind": "CiliumBGPNodeConfig",
      "metadata": {
        "creationTimestamp": "2025-08-13T12:30:13Z",
        "generation": 1,
        "name": "k8s-ctr",
        "ownerReferences": [
          {
            "apiVersion": "cilium.io/v2",
            "controller": true,
            "kind": "CiliumBGPClusterConfig",
            "name": "cilium-bgp",
            "uid": "6ab5f53f-b4fd-428e-adfa-1e7fc1b3648d"
          }
        ],
        "resourceVersion": "37233",
        "uid": "f43979f2-7d3c-4d10-8a89-d9fc0cf409e6"
      },
      "spec": {
        "bgpInstances": [
          {
            "localASN": 65001,
            "name": "instance-65001",
            "peers": [
              {
                "name": "tor-switch",
                "peerASN": 65000,
                "peerAddress": "192.168.10.200",
                "peerConfigRef": {
                  "name": "cilium-peer"
                }
              }
            ]
          }
        ]
      },
      "status": {
        "bgpInstances": [
          {
            "localASN": 65001,
            "name": "instance-65001",
            "peers": [
              {
                "establishedTime": "2025-08-13T12:30:16Z",
                "name": "tor-switch",
                "peerASN": 65000,
                "peerAddress": "192.168.10.200",
                "peeringState": "established",
                "routeCount": [
                  {
                    "advertised": 2,
                    "afi": "ipv4",
                    "received": 3,
                    "safi": "unicast"
                  }
                ],
                "timers": {
                  "appliedHoldTimeSeconds": 9,
                  "appliedKeepaliveSeconds": 3
                }
              }
            ]
          }
        ]
      }
    },
    {
      "apiVersion": "cilium.io/v2",
      "kind": "CiliumBGPNodeConfig",
      "metadata": {
        "creationTimestamp": "2025-08-13T12:30:13Z",
        "generation": 1,
        "name": "k8s-w0",
        "ownerReferences": [
          {
            "apiVersion": "cilium.io/v2",
            "controller": true,
            "kind": "CiliumBGPClusterConfig",
            "name": "cilium-bgp",
            "uid": "6ab5f53f-b4fd-428e-adfa-1e7fc1b3648d"
          }
        ],
        "resourceVersion": "37226",
        "uid": "b570c84e-0520-43b7-85d0-2466df0c9e04"
      },
      "spec": {
        "bgpInstances": [
          {
            "localASN": 65001,
            "name": "instance-65001",
            "peers": [
              {
                "name": "tor-switch",
                "peerASN": 65000,
                "peerAddress": "192.168.10.200",
                "peerConfigRef": {
                  "name": "cilium-peer"
                }
              }
            ]
          }
        ]
      },
      "status": {
        "bgpInstances": [
          {
            "localASN": 65001,
            "name": "instance-65001",
            "peers": [
              {
                "establishedTime": "2025-08-13T12:30:27Z",
                "name": "tor-switch",
                "peerASN": 65000,
                "peerAddress": "192.168.10.200",
                "peeringState": "established",
                "routeCount": [
                  {
                    "advertised": 2,
                    "afi": "ipv4",
                    "received": 1,
                    "safi": "unicast"
                  }
                ],
                "timers": {
                  "appliedHoldTimeSeconds": 9,
                  "appliedKeepaliveSeconds": 3
                }
              }
            ]
          }
        ]
      }
    },
    {
      "apiVersion": "cilium.io/v2",
      "kind": "CiliumBGPNodeConfig",
      "metadata": {
        "creationTimestamp": "2025-08-13T12:30:13Z",
        "generation": 1,
        "name": "k8s-w1",
        "ownerReferences": [
          {
            "apiVersion": "cilium.io/v2",
            "controller": true,
            "kind": "CiliumBGPClusterConfig",
            "name": "cilium-bgp",
            "uid": "6ab5f53f-b4fd-428e-adfa-1e7fc1b3648d"
          }
        ],
        "resourceVersion": "37239",
        "uid": "2c2497ce-e5de-40d2-aa80-c6b24d0d9dcc"
      },
      "spec": {
        "bgpInstances": [
          {
            "localASN": 65001,
            "name": "instance-65001",
            "peers": [
              {
                "name": "tor-switch",
                "peerASN": 65000,
                "peerAddress": "192.168.10.200",
                "peerConfigRef": {
                  "name": "cilium-peer"
                }
              }
            ]
          }
        ]
      },
      "status": {
        "bgpInstances": [
          {
            "localASN": 65001,
            "name": "instance-65001",
            "peers": [
              {
                "establishedTime": "2025-08-13T12:27:51Z",
                "name": "tor-switch",
                "peerASN": 65000,
                "peerAddress": "192.168.10.200",
                "peeringState": "established",
                "routeCount": [
                  {
                    "advertised": 2,
                    "afi": "ipv4",
                    "received": 1,
                    "safi": "unicast"
                  }
                ],
                "timers": {
                  "appliedHoldTimeSeconds": 9,
                  "appliedKeepaliveSeconds": 3
                }
              }
            ]
          }
        ]
      }
    }
  ],
  "kind": "List",
  "metadata": {
    "resourceVersion": ""
  }
}

# router에는 전달 받은 IP 대역에 대한 라우팅이 추가됨
ip -c route | grep bgp

root@router:~# ip -c route | grep bgp
172.20.0.0/24 nhid 32 via 192.168.10.100 dev eth1 proto bgp metric 20
172.20.1.0/24 nhid 30 via 192.168.10.101 dev eth1 proto bgp metric 20
172.20.2.0/24 nhid 29 via 192.168.20.100 dev eth2 proto bgp metric 20


# router에서 beigbor 정보 확인
vtysh -c 'show ip bgp summary'

root@router:~# vtysh -c 'show ip bgp summary'

IPv4 Unicast Summary (VRF default):
BGP router identifier 192.168.10.200, local AS number 65000 vrf-id 0
BGP table version 4
RIB entries 7, using 1344 bytes of memory
Peers 3, using 2172 KiB of memory
Peer groups 1, using 64 bytes of memory

Neighbor        V         AS   MsgRcvd   MsgSent   TblVer  InQ OutQ  Up/Down State/PfxRcd   PfxSnt Desc
192.168.10.100  4      65001       422       426        0    0    0 00:21:00            1        4 N/A
192.168.10.101  4      65001       424       426        0    0    0 00:21:01            1        4 N/A
192.168.20.100  4      65001       424       426        0    0    0 00:21:01            1        4 N/A

Total number of neighbors 3

vtysh -c 'show ip bgp'

root@router:~# vtysh -c 'show ip bgp'
BGP table version is 4, local router ID is 192.168.10.200, vrf id 0
Default local pref 100, local AS 65000
Status codes:  s suppressed, d damped, h history, * valid, > best, = multipath,
               i internal, r RIB-failure, S Stale, R Removed
Nexthop codes: @NNN nexthop's vrf id, < announce-nh-self
Origin codes:  i - IGP, e - EGP, ? - incomplete
RPKI validation codes: V valid, I invalid, N Not found

   Network          Next Hop            Metric LocPrf Weight Path
*> 10.10.1.0/24     0.0.0.0                  0         32768 i
*> 172.20.0.0/24    192.168.10.100                         0 65001 i
*> 172.20.1.0/24    192.168.10.101                         0 65001 i
*> 172.20.2.0/24    192.168.20.100                         0 65001 i

Displayed  4 routes and 4 total paths
이렇게 보면 router는 Cilium 노드의 PodCIDR을 정상적으로 전달받아 라우팅이 가능한 것을 알 수 있습니다. 다만 이 상황에서도 curl-pod -> webpod로의 통신은 전체가 이뤄지지 않습니다.
# 신규 터미널 2 (k8s-ctr)
kubectl exec -it curl-pod -- sh -c 'while true; do curl -s --connect-timeout 1 webpod | grep Hostname; echo "---" ; sleep 1; done'
---
---
Hostname: webpod-697b545f57-rtmv9
---
Hostname: webpod-697b545f57-rtmv9
---
---
---
Hostname: webpod-697b545f57-rtmv9
---
---
---
CiliumBPGClusterconfig를 통해서 각 노드를 Peer로 등록해보려고 했지만 앞서 살펴본 바와 같이 cilium 자체가 직접 BGP를 받아주는 역할을 하지 않는 것으로 보이며, 테스트 결과 불가한 것으로 보입니다.
관련하여 Cilium에 대한 몇가지 Issue를 살펴보면, Cilium은 upstream으로 Advertising만 하는 역할을 하도록 구현된 것 같습니다.
https://github.com/cilium/cilium/issues/34296

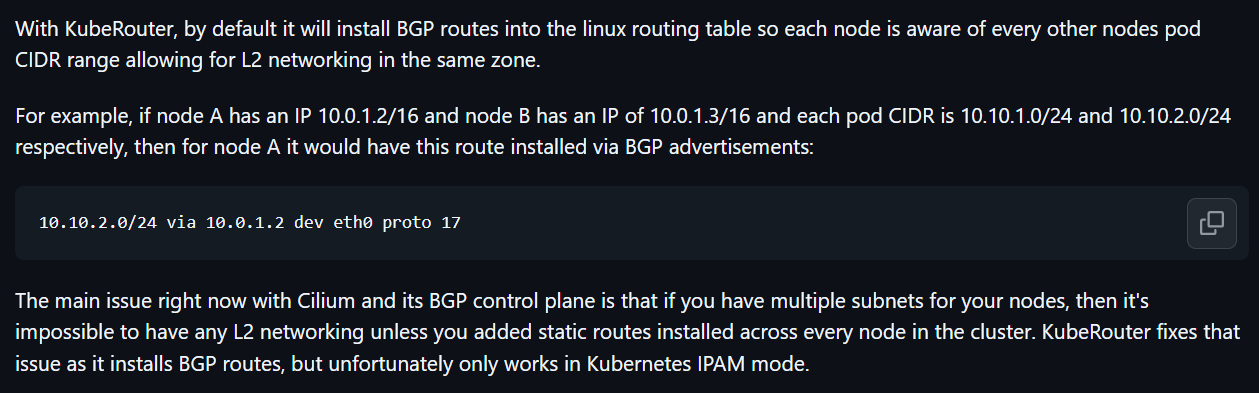
또한 이미 살펴본 내용과 같이 auto-direct-node-routes를 통해서 L2 의 노드 연결은 가능하지만, L3는 불가합니다. Full Mesh BGP는 현재는 계획이 없는 것으로 확인됩니다.
https://github.com/cilium/cilium/issues/31124

아래 Issue에서 Kubernetes IPAM 모드에서 KubeRouter을 사용하는 경우 가능하다는 커맨트가 있기는 한데, 시간 관계상 추가 테스트를 진행하지는 못했습니다.
https://github.com/cilium/cilium/issues/31091#issuecomment-1976188804
한편 모든 노드에서 default Gateway를 tor-Router로 등록하고, tor-Router에서 PodCIDR에 대한 라우팅 정보를 알고 있다면, 실제로 각 노드에서 상대노드의 PodCIDR에 대한 정보를 직접 등록하지 않아도 통신이 가능할 수 있습니다.
다만 실습 환경의 특성상 default routing이 NAT를 수행하는 eth0로 되어 있기 때문에 별도의 라우팅이 필요합니다.
(⎈|HomeLab:N/A) root@k8s-ctr:~# ip route
default via 10.0.2.2 dev eth0 proto dhcp src 10.0.2.15 metric 100 # default
10.0.2.0/24 dev eth0 proto kernel scope link src 10.0.2.15 metric 100
10.0.2.2 dev eth0 proto dhcp scope link src 10.0.2.15 metric 100
10.0.2.3 dev eth0 proto dhcp scope link src 10.0.2.15 metric 100
172.20.0.0/24 via 172.20.0.66 dev cilium_host proto kernel src 172.20.0.66
172.20.0.66 dev cilium_host proto kernel scope link
192.168.10.0/24 dev eth1 proto kernel scope link src 192.168.10.100
192.168.20.0/24 via 192.168.10.200 dev eth1 proto static
문제를 해결하기 위해서 아래와 같이 Static 라우팅을 추가해 보겠습니다. PodCIDR에 대해서 router(192.168.10.200)이 처리하도록 합니다.
# k8s 파드 사용 대역 통신 전체는 eth1을 통해서 라우팅 설정
ip route add 172.20.0.0/16 via 192.168.10.200
for i in k8s-w0 k8s-w1 router ; do echo ">> node : $i <<"; sshpass -p 'vagrant' ssh -o StrictHostKeyChecking=no vagrant@$i hostname; echo; done
sshpass -p 'vagrant' ssh vagrant@k8s-w1 sudo ip route add 172.20.0.0/16 via 192.168.10.200
sshpass -p 'vagrant' ssh vagrant@k8s-w0 sudo ip route add 172.20.0.0/16 via 192.168.20.200

# router 가 bgp로 학습한 라우팅 정보 한번 더 확인 :
sshpass -p 'vagrant' ssh vagrant@router ip -c route | grep bgp
172.20.0.0/24 nhid 64 via 192.168.10.100 dev eth1 proto bgp metric 20
172.20.1.0/24 nhid 60 via 192.168.10.101 dev eth1 proto bgp metric 20
172.20.2.0/24 nhid 62 via 192.168.20.100 dev eth2 proto bgp metric 20

# 정상 통신 확인!
kubectl exec -it curl-pod -- sh -c 'while true; do curl -s --connect-timeout 1 webpod | grep Hostname; echo "---" ; sleep 1; done'
---
---
Hostname: webpod-697b545f57-rtmv9
---
---
---
Hostname: webpod-697b545f57-wr4tf # 각 노드에 라우팅 등록 이후 정상 통신 가능
---
Hostname: webpod-697b545f57-wr4tf
---
Hostname: webpod-697b545f57-rtmv9
---
Hostname: webpod-697b545f57-wr4tf
---
Hostname: webpod-697b545f57-rtmv9
---
Hostname: webpod-697b545f57-bvm82
---
3. External IP에 대한 BGP Advertisement
앞선 게시글에서 Cilium LoadBalancer IPAM과 L2 Announcement를 통해서 Loadbalancer 유형의 서비스의 External IP를 외부에서 접근 가능하도록 설정하는 방식을 알봤습니다.
참고: https://a-person.tistory.com/54
Cilium의 BGP Control Plane에서 이러한 External IP를 BGP로 Advertisement할 수 있습니다.
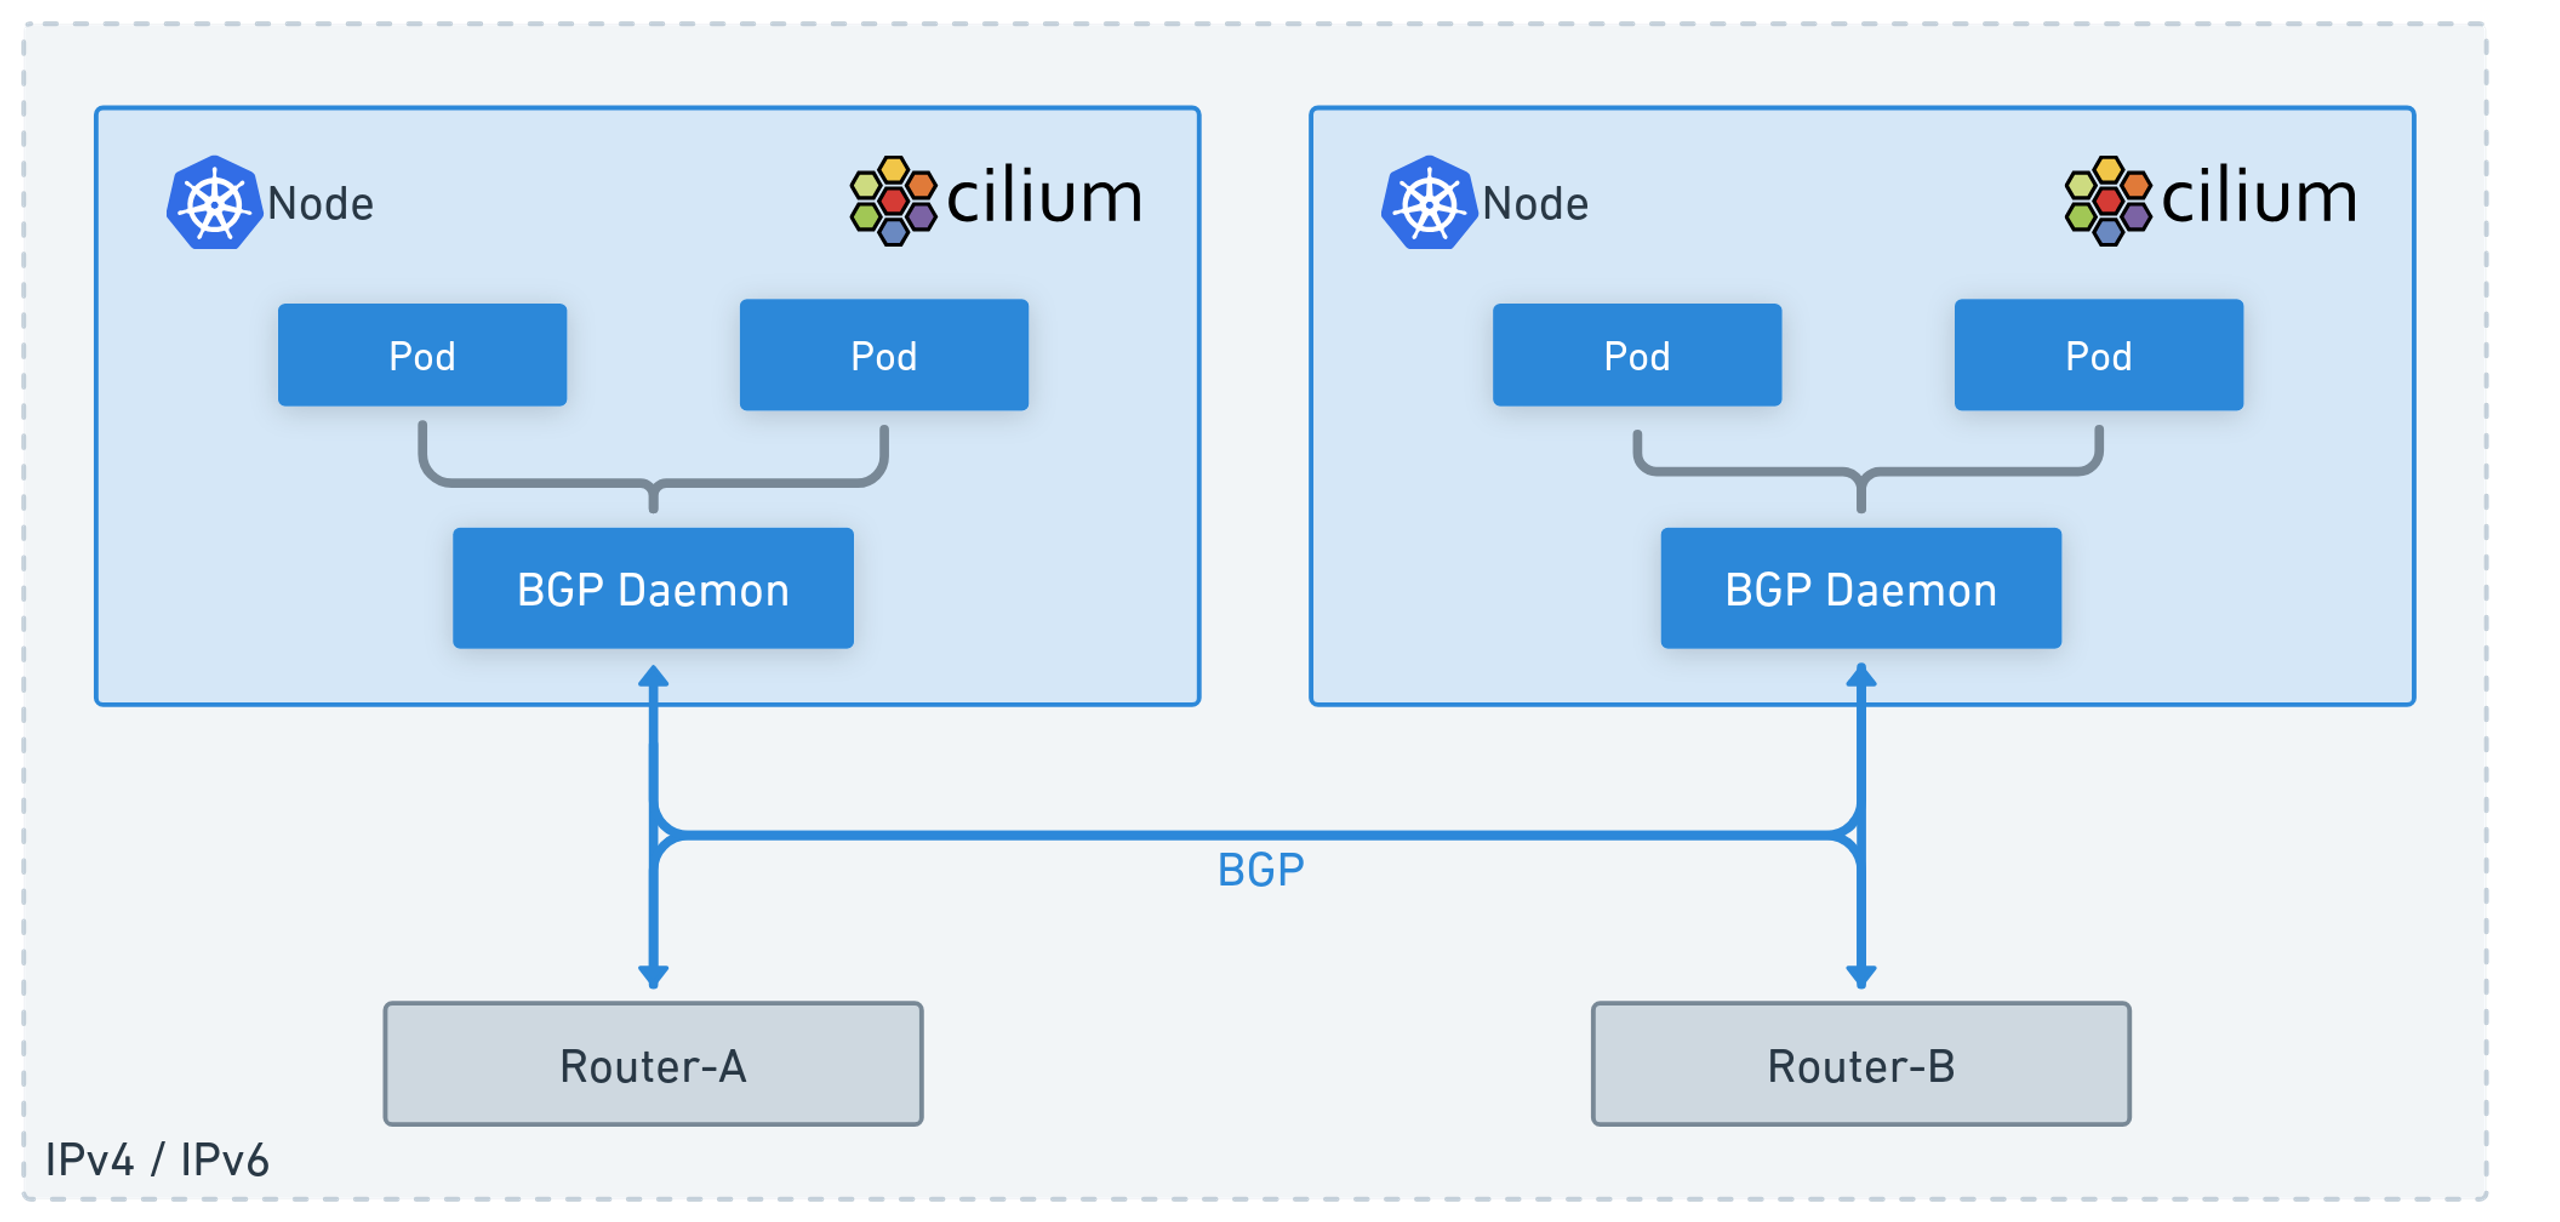
출처: https://isovalent.com/blog/post/migrating-from-metallb-to-cilium/#l3-announcement-over-bgp
실습을 위해서 LoadBalancer IP Pool과 Service에 대한 기본적인 구성을 아래와 같이 진행합니다.
# LB IPAM Announcement over BGP 설정 예정으로, 노드의 네트워크 대역이 아니여도 가능!
cat << EOF | kubectl apply -f -
apiVersion: "cilium.io/v2"
kind: CiliumLoadBalancerIPPool
metadata:
  name: "cilium-pool"
spec:
  allowFirstLastIPs: "No"
  blocks:
  - cidr: "172.16.1.0/24"
EOF

kubectl get ippool

(⎈|HomeLab:N/A) root@k8s-ctr:~# kubectl get ippool
NAME          DISABLED   CONFLICTING   IPS AVAILABLE   AGE
cilium-pool   false      False         254             9s

# 기존 Service의 유형을 LoadBalancer로 변경
kubectl patch svc webpod -p '{"spec": {"type": "LoadBalancer"}}'
kubectl get svc webpod


(⎈|HomeLab:N/A) root@k8s-ctr:~# kubectl patch svc webpod -p '{"spec": {"type": "LoadBalancer"}}'
service/webpod patched
(⎈|HomeLab:N/A) root@k8s-ctr:~# kubectl get svc webpod
NAME     TYPE           CLUSTER-IP      EXTERNAL-IP   PORT(S)        AGE
webpod   LoadBalancer   10.96.120.235   172.16.1.1    80:31039/TCP   24h

# 확인
kubectl get ippool

# IP Avvailable 254 -> 253
(⎈|HomeLab:N/A) root@k8s-ctr:~# kubectl get ippool
NAME          DISABLED   CONFLICTING   IPS AVAILABLE   AGE
cilium-pool   false      False         253             59s

# LBIP로 curl 요청 확인
kubectl get svc webpod -o jsonpath='{.status.loadBalancer.ingress[0].ip}'
LBIP=$(kubectl get svc webpod -o jsonpath='{.status.loadBalancer.ingress[0].ip}')
curl -s $LBIP
curl -s $LBIP | grep Hostname
curl -s $LBIP | grep RemoteAddr

(⎈|HomeLab:N/A) root@k8s-ctr:~# curl -s $LBIP | grep RemoteAddr
RemoteAddr: 172.20.0.66:53430

# router에서 라우팅 정보 확인
root@router:~# ip route
default via 10.0.2.2 dev eth0 proto dhcp src 10.0.2.15 metric 100
10.0.2.0/24 dev eth0 proto kernel scope link src 10.0.2.15 metric 100
10.0.2.2 dev eth0 proto dhcp scope link src 10.0.2.15 metric 100
10.0.2.3 dev eth0 proto dhcp scope link src 10.0.2.15 metric 100
10.10.1.0/24 dev loop1 proto kernel scope link src 10.10.1.200
10.10.2.0/24 dev loop2 proto kernel scope link src 10.10.2.200
172.20.0.0/24 nhid 108 via 192.168.10.100 dev eth1 proto bgp metric 20
172.20.1.0/24 nhid 106 via 192.168.10.101 dev eth1 proto bgp metric 20
172.20.2.0/24 nhid 107 via 192.168.20.100 dev eth2 proto bgp metric 20
192.168.10.0/24 dev eth1 proto kernel scope link src 192.168.10.200
192.168.20.0/24 dev eth2 proto kernel scope link src 192.168.20.200
이제 LoadBalancer EXternal IP에 대해서 BGP로 광고 설정을 진행하겠습니다.
# 지정된 서비스에 대한 LoadBalancer의 EXternal IP를 BGP로 광고 설정
cat << EOF | kubectl apply -f -
apiVersion: cilium.io/v2
kind: CiliumBGPAdvertisement
metadata:
  name: bgp-advertisements-lb-exip-webpod
  labels:
    advertise: bgp
spec:
  advertisements:
    - advertisementType: "Service"
      service:
        addresses:
          - LoadBalancerIP
      selector:
        matchExpressions:
          - { key: app, operator: In, values: [ webpod ] }
EOF

kubectl get CiliumBGPAdvertisement

(⎈|HomeLab:N/A) root@k8s-ctr:~# kubectl get CiliumBGPAdvertisement
NAME                                AGE
bgp-advertisements                  135m
bgp-advertisements-lb-exip-webpod   13s


# 확인
kubectl exec -it -n kube-system ds/cilium -- cilium-dbg bgp route-policies

(⎈|HomeLab:N/A) root@k8s-ctr:~# kubectl exec -it -n kube-system ds/cilium -- cilium-dbg bgp route-policies
VRouter   Policy Name                                             Type     Match Peers         Match Families   Match Prefixes (Min..Max Len)   RIB Action   Path Actions
65001     allow-local                                             import                                                                        accept
65001     tor-switch-ipv4-PodCIDR                                 export   192.168.10.200/32                    172.20.0.0/24 (24..24)          accept
65001     tor-switch-ipv4-Service-webpod-default-LoadBalancerIP   export   192.168.10.200/32                    172.16.1.1/32 (32..32)          accept


cilium bgp routes available ipv4 unicast

# 모든 노드로 광고가 된다.
(⎈|HomeLab:N/A) root@k8s-ctr:~# cilium bgp routes available ipv4 unicast
Node      VRouter   Prefix          NextHop   Age      Attrs
k8s-ctr   65001     172.16.1.1/32   0.0.0.0   41s      [{Origin: i} {Nexthop: 0.0.0.0}]
          65001     172.20.0.0/24   0.0.0.0   44m56s   [{Origin: i} {Nexthop: 0.0.0.0}]
k8s-w0    65001     172.16.1.1/32   0.0.0.0   41s      [{Origin: i} {Nexthop: 0.0.0.0}]
          65001     172.20.2.0/24   0.0.0.0   44m56s   [{Origin: i} {Nexthop: 0.0.0.0}]
k8s-w1    65001     172.16.1.1/32   0.0.0.0   41s      [{Origin: i} {Nexthop: 0.0.0.0}]
          65001     172.20.1.0/24   0.0.0.0   44m56s   [{Origin: i} {Nexthop: 0.0.0.0}]

# 현재 ExternalTrafficPolicy: Cluster이므로, 모든 노드에 대해서 연결이 가능하다.
(⎈|HomeLab:N/A) root@k8s-ctr:~# kubectl describe svc webpod | grep 'Traffic Policy'
External Traffic Policy:  Cluster
Internal Traffic Policy:  Cluster


# 현재 BGP가 동작하는 모든 노드로 전달 가능함
root@router:~# ip route
default via 10.0.2.2 dev eth0 proto dhcp src 10.0.2.15 metric 100
10.0.2.0/24 dev eth0 proto kernel scope link src 10.0.2.15 metric 100
10.0.2.2 dev eth0 proto dhcp scope link src 10.0.2.15 metric 100
10.0.2.3 dev eth0 proto dhcp scope link src 10.0.2.15 metric 100
10.10.1.0/24 dev loop1 proto kernel scope link src 10.10.1.200
10.10.2.0/24 dev loop2 proto kernel scope link src 10.10.2.200
172.16.1.1 nhid 113 proto bgp metric 20
        nexthop via 192.168.10.101 dev eth1 weight 1
        nexthop via 192.168.20.100 dev eth2 weight 1
        nexthop via 192.168.10.100 dev eth1 weight 1
172.20.0.0/24 nhid 108 via 192.168.10.100 dev eth1 proto bgp metric 20
172.20.1.0/24 nhid 106 via 192.168.10.101 dev eth1 proto bgp metric 20
172.20.2.0/24 nhid 107 via 192.168.20.100 dev eth2 proto bgp metric 20
192.168.10.0/24 dev eth1 proto kernel scope link src 192.168.10.200
192.168.20.0/24 dev eth2 proto kernel scope link src 192.168.20.200


sudo vtysh -c 'show ip route bgp'
sudo vtysh -c 'show ip bgp summary'
sudo vtysh -c 'show ip bgp'

root@router:~# sudo vtysh -c 'show ip route bgp'
Codes: K - kernel route, C - connected, S - static, R - RIP,
       O - OSPF, I - IS-IS, B - BGP, E - EIGRP, N - NHRP,
       T - Table, v - VNC, V - VNC-Direct, A - Babel, F - PBR,
       f - OpenFabric,
       > - selected route, * - FIB route, q - queued, r - rejected, b - backup
       t - trapped, o - offload failure

B>* 172.16.1.1/32 [20/0] via 192.168.10.100, eth1, weight 1, 00:01:12
  *                      via 192.168.10.101, eth1, weight 1, 00:01:12
  *                      via 192.168.20.100, eth2, weight 1, 00:01:12
B>* 172.20.0.0/24 [20/0] via 192.168.10.100, eth1, weight 1, 00:45:24
B>* 172.20.1.0/24 [20/0] via 192.168.10.101, eth1, weight 1, 00:45:24
B>* 172.20.2.0/24 [20/0] via 192.168.20.100, eth2, weight 1, 00:45:24
root@router:~# sudo vtysh -c 'show ip bgp summary'

IPv4 Unicast Summary (VRF default):
BGP router identifier 192.168.10.200, local AS number 65000 vrf-id 0
BGP table version 17
RIB entries 9, using 1728 bytes of memory
Peers 3, using 2172 KiB of memory
Peer groups 1, using 64 bytes of memory

Neighbor        V         AS   MsgRcvd   MsgSent   TblVer  InQ OutQ  Up/Down State/PfxRcd   PfxSnt Desc
192.168.10.100  4      65001      1447      1450        0    0    0 00:46:35            2        5 N/A
192.168.10.101  4      65001      1450      1454        0    0    0 00:46:36            2        5 N/A
192.168.20.100  4      65001      1450      1452        0    0    0 00:46:36            2        5 N/A

Total number of neighbors 3
root@router:~# sudo vtysh -c 'show ip bgp'
BGP table version is 17, local router ID is 192.168.10.200, vrf id 0
Default local pref 100, local AS 65000
Status codes:  s suppressed, d damped, h history, * valid, > best, = multipath,
               i internal, r RIB-failure, S Stale, R Removed
Nexthop codes: @NNN nexthop's vrf id, < announce-nh-self
Origin codes:  i - IGP, e - EGP, ? - incomplete
RPKI validation codes: V valid, I invalid, N Not found

   Network          Next Hop            Metric LocPrf Weight Path
*> 10.10.1.0/24     0.0.0.0                  0         32768 i
*> 172.16.1.1/32    192.168.10.100                         0 65001 i
*=                  192.168.20.100                         0 65001 i
*=                  192.168.10.101                         0 65001 i
*> 172.20.0.0/24    192.168.10.100                         0 65001 i
*> 172.20.1.0/24    192.168.10.101                         0 65001 i
*> 172.20.2.0/24    192.168.20.100                         0 65001 i

Displayed  5 routes and 7 total paths


sudo vtysh -c 'show ip bgp 172.16.1.1/32'

root@router:~# sudo vtysh -c 'show ip bgp 172.16.1.1/32'
BGP routing table entry for 172.16.1.1/32, version 17
Paths: (3 available, best #1, table default)
  Advertised to non peer-group peers:
  192.168.10.100 192.168.10.101 192.168.20.100
  65001
    192.168.10.100 from 192.168.10.100 (192.168.10.100)
      Origin IGP, valid, external, multipath, best (Router ID)
      Last update: Wed Aug 13 23:44:49 2025
  65001
    192.168.20.100 from 192.168.20.100 (192.168.20.100)
      Origin IGP, valid, external, multipath
      Last update: Wed Aug 13 23:44:49 2025
  65001
    192.168.10.101 from 192.168.10.101 (192.168.10.101)
      Origin IGP, valid, external, multipath
      Last update: Wed Aug 13 23:44:49 2025
통신 테스트를 수행해보겠습니다.
# 통신 테스트
LBIP=172.16.1.1
curl -s $LBIP
curl -s $LBIP | grep Hostname
curl -s $LBIP | grep RemoteAddr

# 반복 접속
for i in {1..100};  do curl -s $LBIP | grep Hostname; done | sort | uniq -c | sort -nr
while true; do curl -s $LBIP | egrep 'Hostname|RemoteAddr' ; sleep 0.1; done

# 접속이 잘 된다.
(⎈|HomeLab:N/A) root@k8s-ctr:~# for i in {1..100};  do curl -s $LBIP | grep Hostname; done | sort | uniq -c | sort -nr
     41 Hostname: webpod-697b545f57-wr4tf
     30 Hostname: webpod-697b545f57-bvm82
     29 Hostname: webpod-697b545f57-rtmv9
(⎈|HomeLab:N/A) root@k8s-ctr:~# while true; do curl -s $LBIP | egrep 'Hostname|RemoteAddr' ; sleep 0.1; done
Hostname: webpod-697b545f57-rtmv9
RemoteAddr: 172.20.0.66:57324
Hostname: webpod-697b545f57-bvm82
RemoteAddr: 192.168.10.100:43910
Hostname: webpod-697b545f57-wr4tf
RemoteAddr: 192.168.10.100:45136
Hostname: webpod-697b545f57-wr4tf
RemoteAddr: 192.168.10.100:45144
Hostname: webpod-697b545f57-rtmv9
RemoteAddr: 172.20.0.66:57330
Hostname: webpod-697b545f57-rtmv9
RemoteAddr: 172.20.0.66:57332
앞서 확인해본 External Traffic Policy가 Cluster인 환경에 대해서 어떤 방식으로 동작하는지 추가로 실습해보겠습니다.
# k8s-ctr 에서 replicas=2 로 줄여보자
kubectl scale deployment webpod --replicas 2
kubectl get pod -owide

# 실제 파드는 k8s-ctr, k8s-w0 에 실행 중이다.
(⎈|HomeLab:N/A) root@k8s-ctr:~# kubectl scale deployment webpod --replicas 2
deployment.apps/webpod scaled
(⎈|HomeLab:N/A) root@k8s-ctr:~# kubectl get pod -owide
NAME                      READY   STATUS    RESTARTS   AGE   IP             NODE      NOMINATED NODE   READINESS GATES
curl-pod                  1/1     Running   0          25h   172.20.0.218   k8s-ctr   <none>           <none>
webpod-697b545f57-bvm82   1/1     Running   0          24h   172.20.2.129   k8s-w0    <none>           <none>
webpod-697b545f57-rtmv9   1/1     Running   0          25h   172.20.0.145   k8s-ctr   <none>           <none>

cilium bgp routes

# 파드는 2개이지만 여전히 모든 노드가 BGP로 advertise를 하고 있따.
(⎈|HomeLab:N/A) root@k8s-ctr:~# cilium bgp routes
(Defaulting to `available ipv4 unicast` routes, please see help for more options)

Node      VRouter   Prefix          NextHop   Age      Attrs
k8s-ctr   65001     172.16.1.1/32   0.0.0.0   10m40s   [{Origin: i} {Nexthop: 0.0.0.0}]
          65001     172.20.0.0/24   0.0.0.0   54m55s   [{Origin: i} {Nexthop: 0.0.0.0}]
k8s-w0    65001     172.16.1.1/32   0.0.0.0   10m40s   [{Origin: i} {Nexthop: 0.0.0.0}]
          65001     172.20.2.0/24   0.0.0.0   54m55s   [{Origin: i} {Nexthop: 0.0.0.0}]
k8s-w1    65001     172.16.1.1/32   0.0.0.0   10m40s   [{Origin: i} {Nexthop: 0.0.0.0}]
          65001     172.20.1.0/24   0.0.0.0   54m55s   [{Origin: i} {Nexthop: 0.0.0.0}]

# router 에서 정보 확인 : k8s-w1 노드에 대상 파드가 배치되지 않았지만, 라우팅 경로 설정이 되어 있다.
ip -c route
vtysh -c 'show ip bgp 172.16.1.1/32'

root@router:~# ip -c route
172.16.1.1 nhid 113 proto bgp metric 20
        nexthop via 192.168.10.101 dev eth1 weight 1
        nexthop via 192.168.20.100 dev eth2 weight 1
        nexthop via 192.168.10.100 dev eth1 weight 1

root@router:~# vtysh -c 'show ip bgp 172.16.1.1/32'
BGP routing table entry for 172.16.1.1/32, version 17
Paths: (3 available, best #1, table default)
  Advertised to non peer-group peers:
  192.168.10.100 192.168.10.101 192.168.20.100
  65001
    192.168.10.100 from 192.168.10.100 (192.168.10.100)
      Origin IGP, valid, external, multipath, best (Router ID)
      Last update: Wed Aug 13 23:44:50 2025
  65001
    192.168.20.100 from 192.168.20.100 (192.168.20.100)
      Origin IGP, valid, external, multipath
      Last update: Wed Aug 13 23:44:50 2025
  65001
    192.168.10.101 from 192.168.10.101 (192.168.10.101)
      Origin IGP, valid, external, multipath
      Last update: Wed Aug 13 23:44:50 2025


# 반복 접속
for i in {1..100};  do curl -s $LBIP | grep Hostname; done | sort | uniq -c | sort -nr
while true; do curl -s $LBIP | egrep 'Hostname|RemoteAddr' ; sleep 0.1; done

# 파드 분산은 잘 이뤄지고 있다.
root@router:~# for i in {1..100};  do curl -s $LBIP | grep Hostname; done | sort | uniq -c | sort -nr
     52 Hostname: webpod-697b545f57-rtmv9
     48 Hostname: webpod-697b545f57-bvm82

# 반복 접속 시 파드가 없는 RemoteAddr: 192.168.10.101도 확인됨. 모든 경우에 정확한 RemoteAddr이 확인되지 않음
root@router:~# while true; do curl -s $LBIP | egrep 'Hostname|RemoteAddr' ; sleep 0.1; done
Hostname: webpod-697b545f57-rtmv9
RemoteAddr: 192.168.20.100:48894
Hostname: webpod-697b545f57-bvm82
RemoteAddr: 192.168.10.100:48902
Hostname: webpod-697b545f57-bvm82
RemoteAddr: 192.168.10.100:48908
Hostname: webpod-697b545f57-bvm82
RemoteAddr: 192.168.10.101:48922
Hostname: webpod-697b545f57-bvm82
RemoteAddr: 192.168.10.101:48936
Hostname: webpod-697b545f57-bvm82
RemoteAddr: 192.168.10.101:48940
Hostname: webpod-697b545f57-bvm82
RemoteAddr: 192.168.10.100:48952
Hostname: webpod-697b545f57-bvm82
RemoteAddr: 192.168.10.101:48968
Hostname: webpod-697b545f57-rtmv9
RemoteAddr: 192.168.20.100:58500
Hostname: webpod-697b545f57-rtmv9
RemoteAddr: 192.168.10.101:58510
Hostname: webpod-697b545f57-rtmv9
RemoteAddr: 192.168.20.200:58520
Hostname: webpod-697b545f57-bvm82
RemoteAddr: 192.168.10.101:58536
Hostname: webpod-697b545f57-bvm82
RemoteAddr: 192.168.10.100:58550
...
External Traffic Policy를 Cluster로 설정되면, 모든 노드들이 BGP Advertise를 하기 때문에, 요청이 모든 노드로 분산된 이후에 다시 파드가 위치하는 노드로 전달됩니다. 이 과정에서 SNAT이 발생하고, remoteAddr도 경유한 노드의 IP가 기록됩니다.
이러한 경우 External Traffic Policy를 Local로 설정하면, 파드가 실행된 노드에만 실제로 BGP advertise가 가능하도록 변경됩니다. 그리고 해당 노드에 진입한 트래픽은 해당 노드에 위치한 파드로 전달됩니다.
이로써 불필요한 노드로 트래픽이 경유하지 않게되고, 결과적으로 Client IP가 보존되는 효과가 있습니다.
# k8s-ctr
kubectl patch service webpod -p '{"spec":{"externalTrafficPolicy":"Local"}}'

# router(frr) : 서비스에 대상 파드가 배치된 노드만 BGP 경로에 출력된다.
ip -c route
vtysh -c 'show ip bgp 172.16.1.1/32'

root@router:~# ip -c route
default via 10.0.2.2 dev eth0 proto dhcp src 10.0.2.15 metric 100
10.0.2.0/24 dev eth0 proto kernel scope link src 10.0.2.15 metric 100
10.0.2.2 dev eth0 proto dhcp scope link src 10.0.2.15 metric 100
10.0.2.3 dev eth0 proto dhcp scope link src 10.0.2.15 metric 100
10.10.1.0/24 dev loop1 proto kernel scope link src 10.10.1.200
10.10.2.0/24 dev loop2 proto kernel scope link src 10.10.2.200
172.16.1.1 nhid 125 proto bgp metric 20
        nexthop via 192.168.20.100 dev eth2 weight 1
        nexthop via 192.168.10.100 dev eth1 weight 1
172.20.0.0/24 nhid 108 via 192.168.10.100 dev eth1 proto bgp metric 20
172.20.1.0/24 nhid 106 via 192.168.10.101 dev eth1 proto bgp metric 20
172.20.2.0/24 nhid 107 via 192.168.20.100 dev eth2 proto bgp metric 20
192.168.10.0/24 dev eth1 proto kernel scope link src 192.168.10.200
192.168.20.0/24 dev eth2 proto kernel scope link src 192.168.20.200

root@router:~# vtysh -c 'show ip bgp 172.16.1.1/32'
BGP routing table entry for 172.16.1.1/32, version 21
Paths: (2 available, best #1, table default)
  Advertised to non peer-group peers:
  192.168.10.100 192.168.10.101 192.168.20.100
  65001
    192.168.10.100 from 192.168.10.100 (192.168.10.100)
      Origin IGP, valid, external, multipath, best (Router ID)
      Last update: Thu Aug 14 00:03:42 2025
  65001
    192.168.20.100 from 192.168.20.100 (192.168.20.100)
      Origin IGP, valid, external, multipath
      Last update: Wed Aug 13 23:44:50 2025


# 현재 실습 환경 경우 반복 접속 시 한쪽 노드로 선택되고, 소스IP가 보존됨.
LBIP=172.16.1.1
curl -s $LBIP
for i in {1..100};  do curl -s $LBIP | grep Hostname; done | sort | uniq -c | sort -nr
while true; do curl -s $LBIP | egrep 'Hostname|RemoteAddr' ; sleep 0.1; done

# 한쪽 파드로 몰린다.
root@router:~# for i in {1..100};  do curl -s $LBIP | grep Hostname; done | sort | uniq -c | sort -nr
    100 Hostname: webpod-697b545f57-bvm82

# 리눅스 커널은 기본적으로 L3(목적지 IP 기반) 해시를 사용합니다. 정교한 부하분산을 원하면 L4 해시(IP + 포트)로 설정
# 1 : source IP, dest IP, source port, dest port 기반 hash (more granular)로 변경
sudo sysctl -w net.ipv4.fib_multipath_hash_policy=1
echo "net.ipv4.fib_multipath_hash_policy=1" >> /etc/sysctl.conf

# 재확인: 분산이 고루 된다.
root@router:~# for i in {1..100};  do curl -s $LBIP | grep Hostname; done | sort | uniq -c | sort -nr
     54 Hostname: webpod-697b545f57-bvm82
     46 Hostname: webpod-697b545f57-rtmv9

# 불필요한 노드를 경유하지 않음에 따라 SNAT이 발생하지 않고, remoteAddr도 router의 IP로 보존되는 것을 알 수 있다.
root@router:~# while true; do curl -s $LBIP | egrep 'Hostname|RemoteAddr' ; sleep 0.1; done
Hostname: webpod-697b545f57-rtmv9
RemoteAddr: 192.168.20.200:35666
Hostname: webpod-697b545f57-rtmv9
RemoteAddr: 192.168.20.200:35678
Hostname: webpod-697b545f57-rtmv9
RemoteAddr: 192.168.20.200:35692
Hostname: webpod-697b545f57-bvm82
RemoteAddr: 192.168.20.200:35708
Hostname: webpod-697b545f57-rtmv9
RemoteAddr: 192.168.20.200:35720
Hostname: webpod-697b545f57-rtmv9
RemoteAddr: 192.168.20.200:35732
Hostname: webpod-697b545f57-rtmv9
RemoteAddr: 192.168.20.200:35744
이상 BGP를 통해서 Loadbalancer의 External IP를 Advertise하는 방법을 살펴봤습니다.
마치며
이번 게시물에서는 Cilium에서 BGP Control Plane을 활용하여 PodCIDR이나 External IP를 외부 라우터에 Advertise해 보았습니다.
다음 게시물에서는 Cilium으로 구성된 클러스터 간 서비스를 연동하는 ClusterMesh에 대해서 살펴보겠습니다.
'Cilium' 카테고리의 다른 글
| [9] Cilium - ServiceMesh (0) | 2025.08.23 |
|---|---|
| [8] Cilium - Cluster Mesh (0) | 2025.08.14 |
| [6] Cilium - LoadBalancer IPAM, L2 Announcement (0) | 2025.08.08 |
| [5] Cilium - Encapsulation 모드 (0) | 2025.08.08 |
| [4] Cilium에서 NodeLocalDNS 사용 (0) | 2025.08.02 |


