
| 일 | 월 | 화 | 수 | 목 | 금 | 토 |
|---|---|---|---|---|---|---|
| 1 | 2 | 3 | 4 | 5 | 6 | 7 |
| 8 | 9 | 10 | 11 | 12 | 13 | 14 |
| 15 | 16 | 17 | 18 | 19 | 20 | 21 |
| 22 | 23 | 24 | 25 | 26 | 27 | 28 |
- Timeout
- AutoScaling
- ubuntu
- upgrade
- minIO
- Karpenter
- 업그레이드
- gateway api
- ansible
- KEDA
- Azure
- AKS
- kubernetes
- 묘공단
- 컨테이너
- vscode
- WSL
- aws
- curl
- windows
- go
- ipam
- directpv
- VPA
- Object Storage
- calico
- HPA
- 쿠버네티스
- EKS
- cilium
- Today
- Total
a story
[9] Cilium - ServiceMesh 본문
Service Mesh는 마이크로 서비스 환경에서 분산된 서비스에서 가시성, 연결성 및 보안 요구사항과 같은 다양한 공통 기능을 각 애플리케이션에서 구현하지 않고, 인프라의 일부로 기능을 제공합니다. Istio가 Service Mesh를 제공하는 가장 잘 알려진 제품입니다.
이번 게시물에서는 Cilium ServiceMesh에 대해서 알아보겠습니다.
목차
- 실습 환경 구성
- Cilium ServiceMesh
- Kubernetes Ingress Support
- Gateway API Support
- L7 Aware Traffic Management
1. 실습 환경 구성
실습 환경을 구성하기 위해서 vagrant up을 수행합니다.
mkdir cilium-lab && cd cilium-lab

curl -O https://raw.githubusercontent.com/gasida/vagrant-lab/refs/heads/main/cilium-study/6w/Vagrantfile

vagrant up
실습환경을 구성하면 아래와 같이 3대의 가상머신이 생성됩니다. 컨트롤 플레인과 워커노드로 구성된 쿠버네티스 클러스터와 라우터 한대가 있습니다.
PS C:\Users\chuir\projects\cilium-lab\w6> vagrant status
Current machine states:

k8s-ctr                   running (virtualbox)
k8s-w1                    running (virtualbox)
router                    running (virtualbox)

This environment represents multiple VMs. The VMs are all listed
above with their current state. For more information about a specific
VM, run `vagrant status NAME`.

# vagrant ssh k8s-ctr 로 접속하여 클러스터 확인
(⎈|HomeLab:N/A) root@k8s-ctr:~# kubectl get no
NAME      STATUS   ROLES           AGE   VERSION
k8s-ctr   Ready    control-plane   22h   v1.33.4
k8s-w1    Ready    <none>          22h   v1.33.4

(⎈|HomeLab:N/A) root@k8s-ctr:~# cilium config view | grep ^ipam
ipam                                              cluster-pool
ipam-cilium-node-update-rate                      15s
(⎈|HomeLab:N/A) root@k8s-ctr:~# cilium config view | grep ^routing
routing-mode                                      native
2. Cilium ServiceMesh
Service Mesh는 마이크로 서비스 환경에서 분산된 서비스에서 가시성, 연결성 및 보안 요구사항과 같은 다양한 공통 기능을 각 애플리케이션에서 구현하지 않고, 인프라의 일부로 기능을 제공하는 것을 목적으로 합니다.
아래는 Cilium Service Mesh에서 소개하고 있는 Service Mesh의 기능입니다.
참고: https://docs.cilium.io/en/stable/network/servicemesh/
- Resilient Connectivity: Service to service communication must be possible across boundaries such as clouds, clusters, and premises. Communication must be resilient and fault tolerant.
- L7 Traffic Management: Load balancing, rate limiting, and resiliency must be L7-aware (HTTP, REST, gRPC, WebSocket, …).
- Identity-based Security: Relying on network identifiers to achieve security is no longer sufficient, both the sending and receiving services must be able to authenticate each other based on identities instead of a network identifier.
- Observability & Tracing: Observability in the form of tracing and metrics is critical to understanding, monitoring, and troubleshooting application stability, performance, and availability.
- Transparency: The functionality must be available to applications in a transparent manner, i.e. without requiring to change application code.
Istio는 Service Mesh에서 가장 잘 알려진 제품으로, Istio문서를 살펴보면 주요 작업으로 Traffic Management, Security, Observability, Policy Enforcement, Extensibility 와 같은 범주로 설명하고 있어, 어느 정도의 유사성이 있기는 합니다. Istio에서 제공하는 모든 기능을 대체하는 것은 아니며, Traffic Management와 Observability 와 같은 기능을 제한적으로 제공하고, 일부 기능은 아직 beta 수준으로 보입니다.
참고: https://istio.io/latest/docs/tasks/
전통적인 Envoy Sidecar 기반의 ServiceMesh와 Cilium Service Mesh는 아래와 같은 차이가 있습니다.
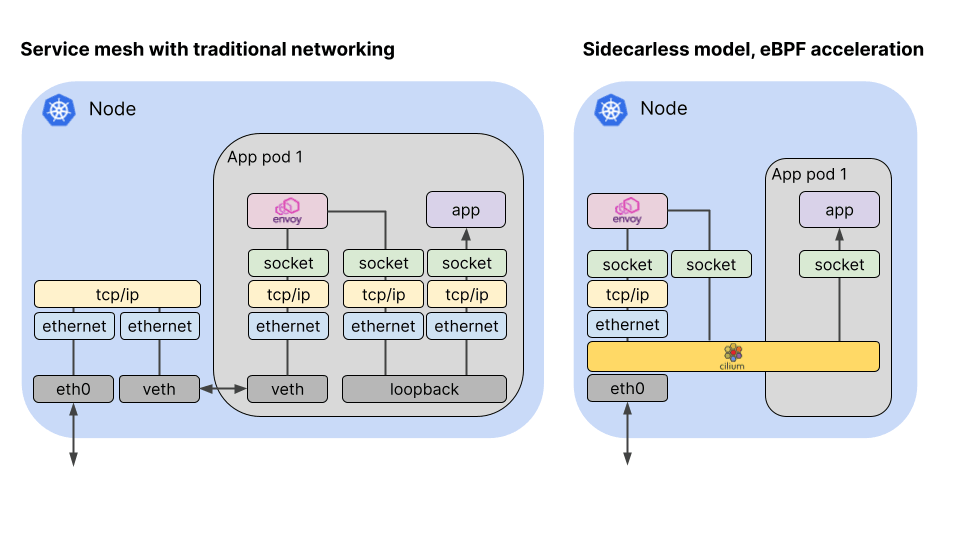
출처: https://cilium.io/blog/2021/12/01/cilium-service-mesh-beta/
Envoy Sidecar 기반의 Service Mesh는 Iptables를 통해서 파드의 Inbound 트래픽을 envoy에서 처리하게되고, 또한 Outbound 트래픽도 envoy를 거치도록 하여, 프록시를 통한 Service Mesh의 기능을 구현합니다.
Cilium Service Mesh는 기존 Service Mesh 구현을 효율화하기 위해서, Sidecar 대신 envoy 데몬 셋을 사용하고, 복잡한 연결을 eBPF 기반의 Cilium으로 구현합니다. 이때 L3/4 기반의 통신은 Cilium에서 처리하고, L7 수준의 통신은 envoy를 경유하도록 합니다.
3. Kubernetes Ingress Support
먼저 ServiceMesh의 Traffic Management 관점에서 쿠버네티스 Ingress 지원부터 설명을 이어가겠습니다.
Cilium의 ServiceMesh에서는 쿠버네티스의 Ingress를 지원하고 있으며 이를 사용하기 위해서는 Cilium 설치 과정에서 nodePort.enabled=true나 kubeProxyReplacement=true를 설정하여야 합니다. 추가로l7Proxy=true 가 설정되어야 하는데 기본값이 true 입니다.
# cilium 설치 시 아래 파라미터 적용되어 있음
## --set ingressController.enabled=true
## --set ingressController.loadbalancerMode=shared
## --set loadBalancer.l7.backend=envoy \

# 옵션 확인
(⎈|HomeLab:N/A) root@k8s-ctr:~# cilium config view | grep -E 'kube-proxy-replacement|l7'
enable-l7-proxy                                   true
kube-proxy-replacement                            true
kube-proxy-replacement-healthz-bind-address
loadbalancer-l7                                   envoy
loadbalancer-l7-algorithm                         round_robin
loadbalancer-l7-ports
일반적으로 Ingress는 Ingress Controller라는 구현체가 있어야 합니다. 다만 Cilum의 Ingress 또는 Gateway API 컨트롤러는 LoadBalancer, NodePort 서비스 혹은 Host Network으로 노출이 되지만, 트래픽이 서비스 포트로 도착하면 eBPF 프로그램이 트래픽을 가로채고 Tproxy 커널 기능을 사용해 Envoy에게 전달하도록 구현이 되어 있습니다. 이때 Envoy는 실제 Client IP를 x-forwarded-for로 처리하여 전달합니다.
[Note]
Tproxy(Transparent proxy): 일반적 프록시는 클라이언트가 프록시 서버를 명시적으로 지정해야 합니다. 반면 Transparent proxy는 클라이언트가 프록시를 인식하지 못한 채 트래픽이 프록시를 거지게 하므로 이를 Transparent라고 하는게 아닌가 생각됩니다.
이를 위해서 Non-local socket을 처리 해야하는데, 로컬에 존재하지 않은 IP주소로 소켓을 바인딩하고 트래픽을 처리할 수 있습니다(일반적으로는 로컬 IP 주소가 아닌 곳으로는 소켓을 바인딩 할 수 없음).
Cilum이 구현한 Ingress Controller의 컨텍스트에서 보면, 노드에 존재하지 않은 Ingress IP를 Tproxy를 통해서 처리하고, Envoy로 전달하도록 구현되어 있는 것으로 이해할 수 있습니다.
리눅스 커널 수준의 Tproxy에 대한 설명은 아래 문서를 참고 부탁드립니다.
참고: https://docs.kernel.org/networking/tproxy.html
이 경우 트래픽 흐름은 아래 그림에서 TC@Enpoint 에서 L7 Proxy인 Envoy로 흘러가고, 다시 Pod로 향하게 됩니다.

출처: https://docs.cilium.io/en/stable/network/ebpf/lifeofapacket/#ingress-to-endpoint
실습을 통해서 Ingress 구성 정보를 확인해보겠습니다.
# ingress 에 예약된 내부 IP 확인 : node(cilium-envoy) 별로 존재
kubectl exec -it -n kube-system ds/cilium -- cilium ip list | grep ingress

(⎈|HomeLab:N/A) root@k8s-ctr:~# kubectl exec -it -n kube-system ds/cilium -- cilium ip list | grep ingress
172.20.0.4/32       reserved:ingress
172.20.1.78/32      reserved:ingress

# cilium-envoy 확인
kubectl get pod -n kube-system -l k8s-app=cilium-envoy -owide

(⎈|HomeLab:N/A) root@k8s-ctr:~# kubectl get pod -n kube-system -l k8s-app=cilium-envoy -owide
NAME                 READY   STATUS    RESTARTS      AGE   IP               NODE      NOMINATED NODE   READINESS GATES
cilium-envoy-fbdhj   1/1     Running   0             24h   192.168.10.100   k8s-ctr   <none>           <none>
cilium-envoy-pjwhb   1/1     Running   1 (20h ago)   24h   192.168.10.101   k8s-w1    <none>           <none>


kubectl describe pod -n kube-system -l k8s-app=cilium-envoy
...
Containers:
  cilium-envoy:
    Container ID:  containerd://df0215f93e3193eaf81281e40cbdaa6ca1136c2ee3268fe3bcb60875f34bdbbf
    Image:         quay.io/cilium/cilium-envoy:v1.34.4-1754895458-68cffdfa568b6b226d70a7ef81fc65dda3b890bf@sha256:247e908700012f7ef56f75908f8c965215c26a27762f296068645eb55450bda2
    Image ID:      quay.io/cilium/cilium-envoy@sha256:247e908700012f7ef56f75908f8c965215c26a27762f296068645eb55450bda2
    Port:          9964/TCP
    Host Port:     9964/TCP
    Command:
      /usr/bin/cilium-envoy-starter
    Args:
      --
      -c /var/run/cilium/envoy/bootstrap-config.json
      --base-id 0
    ...
    Mounts:
      /sys/fs/bpf from bpf-maps (rw)
      /var/run/cilium/envoy/ from envoy-config (ro)
      /var/run/cilium/envoy/artifacts from envoy-artifacts (ro)
      /var/run/cilium/envoy/sockets from envoy-sockets (rw)
      /var/run/secrets/kubernetes.io/serviceaccount from kube-api-access-6gsbl (ro)
...
Volumes:
  envoy-sockets: # cilim-agent와 socket 통신을 하기 위해서 hostPath로 socket을 마운트
    Type:          HostPath (bare host directory volume)
    Path:          /var/run/cilium/envoy/sockets
    HostPathType:  DirectoryOrCreate
  envoy-artifacts:
    Type:          HostPath (bare host directory volume)
    Path:          /var/run/cilium/envoy/artifacts
    HostPathType:  DirectoryOrCreate
  envoy-config:
    Type:      ConfigMap (a volume populated by a ConfigMap)
    Name:      cilium-envoy-config
    Optional:  false
  bpf-maps:
    Type:          HostPath (bare host directory volume)
    Path:          /sys/fs/bpf
    HostPathType:  DirectoryOrCreate

# hostpath에 위치하는 실제 socket
ls -al /var/run/cilium/envoy/sockets
total 0
drwxr-xr-x 3 root root 120 Aug 16 17:47 .
drwxr-xr-x 4 root root  80 Aug 16 16:16 ..
srw-rw---- 1 root 1337   0 Aug 16 17:47 access_log.sock
srwxr-xr-x 1 root root   0 Aug 16 16:16 admin.sock
drwxr-xr-x 3 root root  60 Aug 16 16:16 envoy
srw-rw---- 1 root 1337   0 Aug 16 17:47 xds.sock


# envoy configmap 설정 내용 확인 -> envoy 설정
kubectl -n kube-system get configmap cilium-envoy-config
kubectl -n kube-system get configmap cilium-envoy-config -o json \
  | jq -r '.data["bootstrap-config.json"]' \
  | jq .
...
{
  "admin": {
    "address": {
      "pipe": {
        "path": "/var/run/cilium/envoy/sockets/admin.sock"
      }
    }
  },
...
    "listeners": [
      {
        "address": {
          "socketAddress": {
            "address": "0.0.0.0",
            "portValue": 9964
...


# envoy는 headless 서비스로 구성됨
kubectl get svc,ep -n kube-system cilium-envoy

(⎈|HomeLab:N/A) root@k8s-ctr:~# kubectl get svc,ep -n kube-system cilium-envoy
Warning: v1 Endpoints is deprecated in v1.33+; use discovery.k8s.io/v1 EndpointSlice
NAME                   TYPE        CLUSTER-IP   EXTERNAL-IP   PORT(S)    AGE
service/cilium-envoy   ClusterIP   None         <none>        9964/TCP   24h

NAME                     ENDPOINTS                                 AGE
endpoints/cilium-envoy   192.168.10.100:9964,192.168.10.101:9964   24h


# ingress 서비스가 생성되어 있으며, 현재는 EXTERNAL-IP가 pending으로 확인됨
(⎈|HomeLab:N/A) root@k8s-ctr:~# kubectl get svc,ep -n kube-system cilium-ingress
Warning: v1 Endpoints is deprecated in v1.33+; use discovery.k8s.io/v1 EndpointSlice
NAME                     TYPE           CLUSTER-IP    EXTERNAL-IP   PORT(S)                      AGE
service/cilium-ingress   LoadBalancer   10.96.71.89   <pending>     80:31646/TCP,443:30837/TCP   24h

NAME                       ENDPOINTS              AGE
endpoints/cilium-ingress   192.192.192.192:9999   24h
# 실제로 Loadbalancer로 호출되면 모든 노드에서 eBPF로 처리하므로, 실제 존재하는 endpoint는 아님
# 내부적으로 사용되는 논리 IP
이제 LoadBalancer IPAM을 설정하여 Ingress용 LoadBalancer IP를 가져오도록 설정하겠습니다.
# 현재 L2 Announcement 활성화 상태
cilium config view | grep l2

(⎈|HomeLab:N/A) root@k8s-ctr:~# cilium config view | grep l2
enable-l2-announcements                           true
enable-l2-neigh-discovery                         false

# 충돌나지 않는지 대역으로 IPPool 생성
cat << EOF | kubectl apply -f -
apiVersion: "cilium.io/v2"
kind: CiliumLoadBalancerIPPool
metadata:
  name: "cilium-lb-ippool"
spec:
  blocks:
  - start: "192.168.10.211"
    stop:  "192.168.10.215"
EOF

# 확인
kubectl get ippool
kubectl get ippools -o jsonpath='{.items[*].status.conditions[?(@.type!="cilium.io/PoolConflict")]}' | jq

(⎈|HomeLab:N/A) root@k8s-ctr:~# kubectl get ippool
NAME               DISABLED   CONFLICTING   IPS AVAILABLE   AGE
cilium-lb-ippool   false      False         4               6s
(⎈|HomeLab:N/A) root@k8s-ctr:~# kubectl get ippools -o jsonpath='{.items[*].status.conditions[?(@.type!="cilium.io/PoolConflict")]}' | jq
{
  "lastTransitionTime": "2025-08-21T14:37:41Z",
  "message": "5",
  "observedGeneration": 1,
  "reason": "noreason",
  "status": "Unknown",
  "type": "cilium.io/IPsTotal"
}
{
  "lastTransitionTime": "2025-08-21T14:37:41Z",
  "message": "4",
  "observedGeneration": 1,
  "reason": "noreason",
  "status": "Unknown",
  "type": "cilium.io/IPsAvailable"
}
{
  "lastTransitionTime": "2025-08-21T14:37:42Z",
  "message": "1",
  "observedGeneration": 1,
  "reason": "noreason",
  "status": "Unknown",
  "type": "cilium.io/IPsUsed"
}

# L2 Announcement 정책 설정
cat << EOF | kubectl apply -f -
apiVersion: "cilium.io/v2alpha1"
kind: CiliumL2AnnouncementPolicy
metadata:
  name: policy1
spec:
  interfaces:
  - eth1
  externalIPs: true
  loadBalancerIPs: true
EOF

# 현재 리더 역할 노드 확인
kubectl -n kube-system get lease | grep "cilium-l2announce"
kubectl -n kube-system get lease/cilium-l2announce-kube-system-cilium-ingress -o yaml | yq

(⎈|HomeLab:N/A) root@k8s-ctr:~# kubectl -n kube-system get lease | grep "cilium-l2announce"
cilium-l2announce-kube-system-cilium-ingress   k8s-w1                                                                      10s
(⎈|HomeLab:N/A) root@k8s-ctr:~# kubectl -n kube-system get lease/cilium-l2announce-kube-system-cilium-ingress -o yaml | yq
{
  "apiVersion": "coordination.k8s.io/v1",
  "kind": "Lease",
  "metadata": {
    "creationTimestamp": "2025-08-21T14:38:36Z",
    "name": "cilium-l2announce-kube-system-cilium-ingress",
    "namespace": "kube-system",
    "resourceVersion": "29907",
    "uid": "7236a912-14d9-4aab-b37c-431faf4fe18b"
  },
  "spec": {
    "acquireTime": "2025-08-21T14:38:36.718001Z",
    "holderIdentity": "k8s-w1",
    "leaseDurationSeconds": 15,
    "leaseTransitions": 0,
    "renewTime": "2025-08-21T14:38:51.105438Z"
  }
}

# K8S 클러스터 내부 LB EX-IP로 호출 가능
(⎈|HomeLab:N/A) root@k8s-ctr:~#  kubectl get svc,ep -n kube-system cilium-ingress
Warning: v1 Endpoints is deprecated in v1.33+; use discovery.k8s.io/v1 EndpointSlice
NAME                     TYPE           CLUSTER-IP    EXTERNAL-IP      PORT(S)                      AGE
service/cilium-ingress   LoadBalancer   10.96.71.89   192.168.10.211   80:31646/TCP,443:30837/TCP   24h

NAME                       ENDPOINTS              AGE
endpoints/cilium-ingress   192.192.192.192:9999   24h

LBIP=$(kubectl get svc -n kube-system cilium-ingress -o jsonpath='{.status.loadBalancer.ingress[0].ip}')
echo $LBIP
arping -i eth1 $LBIP -c 2

(⎈|HomeLab:N/A) root@k8s-ctr:~# LBIP=$(kubectl get svc -n kube-system cilium-ingress -o jsonpath='{.status.loadBalancer.ingress[0].ip}')
echo $LBIP
arping -i eth1 $LBIP -c 2
192.168.10.211
ARPING 192.168.10.211
60 bytes from 08:00:27:d8:5c:fd (192.168.10.211): index=0 time=4.397 msec
60 bytes from 08:00:27:d8:5c:fd (192.168.10.211): index=1 time=3.683 msec

--- 192.168.10.211 statistics ---
2 packets transmitted, 2 packets received,   0% unanswered (0 extra)
rtt min/avg/max/std-dev = 3.683/4.040/4.397/0.357 ms

# k8s 외부 노드(router)에서 LB EX-IP로 호출 가능 확인
for i in k8s-w1 router ; do echo ">> node : $i <<"; sshpass -p 'vagrant' ssh -o StrictHostKeyChecking=no vagrant@$i hostname; echo; done

sshpass -p 'vagrant' ssh vagrant@router sudo arping -i eth1 $LBIP -c 2

(⎈|HomeLab:N/A) root@k8s-ctr:~# sshpass -p 'vagrant' ssh vagrant@router sudo arping -i eth1 $LBIP -c 2
ARPING 192.168.10.211
60 bytes from 08:00:27:d8:5c:fd (192.168.10.211): index=0 time=20.001 usec
60 bytes from 08:00:27:d8:5c:fd (192.168.10.211): index=1 time=16.367 usec

--- 192.168.10.211 statistics ---
2 packets transmitted, 2 packets received,   0% unanswered (0 extra)
rtt min/avg/max/std-dev = 0.016/0.018/0.020/0.002 ms
LoadBalancer IPAM을 구성하여 LoadBalancer 의 IP가 정상적으로 통신되는 것으로 확인됩니다.
이제 Ingress를 직접 테스트 해보기 위해서 샘플 예제를 배포해보겠습니다.
# Deploy the Demo App : release-1.11는 ARM CPU 에서 실패함 1.26 버전을 높여서 샘플 배포
kubectl apply -f https://raw.githubusercontent.com/istio/istio/release-1.26/samples/bookinfo/platform/kube/bookinfo.yaml

# istio 와 다르게 사이드카 컨테이너가 없다 1/1, NodePort와 LoadBalancer 서비스 없다.
kubectl get pod,svc,ep

(⎈|HomeLab:N/A) root@k8s-ctr:~# kubectl get pod,svc,ep
Warning: v1 Endpoints is deprecated in v1.33+; use discovery.k8s.io/v1 EndpointSlice
NAME                                  READY   STATUS    RESTARTS   AGE
pod/details-v1-766844796b-fl9tx       1/1     Running   0          3m36s
pod/productpage-v1-54bb874995-sxx28   1/1     Running   0          3m34s
pod/ratings-v1-5dc79b6bcd-lvzfv       1/1     Running   0          3m36s
pod/reviews-v1-598b896c9d-kv66w       1/1     Running   0          3m35s
pod/reviews-v2-556d6457d-w98v8        1/1     Running   0          3m35s
pod/reviews-v3-564544b4d6-h2g2d       1/1     Running   0          3m35s

NAME                  TYPE        CLUSTER-IP     EXTERNAL-IP   PORT(S)    AGE
service/details       ClusterIP   10.96.177.64   <none>        9080/TCP   3m37s
service/kubernetes    ClusterIP   10.96.0.1      <none>        443/TCP    24h
service/productpage   ClusterIP   10.96.247.93   <none>        9080/TCP   3m35s
service/ratings       ClusterIP   10.96.207.66   <none>        9080/TCP   3m36s
service/reviews       ClusterIP   10.96.97.81    <none>        9080/TCP   3m36s

NAME                    ENDPOINTS                                              AGE
endpoints/details       172.20.1.182:9080                                      3m36s
endpoints/kubernetes    192.168.10.100:6443                                    24h
endpoints/productpage   172.20.1.1:9080                                        3m35s
endpoints/ratings       172.20.1.251:9080                                      3m36s
endpoints/reviews       172.20.1.218:9080,172.20.1.227:9080,172.20.1.48:9080   3m36s

# Ingress Class 생성 확인
kubectl get ingressclasses.networking.k8s.io

(⎈|HomeLab:N/A) root@k8s-ctr:~# kubectl get ingressclasses.networking.k8s.io
NAME     CONTROLLER                     PARAMETERS   AGE
cilium   cilium.io/ingress-controller   <none>       24h


# Ingress 생성
cat << EOF | kubectl apply -f -
apiVersion: networking.k8s.io/v1
kind: Ingress
metadata:
  name: basic-ingress
  namespace: default
spec:
  ingressClassName: cilium # IngressClassName을 맞춰준다.
  rules:
  - http:
      paths:
      - backend:
          service:
            name: details
            port:
              number: 9080
        path: /details
        pathType: Prefix
      - backend:
          service:
            name: productpage
            port:
              number: 9080
        path: /
        pathType: Prefix
EOF

# Adress 는 cilium-ingress LoadBalancer 의 EXTERNAL-IP
kubectl get svc -n kube-system cilium-ingress
kubectl get ingress
kubectl describe ingress basic-ingress

(⎈|HomeLab:N/A) root@k8s-ctr:~# kubectl get svc -n kube-system cilium-ingress
NAME             TYPE           CLUSTER-IP    EXTERNAL-IP      PORT(S)                      AGE
cilium-ingress   LoadBalancer   10.96.71.89   192.168.10.211   80:31646/TCP,443:30837/TCP   24h
(⎈|HomeLab:N/A) root@k8s-ctr:~# kubectl get ingress
NAME            CLASS    HOSTS   ADDRESS          PORTS   AGE
basic-ingress   cilium   *       192.168.10.211   80      112s

(⎈|HomeLab:N/A) root@k8s-ctr:~# kubectl describe ingress basic-ingress
Name:             basic-ingress
Labels:           <none>
Namespace:        default
Address:          192.168.10.211
Ingress Class:    cilium
Default backend:  <default>
Rules:
  Host        Path  Backends
  ----        ----  --------
  *
              /details   details:9080 (172.20.1.182:9080)
              /          productpage:9080 (172.20.1.1:9080)
Annotations:  <none>
Events:       <none>

# 호출 확인
LBIP=$(kubectl get svc -n kube-system cilium-ingress -o jsonpath='{.status.loadBalancer.ingress[0].ip}')
echo $LBIP
curl -so /dev/null -w "%{http_code}\n" http://$LBIP/
curl -so /dev/null -w "%{http_code}\n" http://$LBIP/details/1
curl -so /dev/null -w "%{http_code}\n" http://$LBIP/ratings

(⎈|HomeLab:N/A) root@k8s-ctr:~# curl -so /dev/null -w "%{http_code}\n" http://$LBIP/
200
(⎈|HomeLab:N/A) root@k8s-ctr:~# curl -so /dev/null -w "%{http_code}\n" http://$LBIP/details/1
200
(⎈|HomeLab:N/A) root@k8s-ctr:~# curl -so /dev/null -w "%{http_code}\n" http://$LBIP/ratings # 현재 구성되지 않은 path임
404

# 모니터링
cilium hubble port-forward&
hubble observe -f -t l7
or
hubble observe -f --identity ingress
...

(⎈|HomeLab:N/A) root@k8s-ctr:~# hubble observe -f -t l7
Aug 21 15:09:36.465: 192.168.10.200:50646 (ingress) -> default/productpage-v1-54bb874995-sxx28:9080 (ID:6397) http-request FORWARDED (HTTP/1.1 GET http://192.168.10.211/)
Aug 21 15:09:36.487: 192.168.10.200:50646 (ingress) <- default/productpage-v1-54bb874995-sxx28:9080 (ID:6397) http-response FORWARDED (HTTP/1.1 200 32ms (GET http://192.168.10.211/))
Aug 21 15:09:42.087: 192.168.10.200:47782 (ingress) -> default/details-v1-766844796b-fl9tx:9080 (ID:39514) http-request FORWARDED (HTTP/1.1 GET http://192.168.10.211/details/1)
Aug 21 15:09:42.102: 192.168.10.200:47782 (ingress) <- default/details-v1-766844796b-fl9tx:9080 (ID:39514) http-response FORWARDED (HTTP/1.1 200 17ms (GET http://192.168.10.211/details/1))
Aug 21 15:09:49.591: 192.168.10.200:56376 (ingress) -> default/productpage-v1-54bb874995-sxx28:9080 (ID:6397) http-request FORWARDED (HTTP/1.1 GET http://192.168.10.211/ratings)
Aug 21 15:09:49.602: 192.168.10.200:56376 (ingress) <- default/productpage-v1-54bb874995-sxx28:9080 (ID:6397) http-response FORWARDED (HTTP/1.1 404 18ms (GET http://192.168.10.211/ratings))


# router에서 호출
LBIP=192.168.10.211
curl -so /dev/null -w "%{http_code}\n" http://$LBIP/
curl -so /dev/null -w "%{http_code}\n" http://$LBIP/details/1
curl -so /dev/null -w "%{http_code}\n" http://$LBIP/ratings
curl -s http://$LBIP/details/1 -v

root@router:~# curl -s http://$LBIP/details/1 -v
*   Trying 192.168.10.211:80...
* Connected to 192.168.10.211 (192.168.10.211) port 80
> GET /details/1 HTTP/1.1
> Host: 192.168.10.211
> User-Agent: curl/8.5.0
> Accept: */*
>
< HTTP/1.1 200 OK
< content-type: application/json
< server: envoy  # envoy에서 응답을 보내주는 것 처럼 보인다.
< date: Thu, 21 Aug 2025 15:12:30 GMT
< content-length: 178
< x-envoy-upstream-service-time: 14
<
* Connection #0 to host 192.168.10.211 left intact
{"id":1,"author":"William Shakespeare","year":1595,"type":"paperback","pages":200,"publisher":"PublisherA","language":"English","ISBN-10":"1234567890","ISBN-13":"123-1234567890"}
Cilium의 Ingress에는 두 가지 Loadbalancer 모드가 있습니다.
dedicated: The Ingress controller will create a dedicated loadbalancer for the Ingress.shared: The Ingress controller will use a shared loadbalancer for all Ingress resources.
실습 환경은 shared 모드로 구성이 되어 있으며, 이 경우 생성되는 Ingress 들은 모두 ingress controller용 서비스 IP를 사용하게 됩니다.
(⎈|HomeLab:N/A) root@k8s-ctr:~# cilium config view |grep shared
ingress-default-lb-mode                           shared
ingress-hostnetwork-shared-listener-port          8080
ingress-shared-lb-service-name                    cilium-ingress

(⎈|HomeLab:N/A) root@k8s-ctr:~# kubectl get svc cilium-ingress -n kube-system
NAME             TYPE           CLUSTER-IP    EXTERNAL-IP      PORT(S)                      AGE
cilium-ingress   LoadBalancer   10.96.71.89   192.168.10.211   80:31646/TCP,443:30837/TCP   47h

(⎈|HomeLab:N/A) root@k8s-ctr:~# kubectl get ing
NAME            CLASS    HOSTS   ADDRESS          PORTS   AGE
basic-ingress   cilium   *       192.168.10.211   80      22h
Cilium에서 Loadbalancer 모드 자체를 변경할 수 도 있으며, 혹은 리소스에서 어노테이션으로 직접 지정할 수도 있습니다.
shared 모드에서 추가 Ingress를 생성해보고, dedicated 모드를 명시한 Ingress도 추가해보겠습니다.
# 추가 Ingriess 생성
cat << EOF | kubectl apply -f -
apiVersion: networking.k8s.io/v1
kind: Ingress
metadata:
  name: basic-ingress2
  namespace: default
spec:
  ingressClassName: cilium
  rules:
  - http:
      paths:
      - backend:
          service:
            name: webpod
            port:
              number: 80
        path: /
        pathType: Prefix
EOF

# dedicated 모드로 생성
cat << EOF | kubectl apply -f -
apiVersion: networking.k8s.io/v1
kind: Ingress
metadata:
  name: webpod-ingress
  namespace: default
  annotations:
    ingress.cilium.io/loadbalancer-mode: dedicated
spec:
  ingressClassName: cilium
  rules:
  - http:
      paths:
      - backend:
          service:
            name: webpod
            port:
              number: 80
        path: /
        pathType: Prefix
EOF

# 확인
kubectl get svc -A |grep LoadBalancer
kubectl get ingress

# 논리적인 구현체가 생성됨
(⎈|HomeLab:N/A) root@k8s-ctr:~# kubectl get svc -A |grep LoadBalancer
default       cilium-ingress-webpod-ingress   LoadBalancer   10.96.188.161   192.168.10.212   80:32576/TCP,443:30413/TCP   42s
kube-system   cilium-ingress                  LoadBalancer   10.96.71.89     192.168.10.211   80:31646/TCP,443:30837/TCP   47h

(⎈|HomeLab:N/A) root@k8s-ctr:~# kubectl get ing
NAME             CLASS    HOSTS   ADDRESS          PORTS   AGE
basic-ingress    cilium   *       192.168.10.211   80      22h # shared 모드
basic-ingress2   cilium   *       192.168.10.211   80      9s # shared 모드
webpod-ingress   cilium   *       192.168.10.212   80      4s # dedicated 모드


kubectl get svc,ep cilium-ingress-webpod-ingress

(⎈|HomeLab:N/A) root@k8s-ctr:~# kubectl get svc,ep cilium-ingress-webpod-ingress
Warning: v1 Endpoints is deprecated in v1.33+; use discovery.k8s.io/v1 EndpointSlice
NAME                                    TYPE           CLUSTER-IP      EXTERNAL-IP      PORT(S)                      AGE
service/cilium-ingress-webpod-ingress   LoadBalancer   10.96.188.161   192.168.10.212   80:32576/TCP,443:30413/TCP   117s

NAME                                      ENDPOINTS              AGE
endpoints/cilium-ingress-webpod-ingress   192.192.192.192:9999   116s


# LB EX-IP에 대한 L2 Announcement 의 Leader 노드 확인
kubectl get lease -n kube-system | grep ingress

(⎈|HomeLab:N/A) root@k8s-ctr:~# kubectl get lease -n kube-system | grep ingress
cilium-l2announce-default-cilium-ingress-webpod-ingress   k8s-w1                                                                      2m15s
cilium-l2announce-kube-system-cilium-ingress              k8s-ctr                                                                     22h
Cilium Ingress에서 활용 가능한 어노테이션은 아래를 참고하실 수 있습니다.
https://docs.cilium.io/en/stable/network/servicemesh/ingress/#supported-ingress-annotations
참고로 Cilium Ingress Controller와 Cilium Gateway API Controller는 동시에 사용이 불가합니다. 이후 실습을 진행하기 전에 생성된 Ingress를 모두 정리하겠습니다.
kubectl delete ingress basic-ingress basic-ingress2 webpod-ingress
4. Gateway API Support
Ingress가 가지는 아래와 같은 한계점을 극복하기 위해서 Gateway API를 사용할 수 있습니다.
- 다양한 프로토콜을 지원 부족: Ingress 리소스는 HTTP, HTTPS와 같은 L7 트래픽에 최적화 되어있고, gRPC 및 TCP, UDP와 같은 비 L7 프로토콜에 대한 라우팅은 제공되지 않음.
- 다양한 구현체별 표준화되지 않은 고급 기능: Ingress에서는 각 구현체별로 제공하는 기능에 차이가 있고 각 제품별 표준화된 기능을 제공하기 어려움. 이로 인해 Ingress의 고급 기능(인증, 속도 제한 정책, 고급 트래픽 관리 등)은 각 제품 별 사용자 정의 어노테이션을 통해서 구현함. 이로 인해서 점차 어노테이션이 복잡해지고 표준화가 어려워지며, 또한 한 구현체에서 다른 구현체로서의 이식성에 한계가 존재함.
- 역할 분리가 어려운 구조: Ingress 리소스는 네트워크 설정, 인증, 인증서 등 중요한 인프라 설정까지도 개발자가 Ingress 안에서 작성해야 하고, 기반 인프라로 제공되는 Ingress Controller에서 제공하는 기능을 파악해 Ingress에서 어노테이션으로 처리해야 하는 부담이 있음.
Cilium에서도 Gateway API를 지원합니다.
참고: https://docs.cilium.io/en/stable/network/servicemesh/gateway-api/gateway-api/
Cilium에서는 앞선 Ingress 지원와 동일하게 nodePort.enabled=true나 kubeProxyReplacement=true를 설정하여야 하며, l7Proxy=true 가 설정되어야 합니다.
다만 Gateway API에서 사용되는 CRD가 설치되어 있지 않아 이를 별도로 설치를 진행해야 합니다.
# CRD 설치
kubectl apply -f https://raw.githubusercontent.com/kubernetes-sigs/gateway-api/v1.2.0/config/crd/standard/gateway.networking.k8s.io_gatewayclasses.yaml
kubectl apply -f https://raw.githubusercontent.com/kubernetes-sigs/gateway-api/v1.2.0/config/crd/standard/gateway.networking.k8s.io_gateways.yaml
kubectl apply -f https://raw.githubusercontent.com/kubernetes-sigs/gateway-api/v1.2.0/config/crd/standard/gateway.networking.k8s.io_httproutes.yaml
kubectl apply -f https://raw.githubusercontent.com/kubernetes-sigs/gateway-api/v1.2.0/config/crd/standard/gateway.networking.k8s.io_referencegrants.yaml
kubectl apply -f https://raw.githubusercontent.com/kubernetes-sigs/gateway-api/v1.2.0/config/crd/standard/gateway.networking.k8s.io_grpcroutes.yaml
kubectl apply -f https://raw.githubusercontent.com/kubernetes-sigs/gateway-api/v1.2.0/config/crd/experimental/gateway.networking.k8s.io_tlsroutes.yaml

# 확인
kubectl get crd | grep gateway.networking.k8s.io

(⎈|HomeLab:N/A) root@k8s-ctr:~# kubectl get crd | grep gateway.networking.k8s.io
gatewayclasses.gateway.networking.k8s.io     2025-08-22T15:22:43Z
gateways.gateway.networking.k8s.io           2025-08-22T15:22:45Z
grpcroutes.gateway.networking.k8s.io         2025-08-22T15:22:50Z
httproutes.gateway.networking.k8s.io         2025-08-22T15:22:47Z
referencegrants.gateway.networking.k8s.io    2025-08-22T15:22:49Z
tlsroutes.gateway.networking.k8s.io          2025-08-22T15:22:52Z
실습을 이어 나가기 위해서 이전 실습에서 사용한 Ingress Controller를 비활성화하고, Gateway API를 활성화 하겠습니다.
# Gateway API 활성화
helm upgrade cilium cilium/cilium --version 1.18.1 --namespace kube-system --reuse-values \
--set ingressController.enabled=false --set gatewayAPI.enabled=true

# Gateway API 활성화 이후 반영을 위해서 cilium-operator, cilium-agent 재시작
kubectl -n kube-system rollout restart deployment/cilium-operator
kubectl -n kube-system rollout restart ds/cilium

# 설정 확인
cilium config view | grep gateway-api

(⎈|HomeLab:N/A) root@k8s-ctr:~# cilium config view | grep gateway-api
enable-gateway-api                                true
enable-gateway-api-alpn                           false
enable-gateway-api-app-protocol                   false
enable-gateway-api-proxy-protocol                 false
enable-gateway-api-secrets-sync                   true
gateway-api-hostnetwork-enabled                   false
gateway-api-hostnetwork-nodelabelselector
gateway-api-secrets-namespace                     cilium-secrets
gateway-api-service-externaltrafficpolicy         Cluster
gateway-api-xff-num-trusted-hops                  0

# cilium-ingress 제거 확인 ->  cilium-ingress 사라짐
kubectl get svc,pod -n kube-system

(⎈|HomeLab:N/A) root@k8s-ctr:~# kubectl get svc,pod -n kube-system
NAME                     TYPE        CLUSTER-IP     EXTERNAL-IP   PORT(S)                  AGE
service/cilium-envoy     ClusterIP   None           <none>        9964/TCP                 2d1h
service/hubble-metrics   ClusterIP   None           <none>        9965/TCP                 2d1h
service/hubble-peer      ClusterIP   10.96.5.178    <none>        443/TCP                  2d1h
service/hubble-relay     ClusterIP   10.96.162.54   <none>        80/TCP                   2d1h
service/hubble-ui        NodePort    10.96.248.26   <none>        80:30003/TCP             2d1h
service/kube-dns         ClusterIP   10.96.0.10     <none>        53/UDP,53/TCP,9153/TCP   2d1h
service/metrics-server   ClusterIP   10.96.148.51   <none>        443/TCP                  2d1h

# 확인
kubectl get GatewayClass
kubectl get gateway -A

(⎈|HomeLab:N/A) root@k8s-ctr:~# kubectl get GatewayClass
NAME     CONTROLLER                     ACCEPTED   AGE
cilium   io.cilium/gateway-controller   True       2m11s
(⎈|HomeLab:N/A) root@k8s-ctr:~# kubectl get gateway -A
No resources found
(⎈|HomeLab:N/A) root@k8s-ctr:~#
Cilium에서는 Ciliun Agent와 Cilium Operator가 Gateway API를 처리하는 역할을 합니다.
- Cilium Operator는 Gateway API를 watch하고 리소스가 유효한지 검증합니다. 리소스가 유효하다면 Cilium Operator는 리소스를 Accepted 된 것으로 표시하고 Cilium Envoy 설정으로 변경하는 작업을 시작합니다.
- Cilium Agent는 Cilium Envoy 구성을 가져오고, Envoy나 Envoy 데몬 셋에 설정을 제공하게되며, Envoy가 트래픽을 처리합니다.
아래와 같이 Gateway API 실습을 이어 나가겠습니다.
# 배포
cat << EOF | kubectl apply -f -
apiVersion: gateway.networking.k8s.io/v1
kind: Gateway
metadata:
  name: my-gateway
spec:
  gatewayClassName: cilium
  listeners:
  - protocol: HTTP
    port: 80
    name: web-gw
    allowedRoutes:
      namespaces:
        from: Same
---
apiVersion: gateway.networking.k8s.io/v1
kind: HTTPRoute
metadata:
  name: http-app-1
spec:
  parentRefs:
  - name: my-gateway
    namespace: default
  rules:
  - matches:
    - path:
        type: PathPrefix
        value: /details
    backendRefs:
    - name: details
      port: 9080
  - matches:
    - headers: # http header 기반 라우팅
      - type: Exact
        name: magic
        value: foo
      queryParams:
      - type: Exact
        name: great
        value: example
      path:
        type: PathPrefix
        value: /
      method: GET
    backendRefs:
    - name: productpage
      port: 9080
EOF

# cilium-gateway-my-gateway 라는 LoadBalancer 서비스가 생성됨
kubectl get svc,ep cilium-gateway-my-gateway

(⎈|HomeLab:N/A) root@k8s-ctr:~# kubectl get svc,ep cilium-gateway-my-gateway
Warning: v1 Endpoints is deprecated in v1.33+; use discovery.k8s.io/v1 EndpointSlice
NAME                                TYPE           CLUSTER-IP     EXTERNAL-IP      PORT(S)        AGE
service/cilium-gateway-my-gateway   LoadBalancer   10.96.89.140   192.168.10.211   80:31194/TCP   83s

NAME                                  ENDPOINTS              AGE
endpoints/cilium-gateway-my-gateway   192.192.192.192:9999   83s

# Gateway의 Address가 서비스의 External IP와 동일함
kubectl get gateway

(⎈|HomeLab:N/A) root@k8s-ctr:~# kubectl get gateway
NAME         CLASS    ADDRESS          PROGRAMMED   AGE
my-gateway   cilium   192.168.10.211   True         4s

## Accepted: the Gateway configuration was accepted.
## Programmed: the Gateway configuration was programmed into Envoy.
## ResolvedRefs: all referenced secrets were found and have permission for use.
kubectl describe gateway

(⎈|HomeLab:N/A) root@k8s-ctr:~# kubectl describe gateway
Name:         my-gateway
Namespace:    default
Labels:       <none>
Annotations:  <none>
API Version:  gateway.networking.k8s.io/v1
Kind:         Gateway
Metadata:
  Creation Timestamp:  2025-08-22T15:44:08Z
  Generation:          1
  Resource Version:    83428
  UID:                 0bcfc472-621c-4daf-8656-945c42cdd7c4
Spec:
  Gateway Class Name:  cilium
  Listeners:
    Allowed Routes:
      Namespaces:
        From:  Same
    Name:      web-gw
    Port:      80
    Protocol:  HTTP
Status:
  Addresses:
    Type:   IPAddress
    Value:  192.168.10.211
  Conditions:
    Last Transition Time:  2025-08-22T15:43:59Z
    Message:               Gateway successfully scheduled
    Observed Generation:   1
    Reason:                Accepted
    Status:                True
    Type:                  Accepted
    Last Transition Time:  2025-08-22T15:43:59Z
    Message:               Gateway successfully reconciled
    Observed Generation:   1
    Reason:                Programmed
    Status:                True
    Type:                  Programmed
  Listeners:
    Attached Routes:  1
    Conditions:
      Last Transition Time:  2025-08-22T15:44:00Z
      Message:               Listener Programmed
      Observed Generation:   1
      Reason:                Programmed
      Status:                True
      Type:                  Programmed
      Last Transition Time:  2025-08-22T15:44:00Z
      Message:               Listener Accepted
      Observed Generation:   1
      Reason:                Accepted
      Status:                True
      Type:                  Accepted
      Last Transition Time:  2025-08-22T15:44:00Z
      Message:               Resolved Refs
      Reason:                ResolvedRefs
      Status:                True
      Type:                  ResolvedRefs
    Name:                    web-gw
    Supported Kinds:
      Group:  gateway.networking.k8s.io
      Kind:   HTTPRoute
Events:       <none>


kubectl get httproutes -A

(⎈|HomeLab:N/A) root@k8s-ctr:~# kubectl get httproutes -A
NAMESPACE   NAME         HOSTNAMES   AGE
default     http-app-1               2m2s

# Accepted: The HTTPRoute configuration was correct and accepted.
# ResolvedRefs: The referenced services were found and are valid references.
kubectl describe httproutes


(⎈|HomeLab:N/A) root@k8s-ctr:~# kubectl describe httproutes
Name:         http-app-1
Namespace:    default
Labels:       <none>
Annotations:  <none>
API Version:  gateway.networking.k8s.io/v1
Kind:         HTTPRoute
Metadata:
  Creation Timestamp:  2025-08-22T15:44:08Z
  Generation:          1
  Resource Version:    83414
  UID:                 36c5adde-26ed-4822-9208-05c3fcaf7e4a
Spec:
  Parent Refs:
    Group:      gateway.networking.k8s.io
    Kind:       Gateway
    Name:       my-gateway
    Namespace:  default
  Rules:
    Backend Refs:
      Group:
      Kind:    Service
      Name:    details
      Port:    9080
      Weight:  1
    Matches:
      Path:
        Type:   PathPrefix
        Value:  /details
    Backend Refs:
      Group:
      Kind:    Service
      Name:    productpage
      Port:    9080
      Weight:  1
    Matches:
      Headers:
        Name:   magic
        Type:   Exact
        Value:  foo
      Method:   GET
      Path:
        Type:   PathPrefix
        Value:  /
      Query Params:
        Name:   great
        Type:   Exact
        Value:  example
Status:
  Parents:
    Conditions:
      Last Transition Time:  2025-08-22T15:43:59Z
      Message:               Accepted HTTPRoute
      Observed Generation:   1
      Reason:                Accepted
      Status:                True
      Type:                  Accepted
      Last Transition Time:  2025-08-22T15:43:59Z
      Message:               Service reference is valid
      Observed Generation:   1
      Reason:                ResolvedRefs
      Status:                True
      Type:                  ResolvedRefs
    Controller Name:         io.cilium/gateway-controller
    Parent Ref:
      Group:      gateway.networking.k8s.io
      Kind:       Gateway
      Name:       my-gateway
      Namespace:  default
Events:           <none>
생성된 Gateway 서비스로 테스트 호출을 해보겠습니다.
# 호출
GATEWAY=$(kubectl get gateway my-gateway -o jsonpath='{.status.addresses[0].value}')
echo $GATEWAY

# HTTP Path 기반 라우팅
# Let's now check that traffic based on the URL path is proxied by the Gateway API.
# Check that you can make HTTP requests to that external address:
# Because the path starts with /details, this traffic will match the first rule and will be proxied to the details Service over port 9080.
curl --fail -s http://"$GATEWAY"/details/1 | jq
sshpass -p 'vagrant' ssh vagrant@router "curl -s --fail -v http://"$GATEWAY"/details/1"


(⎈|HomeLab:N/A) root@k8s-ctr:~# curl --fail -s http://"$GATEWAY"/details/1 | jq
{
  "id": 1,
  "author": "William Shakespeare",
  "year": 1595,
  "type": "paperback",
  "pages": 200,
  "publisher": "PublisherA",
  "language": "English",
  "ISBN-10": "1234567890",
  "ISBN-13": "123-1234567890"
}
(⎈|HomeLab:N/A) root@k8s-ctr:~# sshpass -p 'vagrant' ssh vagrant@router "curl -s --fail -v http://"$GATEWAY"/details/1"
*   Trying 192.168.10.211:80...
* Connected to 192.168.10.211 (192.168.10.211) port 80
> GET /details/1 HTTP/1.1
> Host: 192.168.10.211
> User-Agent: curl/8.5.0
> Accept: */*
>
< {"id":1,"author":"William Shakespeare","year":1595,"type":"paperback","pages":200,"publisher":"PublisherA","language":"English","ISBN-10":"1234567890","ISBN-13":"123-1234567890"}HTTP/1.1 200 OK
< content-type: application/json
< server: envoy
< date: Fri, 22 Aug 2025 15:49:20 GMT
< content-length: 178
< x-envoy-upstream-service-time: 14
<
{ [178 bytes data]
* Connection #0 to host 192.168.10.211 left intact


# HTTP Header기반 라우팅
# This time, we will route traffic based on HTTP parameters like header values, method and query parameters. Run the following command:
curl -v -H 'magic: foo' http://"$GATEWAY"\?great\=example
sshpass -p 'vagrant' ssh vagrant@router "curl -s -v -H 'magic: foo' http://"$GATEWAY"\?great\=example"


(⎈|HomeLab:N/A) root@k8s-ctr:~# curl -v -H 'magic: foo' http://"$GATEWAY"\?great\=example
*   Trying 192.168.10.211:80...
* Connected to 192.168.10.211 (192.168.10.211) port 80
> GET /?great=example HTTP/1.1
> Host: 192.168.10.211
> User-Agent: curl/8.5.0
> Accept: */*
> magic: foo
>
< HTTP/1.1 200 OK
< server: envoy
< date: Fri, 22 Aug 2025 15:50:01 GMT
< content-type: text/html; charset=utf-8
< content-length: 2080
< x-envoy-upstream-service-time: 28
<

<meta charset="utf-8">
<meta http-equiv="X-UA-Compatible" content="IE=edge">
<meta name="viewport" content="width=device-width, initial-scale=1">
...
<script src="static/tailwind/tailwind.css"></script>
...
<div class="mx-auto px-4 sm:px-6 lg:px-8">
    <div class="flex flex-col space-y-5 py-32 mx-auto max-w-7xl">
        <h3 class="text-2xl">Hello! This is a simple bookstore application consisting of three services as shown below
        </h3>

        <table class="table table-condensed table-bordered table-hover"><tr><th>name</th><td>http://details:9080</td></tr><tr><th>endpoint</th><td>details</td></tr><tr><th>children</th><td><table class="table table-condensed table-bordered table-hover"><thead><tr><th>name</th><th>endpoint</th><th>children</th></tr></thead><tbody><tr><td>http://details:9080</td><td>details</td><td></td></tr><tr><td>http://reviews:9080</td><td>reviews</td><td><table class="table table-condensed table-bordered table-hover"><thead><tr><th>name</th><th>endpoint</th><th>children</th></tr></thead><tbody><tr><td>http://ratings:9080</td><td>ratings</td><td></td></tr></tbody></table></td></tr></tbody></table></td></tr></table>

        <p>
            Click on one of the links below to auto generate a request to the backend as a real user or a tester
        </p>
        <ul>
            <li>
                <a href="/productpage?u=normal" class="text-blue-500 hover:text-blue-600">Normal user</a>
            </li>
            <li>
                <a href="/productpage?u=test" class="text-blue-500 hover:text-blue-600">Test user</a>
            </li>
        </ul>
    </div>
</div>
* Connection #0 to host 192.168.10.211 left intact
(⎈|HomeLab:N/A) root@k8s-ctr:~# sshpass -p 'vagrant' ssh vagrant@router "curl -s -v -H 'magic: foo' http://"$GATEWAY"\?great\=example"
*   Trying 192.168.10.211:80...
* Connected to 192.168.10.211 (192.168.10.211) port 80
> GET /?great=example HTTP/1.1
> Host: 192.168.10.211
> User-Agent: curl/8.5.0
> Accept: */*
> magic: foo
>
<
<meta charset="utf-8">
<meta http-equiv="X-UA-Compatible" content="IE=edge">
<meta name="viewport" content="width=device-width, initial-scale=1">
...
<script src="static/tailwind/tailwind.css"></script>
...
<div class="mx-auto px-4 sm:px-6 lg:px-8">
    <div class="flex flex-col space-y-5 py-32 mx-auto max-w-7xl">
        <h3 class="text-2xl">Hello! This is a simple bookstore application consisting of three services as shown below
        </h3>

        <table class="table table-condensed table-bordered table-hover"><tr><th>name</th><td>http://details:9080</td></tr><tr><th>endpoint</th><td>details</td></tr><tr><th>children</th><td><table class="table table-condensed table-bordered table-hover"><thead><tr><th>name</th><th>endpoint</th><th>children</th></tr></thead><tbody><tr><td>http://details:9080</td><td>details</td><td></td></tr><tr><td>http://reviews:9080</td><td>reviews</td><td><table class="table table-condensed table-bordered table-hover"><thead><tr><th>name</th><th>endpoint</th><th>children</th></tr></thead><tbody><tr><td>http://ratings:9080</td><td>ratings</td><td></td></tr></tbody></table></td></tr></tbody></table></td></tr></table>

        <p>
            Click on one of the links below to auto generate a request to the backend as a real user or a tester
        </p>
        <ul>
            <li>
                <a href="/productpage?u=normal" class="text-blue-500 hover:text-blue-600">Normal user</a>
            </li>
            <li>
                <a href="/productpage?u=test" class="text-blue-500 hover:text-blue-600">Test user</a>
            </li>
        </ul>
    </div>
</div>
HTTP/1.1 200 OK
< server: envoy
< date: Fri, 22 Aug 2025 15:50:07 GMT
< content-type: text/html; charset=utf-8
< content-length: 2080
< x-envoy-upstream-service-time: 29
<
{ [2080 bytes data]
* Connection #0 to host 192.168.10.211 left intact
5. L7 Aware Traffic Management
Gateway API에서 일부 Traffic Management의 기능을 보완해주고 있지만, 일부 L7 Traffic Management를 Cilium을 통해세 제공하고 있습니다. 다만 Cilium의 L7 Aware Traffic Management는 별도의 CRD를 활용하기 때문에 쿠버네티스의 표준으로 제공되는 것은 아니라는 점에 유의가 필요합니다.
또한 문서를 살펴보면 CiliumEnvoyConfig는 최소한의 유효성 검사를 할 뿐, 기존에 정의된 설정과 충돌이 나는 경우 대처하는 동작을 하지 않습니다. 사용에 유의가 필요할 것 같습니다.
참고: https://docs.cilium.io/en/stable/network/servicemesh/l7-traffic-management/
Cilium에서는 CiliumEnvoyConfig 와 CiliumClusterwideEnvoyConfig를 통해서 L7 Traffic 제어를 제공합니다. CiliumEnvoyConfig는 네임스페이스 단위의 설정이고, CiliumClusterwideEnvoyConfig는 클러스터 전체 단위의 설정입니다.
아래와 같이 설정을 진행 합니다.
# 설정
helm upgrade cilium cilium/cilium --version 1.18.1 --namespace kube-system --reuse-values \
--set ingressController.enabled=true --set gatewayAPI.enabled=false \
--set envoyConfig.enabled=true  --set loadBalancer.l7.backend=envoy

kubectl -n kube-system rollout restart deployment/cilium-operator
kubectl -n kube-system rollout restart ds/cilium
kubectl -n kube-system rollout restart ds/cilium-envoy

# 확인
cilium config view |grep -i envoy
cilium status --wait

(⎈|HomeLab:N/A) root@k8s-ctr:~# cilium config view |grep -i envoy
enable-envoy-config                               true
envoy-access-log-buffer-size                      4096
envoy-base-id                                     0
envoy-config-retry-interval                       15s
envoy-keep-cap-netbindservice                     false
envoy-secrets-namespace                           cilium-secrets
external-envoy-proxy                              true
loadbalancer-l7                                   envoy
(⎈|HomeLab:N/A) root@k8s-ctr:~# cilium status --wait
    /¯¯\
 /¯¯\__/¯¯\    Cilium:             OK
 \__/¯¯\__/    Operator:           OK
 /¯¯\__/¯¯\    Envoy DaemonSet:    OK
 \__/¯¯\__/    Hubble Relay:       OK
    \__/       ClusterMesh:        disabled

DaemonSet              cilium                   Desired: 2, Ready: 2/2, Available: 2/2
DaemonSet              cilium-envoy             Desired: 2, Ready: 2/2, Available: 2/2
Deployment             cilium-operator          Desired: 1, Ready: 1/1, Available: 1/1
Deployment             hubble-relay             Desired: 1, Ready: 1/1, Available: 1/1
Deployment             hubble-ui                Desired: 1, Ready: 1/1, Available: 1/1
Containers:            cilium                   Running: 2
                       cilium-envoy             Running: 2
                       cilium-operator          Running: 1
                       clustermesh-apiserver
                       hubble-relay             Running: 1
                       hubble-ui                Running: 1
Cluster Pods:          12/12 managed by Cilium
Helm chart version:    1.18.1
Image versions         cilium             quay.io/cilium/cilium:v1.18.1@sha256:65ab17c052d8758b2ad157ce766285e04173722df59bdee1ea6d5fda7149f0e9: 2
                       cilium-envoy       quay.io/cilium/cilium-envoy:v1.34.4-1754895458-68cffdfa568b6b226d70a7ef81fc65dda3b890bf@sha256:247e908700012f7ef56f75908f8c965215c26a27762f296068645eb55450bda2: 2
                       cilium-operator    quay.io/cilium/operator-generic:v1.18.1@sha256:97f4553afa443465bdfbc1cc4927c93f16ac5d78e4dd2706736e7395382201bc: 1
                       hubble-relay       quay.io/cilium/hubble-relay:v1.18.1@sha256:7e2fd4877387c7e112689db7c2b153a4d5c77d125b8d50d472dbe81fc1b139b0: 1
                       hubble-ui          quay.io/cilium/hubble-ui-backend:v0.13.2@sha256:a034b7e98e6ea796ed26df8f4e71f83fc16465a19d166eff67a03b822c0bfa15: 1
                       hubble-ui          quay.io/cilium/hubble-ui:v0.13.2@sha256:9e37c1296b802830834cc87342a9182ccbb71ffebb711971e849221bd9d59392: 1
Cilium 공식 문서에서는 L7 Path Translation, L7 Load Balancing and URL re-writing, L7 Circuit Breaking, L7 Traffic Shifting 와 같은 기능을 설명하고 있습니다.
참고: https://docs.cilium.io/en/stable/network/servicemesh/l7-traffic-management/#examples
이 중 L7 Traffic Shifting과 L7 Circuit Breaking을 살펴보겠습니다.
L7 Traffic Shifting
L7 Traffic Shifting은 CilumEnvoyConfig를 통해서 요청을 백엔드에 분산하는 기능입니다.
참고: https://docs.cilium.io/en/stable/network/servicemesh/envoy-traffic-shifting/
실습의 예시에서는 hellowworld 서비스에 요청이 들어오면 로드밸런싱을 통해 helloworld-v1에 90%를, helloworld-v2에 10%의 트래픽을 흘려보냅니다.
테스트 애플리케이션을 배포합니다.
# 배포
kubectl apply -f https://raw.githubusercontent.com/cilium/cilium/1.18.1/examples/kubernetes/servicemesh/envoy/client-helloworld.yaml

# 확인
(⎈|HomeLab:N/A) root@k8s-ctr:~# kubectl get po,svc
NAME                                 READY   STATUS    RESTARTS   AGE
pod/client-85b7f79db-kqkh9           1/1     Running   0          28s
pod/helloworld-v1-9c5dfd585-wp269    1/1     Running   0          28s
pod/helloworld-v2-6f85d9d76f-fsbsn   1/1     Running   0          28s

NAME                                TYPE           CLUSTER-IP     EXTERNAL-IP      PORT(S)        AGE
service/cilium-gateway-my-gateway   LoadBalancer   10.96.89.140   192.168.10.211   80:31194/TCP   15h
service/helloworld                  ClusterIP      10.96.82.105   <none>           5000/TCP       28s
service/kubernetes                  ClusterIP      10.96.0.1      <none>           443/TCP        2d16h

# app은 동일하고, version이 다름
(⎈|HomeLab:N/A) root@k8s-ctr:~# kubectl get po --show-labels
NAME                             READY   STATUS    RESTARTS   AGE    LABELS
client-85b7f79db-kqkh9           1/1     Running   0          3m8s   kind=client,name=client,pod-template-hash=85b7f79db
helloworld-v1-9c5dfd585-wp269    1/1     Running   0          3m8s   app=helloworld,pod-template-hash=9c5dfd585,version=v1
helloworld-v2-6f85d9d76f-fsbsn   1/1     Running   0          3m8s   app=helloworld,pod-template-hash=6f85d9d76f,version=v2
아래와 같이 기본적인 로드밸런싱을 확인합니다. 대략적으로 두 파드에 분산이 되는 것으로 보입니다.
# client ip 획득
export CLIENT=$(kubectl get pods -l name=client -o jsonpath='{.items[0].metadata.name}')

# 테스트
for i in {1..10}; do  kubectl exec -it $CLIENT -- curl  helloworld:5000/hello; done

(⎈|HomeLab:N/A) root@k8s-ctr:~# for i in {1..10}; do  kubectl exec -it $CLIENT -- curl  helloworld:5000/hello; done
Hello version: v1, instance: helloworld-v1-9c5dfd585-wp269
Hello version: v1, instance: helloworld-v1-9c5dfd585-wp269
Hello version: v1, instance: helloworld-v1-9c5dfd585-wp269
Hello version: v2, instance: helloworld-v2-6f85d9d76f-fsbsn
Hello version: v2, instance: helloworld-v2-6f85d9d76f-fsbsn
Hello version: v2, instance: helloworld-v2-6f85d9d76f-fsbsn
Hello version: v1, instance: helloworld-v1-9c5dfd585-wp269
Hello version: v1, instance: helloworld-v1-9c5dfd585-wp269
Hello version: v1, instance: helloworld-v1-9c5dfd585-wp269
Hello version: v2, instance: helloworld-v2-6f85d9d76f-fsbsn
CiliumEnvoyConfig 는 Service Group으로 트래픽을 로드밸런싱 합니다. Service Group에 포함될 각 version의 워크로드를 지정한 서비스를 각각 생성합니다.
kubectl apply -f https://raw.githubusercontent.com/cilium/cilium/1.18.1/examples/kubernetes/servicemesh/envoy/helloworld-service-v1-v2.yaml

cat helloworld-service-v1-v2.yaml
apiVersion: v1
kind: Service
metadata:
  name: helloworld-v1
  labels:
    app: helloworld
    service: helloworld
    version: v1
spec:
  ports:
    - port: 5000
      name: http
  selector:
    app: helloworld
    version: v1
---
apiVersion: v1
kind: Service
metadata:
  name: helloworld-v2
  labels:
    app: helloworld
    service: helloworld
    version: v2
spec:
  ports:
    - port: 5000
      name: http
  selector:
    app: helloworld
    version: v2
이제 아래와 같이 CiliumEnvoyConfig를 생성합니다.
CR을 살펴보면, 먼저 추가로 생성한 서비스는 Service Group인 helloworld의 backendService로 지정됩니다. 또한 이들 backendService는 Cluster로 선언되고, 이후 Route Configuration의 virtual_host에서 weighted_clusters를 통해서 weight를 지정합니다.
kubectl apply -f https://raw.githubusercontent.com/cilium/cilium/1.18.1/examples/kubernetes/servicemesh/envoy/envoy-helloworld-v1-90-v2-10.yaml

cat envoy-helloworld-v1-90-v2-10.yaml
apiVersion: cilium.io/v2
kind: CiliumEnvoyConfig
metadata:
  name: envoy-lb-listener
spec:
  services:
    - name: helloworld
      namespace: default
  backendServices:
    - name: helloworld-v1
      namespace: default
    - name: helloworld-v2
      namespace: default
  resources:
    - "@type": type.googleapis.com/envoy.config.listener.v3.Listener
      name: envoy-lb-listener
      filter_chains:
        - filters:
            - name: envoy.filters.network.http_connection_manager
              typed_config:
                "@type": type.googleapis.com/envoy.extensions.filters.network.http_connection_manager.v3.HttpConnectionManager
                stat_prefix: envoy-lb-listener
                rds:
                  route_config_name: lb_route
                http_filters:
                  - name: envoy.filters.http.router
                    typed_config:
                      "@type": type.googleapis.com/envoy.extensions.filters.http.router.v3.Router
    - "@type": type.googleapis.com/envoy.config.route.v3.RouteConfiguration
      name: lb_route
      virtual_hosts:
        - name: "lb_route"
          domains: [ "*" ]
          routes:
            - match:
                prefix: "/"
              route:
                weighted_clusters:
                  clusters:
                    - name: "default/helloworld-v1"
                      weight: 90
                    - name: "default/helloworld-v2"
                      weight: 10
                retry_policy:
                  retry_on: 5xx
                  num_retries: 3
                  per_try_timeout: 1s
    - "@type": type.googleapis.com/envoy.config.cluster.v3.Cluster
      name: "default/helloworld-v1"
      connect_timeout: 5s
      lb_policy: ROUND_ROBIN
      type: EDS
      outlier_detection:
        split_external_local_origin_errors: true
        consecutive_local_origin_failure: 2
    - "@type": type.googleapis.com/envoy.config.cluster.v3.Cluster
      name: "default/helloworld-v2"
      connect_timeout: 3s
      lb_policy: ROUND_ROBIN
      type: EDS
      outlier_detection:
        split_external_local_origin_errors: true
        consecutive_local_origin_failure: 2
아래와 같이 리소스가 생성되었습니다.
(⎈|HomeLab:N/A) root@k8s-ctr:~# kubectl get pods --show-labels -o wide
NAME                             READY   STATUS    RESTARTS   AGE   IP             NODE     NOMINATED NODE   READINESS GATES   LABELS
client-85b7f79db-kqkh9           1/1     Running   0          16m   172.20.1.143   k8s-w1   <none>           <none>            kind=client,name=client,pod-template-hash=85b7f79db
helloworld-v1-9c5dfd585-wp269    1/1     Running   0          16m   172.20.1.31    k8s-w1   <none>           <none>            app=helloworld,pod-template-hash=9c5dfd585,version=v1
helloworld-v2-6f85d9d76f-fsbsn   1/1     Running   0          16m   172.20.1.154   k8s-w1   <none>           <none>            app=helloworld,pod-template-hash=6f85d9d76f,version=v2
(⎈|HomeLab:N/A) root@k8s-ctr:~# kubectl get svc --show-labels
NAME                        TYPE           CLUSTER-IP      EXTERNAL-IP      PORT(S)        AGE     LABELS
cilium-gateway-my-gateway   LoadBalancer   10.96.89.140    192.168.10.211   80:31194/TCP   15h     gateway.networking.k8s.io/gateway-name=my-gateway,io.cilium.gateway/owning-gateway=my-gateway
helloworld                  ClusterIP      10.96.82.105    <none>           5000/TCP       16m     app=helloworld,service=helloworld
helloworld-v1               ClusterIP      10.96.15.244    <none>           5000/TCP       19s     app=helloworld,service=helloworld,version=v1
helloworld-v2               ClusterIP      10.96.238.129   <none>           5000/TCP       19s     app=helloworld,service=helloworld,version=v2
kubernetes                  ClusterIP      10.96.0.1       <none>           443/TCP        2d17h   component=apiserver,provider=kubernetes
아래와 같이 추가로 테스트를 해보겠습니다. client는 여전히 helloworld를 호출하며, 이것이 Service Group에 해당합니다.
for i in {1..10}; do  kubectl exec -it $CLIENT -- curl  helloworld:5000/hello; done

(⎈|HomeLab:N/A) root@k8s-ctr:~# for i in {1..10}; do  kubectl exec -it $CLIENT -- curl  helloworld:5000/hello; done
Hello version: v1, instance: helloworld-v1-9c5dfd585-wp269
Hello version: v1, instance: helloworld-v1-9c5dfd585-wp269
Hello version: v1, instance: helloworld-v1-9c5dfd585-wp269
Hello version: v1, instance: helloworld-v1-9c5dfd585-wp269
Hello version: v1, instance: helloworld-v1-9c5dfd585-wp269
Hello version: v2, instance: helloworld-v2-6f85d9d76f-fsbsn
Hello version: v1, instance: helloworld-v1-9c5dfd585-wp269
Hello version: v1, instance: helloworld-v1-9c5dfd585-wp269
Hello version: v1, instance: helloworld-v1-9c5dfd585-wp269
Hello version: v1, instance: helloworld-v1-9c5dfd585-wp269
테스트 결과 v2에는 10%의 요청만 전달되는 것으로 확인됩니다.
L7 Circuit Breaking
두 번째로 살펴볼 실습은 Circuit Breaking입니다.
L7 Circuit Breaking은 CiliumClusterwideEnvoyConfig을 정의하여, 복원력 있는 마이크로서비스 애플리케이션을 만드는데 중요한 패턴으로, Circuit Breaking(회로 차단)을 통해서 애플리케이션에 에러나 대기 시간 증가와 같은 이상이 있을 때, 이를 차단하여 이것이 전파되어 발생하는 전반적인 영향을 제한합니다.
참고: https://docs.cilium.io/en/stable/network/servicemesh/envoy-circuit-breaker/
테스트 애플리케이션을 배포합니다.
kubectl apply -f https://raw.githubusercontent.com/cilium/cilium/1.18.1/examples/kubernetes/servicemesh/envoy/test-application-proxy-circuit-breaker.yaml

# 확인
(⎈|HomeLab:N/A) root@k8s-ctr:~# kubectl get pods --show-labels -o wide
NAME                             READY   STATUS    RESTARTS   AGE    IP             NODE     NOMINATED NODE   READINESS GATES   LABELS
echo-service-67788f4d97-bf7xn    2/2     Running   0          2m5s   172.20.1.157   k8s-w1   <none>           <none>            kind=echo,name=echo-service,other=echo,pod-template-hash=67788f4d97
fortio-deploy-74ffb9b4d6-cr8bp   1/1     Running   0          2m5s   172.20.1.211   k8s-w1   <none>           <none>            app=fortio,pod-template-hash=74ffb9b4d6
아래와 같이 CiliumClusterwideEnvoyConfig을 배포합니다.
CR을 살펴보면, max_pending_requests: 1 및 max_requests: 2를 지정했습니다. 이 설정에서 요청이 2개 이상일 때 대기 요청이 발생하는 경우 envoy에서 Circuit을 열어서 이후 요청에 대해서는 실패를 반환합니다.
kubectl apply -f https://raw.githubusercontent.com/cilium/cilium/1.18.1/examples/kubernetes/servicemesh/envoy/envoy-circuit-breaker.yaml

cat envoy-circuit-breaker.yaml
apiVersion: cilium.io/v2
kind: CiliumClusterwideEnvoyConfig
metadata:
  name: envoy-circuit-breaker
spec:
  services:
    - name: echo-service
      namespace: default
  resources:
    - "@type": type.googleapis.com/envoy.config.listener.v3.Listener
      name: envoy-lb-listener
      filter_chains:
        - filters:
            - name: envoy.filters.network.http_connection_manager
              typed_config:
                "@type": type.googleapis.com/envoy.extensions.filters.network.http_connection_manager.v3.HttpConnectionManager
                stat_prefix: envoy-lb-listener
                rds:
                  route_config_name: lb_route
                use_remote_address: true
                skip_xff_append: true
                http_filters:
                  - name: envoy.filters.http.router
                    typed_config:
                      "@type": type.googleapis.com/envoy.extensions.filters.http.router.v3.Router
    - "@type": type.googleapis.com/envoy.config.route.v3.RouteConfiguration
      name: lb_route
      virtual_hosts:
        - name: "lb_route"
          domains: [ "*" ]
          routes:
            - match:
                prefix: "/"
              route:
                weighted_clusters:
                  clusters:
                    - name: "default/echo-service"
                      weight: 100
    - "@type": type.googleapis.com/envoy.config.cluster.v3.Cluster
      name: "default/echo-service"
      connect_timeout: 5s
      lb_policy: ROUND_ROBIN
      type: EDS
      edsClusterConfig:
        serviceName: default/echo-service
      circuit_breakers:
        thresholds:
        - priority: "DEFAULT"
          max_requests: 2
          max_pending_requests: 1
      outlier_detection:
        split_external_local_origin_errors: true
        consecutive_local_origin_failure: 2
테스트를 진행해보겠습니다. fortio -> echo-service로 요청을 전달합니다.
# client(Fortio) 파드 이름을 환경 변수로 노출
export FORTIO_POD=$(kubectl get pods -l app=fortio -o 'jsonpath={.items[0].metadata.name}')

# 테스트 (-c 2: 동시에 2개 요청, -n 20: 총 20개 요청)
kubectl exec "$FORTIO_POD" -c fortio -- /usr/bin/fortio load -c 2 -qps 0 -n 20 http://echo-service:8080

# 결과
(⎈|HomeLab:N/A) root@k8s-ctr:~# kubectl exec "$FORTIO_POD" -c fortio -- /usr/bin/fortio load -c 2 -qps 0 -n 20 http://echo-service:8080
{"ts":1755934919.902383,"level":"info","r":1,"file":"scli.go","line":122,"msg":"Starting","command":"Φορτίο","version":"1.69.5 h1:h+42fJ1HF61Jj+WgPmC+C2wPtM5Ct8JLHSLDyEgGID4= go1.23.9 amd64 linux","go-max-procs":4}
Fortio 1.69.5 running at 0 queries per second, 4->4 procs, for 20 calls: http://echo-service:8080
{"ts":1755934919.913098,"level":"info","r":1,"file":"httprunner.go","line":121,"msg":"Starting http test","run":0,"url":"http://echo-service:8080","threads":2,"qps":"-1.0","warmup":"parallel","conn-reuse":""}
Starting at max qps with 2 thread(s) [gomax 4] for exactly 20 calls (10 per thread + 0)
{"ts":1755934920.020824,"level":"warn","r":21,"file":"http_client.go","line":1151,"msg":"Non ok http code","code":503,"status":"HTTP/1.1 503","thread":1,"run":0}
{"ts":1755934920.242941,"level":"info","r":20,"file":"periodic.go","line":851,"msg":"T000 ended after 274.554816ms : 10 calls. qps=36.422599121335395"}
{"ts":1755934920.266847,"level":"info","r":21,"file":"periodic.go","line":851,"msg":"T001 ended after 298.834839ms : 10 calls. qps=33.46330044202109"}
Ended after 299.008252ms : 20 calls. qps=66.888
{"ts":1755934920.267067,"level":"info","r":1,"file":"periodic.go","line":581,"msg":"Run ended","run":0,"elapsed":299008252,"calls":20,"qps":66.88778609360922}
Aggregated Function Time : count 20 avg 0.028639969 +/- 0.02031 min 0.008476393 max 0.083982601 sum 0.572799376
# range, mid point, percentile, count
>= 0.00847639 <= 0.009 , 0.0087382 , 5.00, 1
> 0.011 <= 0.012 , 0.0115 , 10.00, 1
> 0.012 <= 0.014 , 0.013 , 15.00, 1
> 0.014 <= 0.016 , 0.015 , 25.00, 2
> 0.016 <= 0.018 , 0.017 , 35.00, 2
> 0.02 <= 0.025 , 0.0225 , 65.00, 6
> 0.025 <= 0.03 , 0.0275 , 75.00, 2
> 0.03 <= 0.035 , 0.0325 , 80.00, 1
> 0.035 <= 0.04 , 0.0375 , 85.00, 1
> 0.05 <= 0.06 , 0.055 , 90.00, 1
> 0.07 <= 0.08 , 0.075 , 95.00, 1
> 0.08 <= 0.0839826 , 0.0819913 , 100.00, 1
# target 50% 0.0225
# target 75% 0.03
# target 90% 0.06
# target 99% 0.0831861
# target 99.9% 0.0839029
Error cases : count 1 avg 0.05452972 +/- 0 min 0.05452972 max 0.05452972 sum 0.05452972
# range, mid point, percentile, count
>= 0.0545297 <= 0.0545297 , 0.0545297 , 100.00, 1
# target 50% 0.0545297
# target 75% 0.0545297
# target 90% 0.0545297
# target 99% 0.0545297
# target 99.9% 0.0545297
# Socket and IP used for each connection:
[0]   1 socket used, resolved to 10.96.170.88:8080, connection timing : count 1 avg 0.009122352 +/- 0 min 0.009122352 max 0.009122352 sum 0.009122352
[1]   2 socket used, resolved to 10.96.170.88:8080, connection timing : count 2 avg 0.018599093 +/- 0.006149 min 0.012450165 max 0.024748021 sum 0.037198186
Connection time histogram (s) : count 3 avg 0.015440179 +/- 0.00672 min 0.009122352 max 0.024748021 sum 0.046320538
# range, mid point, percentile, count
>= 0.00912235 <= 0.01 , 0.00956118 , 33.33, 1
> 0.012 <= 0.014 , 0.013 , 66.67, 1
> 0.02 <= 0.024748 , 0.022374 , 100.00, 1
# target 50% 0.013
# target 75% 0.021187
# target 90% 0.0233236
# target 99% 0.0246056
# target 99.9% 0.0247338
Sockets used: 3 (for perfect keepalive, would be 2)
Uniform: false, Jitter: false, Catchup allowed: true
IP addresses distribution:
10.96.170.88:8080: 3
Code 200 : 19 (95.0 %)
Code 503 : 1 (5.0 %)
Response Header Sizes : count 20 avg 371.3 +/- 85.18 min 0 max 391 sum 7426
Response Body/Total Sizes : count 20 avg 2337.5 +/- 481 min 241 max 2448 sum 46750
All done 20 calls (plus 0 warmup) 28.640 ms avg, 66.9 qps
요청 결과를 보면 일부 요청(Code 503 : 1 (5.0 %))이 503이 발생한 것으로 확인됩니다.
동시 연결 수를 최대 4개로 지정하여 결과가 달라지는 확인해보겠습니다.
(⎈|HomeLab:N/A) root@k8s-ctr:~# kubectl exec "$FORTIO_POD" -c fortio -- /usr/bin/fortio load -c 4 -qps 0 -n 20 http://echo-service:8080
{"ts":1755935051.750785,"level":"info","r":1,"file":"scli.go","line":122,"msg":"Starting","command":"Φορτίο","version":"1.69.5 h1:h+42fJ1HF61Jj+WgPmC+C2wPtM5Ct8JLHSLDyEgGID4= go1.23.9 amd64 linux","go-max-procs":4}
Fortio 1.69.5 running at 0 queries per second, 4->4 procs, for 20 calls: http://echo-service:8080
{"ts":1755935051.760080,"level":"info","r":1,"file":"httprunner.go","line":121,"msg":"Starting http test","run":0,"url":"http://echo-service:8080","threads":4,"qps":"-1.0","warmup":"parallel","conn-reuse":""}
Starting at max qps with 4 thread(s) [gomax 4] for exactly 20 calls (5 per thread + 0)
{"ts":1755935051.927076,"level":"warn","r":57,"file":"http_client.go","line":1151,"msg":"Non ok http code","code":503,"status":"HTTP/1.1 503","thread":1,"run":0}
{"ts":1755935051.944449,"level":"warn","r":56,"file":"http_client.go","line":1151,"msg":"Non ok http code","code":503,"status":"HTTP/1.1 503","thread":0,"run":0}
{"ts":1755935052.003096,"level":"warn","r":56,"file":"http_client.go","line":1151,"msg":"Non ok http code","code":503,"status":"HTTP/1.1 503","thread":0,"run":0}
{"ts":1755935052.070080,"level":"warn","r":56,"file":"http_client.go","line":1151,"msg":"Non ok http code","code":503,"status":"HTTP/1.1 503","thread":0,"run":0}
{"ts":1755935052.092354,"level":"warn","r":57,"file":"http_client.go","line":1151,"msg":"Non ok http code","code":503,"status":"HTTP/1.1 503","thread":1,"run":0}
{"ts":1755935052.176591,"level":"warn","r":56,"file":"http_client.go","line":1151,"msg":"Non ok http code","code":503,"status":"HTTP/1.1 503","thread":0,"run":0}
{"ts":1755935052.190861,"level":"warn","r":57,"file":"http_client.go","line":1151,"msg":"Non ok http code","code":503,"status":"HTTP/1.1 503","thread":1,"run":0}
{"ts":1755935052.242797,"level":"warn","r":56,"file":"http_client.go","line":1151,"msg":"Non ok http code","code":503,"status":"HTTP/1.1 503","thread":0,"run":0}
{"ts":1755935052.247198,"level":"info","r":56,"file":"periodic.go","line":851,"msg":"T000 ended after 363.953089ms : 5 calls. qps=13.738034244297896"}
{"ts":1755935052.261238,"level":"info","r":59,"file":"periodic.go","line":851,"msg":"T003 ended after 377.997668ms : 5 calls. qps=13.227594832674999"}
{"ts":1755935052.261716,"level":"info","r":58,"file":"periodic.go","line":851,"msg":"T002 ended after 378.478799ms : 5 calls. qps=13.210779608291878"}
{"ts":1755935052.262146,"level":"warn","r":57,"file":"http_client.go","line":1151,"msg":"Non ok http code","code":503,"status":"HTTP/1.1 503","thread":1,"run":0}
{"ts":1755935052.355042,"level":"info","r":57,"file":"periodic.go","line":851,"msg":"T001 ended after 471.785135ms : 5 calls. qps=10.59804480698613"}
Ended after 472.656268ms : 20 calls. qps=42.314
{"ts":1755935052.355966,"level":"info","r":1,"file":"periodic.go","line":581,"msg":"Run ended","run":0,"elapsed":472656268,"calls":20,"qps":42.31404797534601}
Aggregated Function Time : count 20 avg 0.077426397 +/- 0.03038 min 0.027672363 max 0.164824901 sum 1.54852794
# range, mid point, percentile, count
>= 0.0276724 <= 0.03 , 0.0288362 , 5.00, 1
> 0.035 <= 0.04 , 0.0375 , 10.00, 1
> 0.05 <= 0.06 , 0.055 , 20.00, 2
> 0.06 <= 0.07 , 0.065 , 45.00, 5
> 0.07 <= 0.08 , 0.075 , 65.00, 4
> 0.08 <= 0.09 , 0.085 , 75.00, 2
> 0.09 <= 0.1 , 0.095 , 80.00, 1
> 0.1 <= 0.12 , 0.11 , 90.00, 2
> 0.12 <= 0.14 , 0.13 , 95.00, 1
> 0.16 <= 0.164825 , 0.162412 , 100.00, 1
# target 50% 0.0725
# target 75% 0.09
# target 90% 0.12
# target 99% 0.16386
# target 99.9% 0.164728
Error cases : count 9 avg 0.080604074 +/- 0.03648 min 0.039005792 max 0.164824901 sum 0.725436665
# range, mid point, percentile, count
>= 0.0390058 <= 0.04 , 0.0395029 , 11.11, 1
> 0.05 <= 0.06 , 0.055 , 22.22, 1
> 0.06 <= 0.07 , 0.065 , 55.56, 3
> 0.07 <= 0.08 , 0.075 , 66.67, 1
> 0.1 <= 0.12 , 0.11 , 88.89, 2
> 0.16 <= 0.164825 , 0.162412 , 100.00, 1
# target 50% 0.0683333
# target 75% 0.1075
# target 90% 0.160482
# target 99% 0.164391
# target 99.9% 0.164781
# Socket and IP used for each connection:
[0]   5 socket used, resolved to 10.96.170.88:8080, connection timing : count 5 avg 0.016470151 +/- 0.0118 min 0.006279733 max 0.039608839 sum 0.082350754
[1]   5 socket used, resolved to 10.96.170.88:8080, connection timing : count 5 avg 0.019381182 +/- 0.01619 min 0.004276236 max 0.050706462 sum 0.096905911
[2]   1 socket used, resolved to 10.96.170.88:8080, connection timing : count 1 avg 0.007946486 +/- 0 min 0.007946486 max 0.007946486 sum 0.007946486
[3]   1 socket used, resolved to 10.96.170.88:8080, connection timing : count 1 avg 0.014975546 +/- 0 min 0.014975546 max 0.014975546 sum 0.014975546
Connection time histogram (s) : count 12 avg 0.016848225 +/- 0.0133 min 0.004276236 max 0.050706462 sum 0.202178697
# range, mid point, percentile, count
>= 0.00427624 <= 0.005 , 0.00463812 , 8.33, 1
> 0.006 <= 0.007 , 0.0065 , 16.67, 1
> 0.007 <= 0.008 , 0.0075 , 25.00, 1
> 0.01 <= 0.011 , 0.0105 , 33.33, 1
> 0.011 <= 0.012 , 0.0115 , 50.00, 2
> 0.012 <= 0.014 , 0.013 , 58.33, 1
> 0.014 <= 0.016 , 0.015 , 83.33, 3
> 0.035 <= 0.04 , 0.0375 , 91.67, 1
> 0.05 <= 0.0507065 , 0.0503532 , 100.00, 1
# target 50% 0.012
# target 75% 0.0153333
# target 90% 0.039
# target 99% 0.0506217
# target 99.9% 0.050698
Sockets used: 12 (for perfect keepalive, would be 4)
Uniform: false, Jitter: false, Catchup allowed: true
IP addresses distribution:
10.96.170.88:8080: 12
Code 200 : 11 (55.0 %)
Code 503 : 9 (45.0 %)
Response Header Sizes : count 20 avg 215.05 +/- 194.5 min 0 max 391 sum 4301
Response Body/Total Sizes : count 20 avg 1454.85 +/- 1098 min 241 max 2448 sum 29097
All done 20 calls (plus 0 warmup) 77.426 ms avg, 42.3 qps
동시 연결이 많아지는 경우, Circuit Breaking에 의한 에러의 비율 조금 더 높아지는 것을 볼 수 있습니다.
이상으로 Cilium의 L7 Aware Traffic Management를 살펴봤습니다. 개인적으로는 CRD가 envoy의 용어나 설정을 노출하는 방식이라 너무 복잡하지 않나라는 생각이 들었습니다.
마치며
이번 게시물에서는 Cilium의 ServiceMesh에 대해서 살펴봤습니다.
기존에 Istio를 사용해보신 분은 다소 혼란스러울 수 있을 것 같습니다. Istio에서는 istio를 설치하면 Istio가 제공하는 CRD를 통해서 Service Mesh의 여러가지 목적을 달성합니다. Cilium의 ServiceMesh는 Cilium이 CNI Plugin의 역할에서 Ingress, Gateway API의 역할을 확장하고, 별도의 CRD를 설치해 Traffic Management 기능을 제한적으로 제공하는 단계로 보입니다.
Service Mesh라는 관점에서 Istio의 완성도가 높지만, 오히려 애플리케이션 보다 Istio가 비대해지는 경향이 있기 때문에 작은 규모의 워크로드에는 적합하지 않을 수 있습니다.
한편으로 Cilium이 제공하는 ServiceMesh는 Cilium 즉, eBPF를 통한 구현이 되는데, 중간 과정에 대한 과도한 생략이 동작을 직관적으로 이해하는데 어렵게 느껴집니다. eBPF로 구현되어 효과적일 것이라는 가정을 하지만 '제대로 동작하지 않을 때는 어디를 봐야할까?'라는 고민이 되는 부분도 있었습니다.
다음 게시물에서는 Ciilum의 Security에 대해서 살펴보겠습니다.
'Cilium' 카테고리의 다른 글
| [10] Cilium - Security (0) | 2025.09.06 |
|---|---|
| AKS의 Azure CNI Powered by Cilium (0) | 2025.08.29 |
| [8] Cilium - Cluster Mesh (0) | 2025.08.14 |
| [7] Cilium - BGP Control Plane (0) | 2025.08.14 |
| [6] Cilium - LoadBalancer IPAM, L2 Announcement (0) | 2025.08.08 |


