
| 일 | 월 | 화 | 수 | 목 | 금 | 토 |
|---|---|---|---|---|---|---|
| 1 | 2 | 3 | 4 | 5 | 6 | 7 |
| 8 | 9 | 10 | 11 | 12 | 13 | 14 |
| 15 | 16 | 17 | 18 | 19 | 20 | 21 |
| 22 | 23 | 24 | 25 | 26 | 27 | 28 |
- minIO
- AKS
- EKS
- VPA
- calico
- 쿠버네티스
- curl
- AutoScaling
- upgrade
- windows
- ubuntu
- Azure
- HPA
- Object Storage
- ansible
- ipam
- cilium
- 컨테이너
- Timeout
- 묘공단
- 업그레이드
- gateway api
- go
- directpv
- vscode
- aws
- Karpenter
- WSL
- KEDA
- kubernetes
- Today
- Total
a story
[8] Cilium - Cluster Mesh 본문
이번 게시물에서는 Cilium 환경의 Multi Cluster 기능을 제공하는 ClusterMesh에 대해서 알아보겠습니다. ClusterMesh는 Cilium으로 구성된 Multi-Cluster 환경에서 각 클러스터의 Service를 손쉽게 접근 가능하게 하며,서로 다른 클러스터의 워크로드를 하나의 Service로 노출하는 방식도 제공합니다.
출처: https://cilium.io/use-cases/cluster-mesh/
목차
- 실습 환경 구성
- ClusterMesh 구성
- ClusterMesh 동작 확인
- Global Service 생성
- Service Affinity 활용
1. 실습 환경 구성
해당 실습에서는 kind를 통해서 실습 환경을 구성하겠습니다. 아래와 같이 각 east, west 클러스터를 생성합니다.
# west 클러스터 생성
kind create cluster --name west --image kindest/node:v1.33.2 --config - <<EOF
kind: Cluster
apiVersion: kind.x-k8s.io/v1alpha4
nodes:
- role: control-plane
  extraPortMappings:
  - containerPort: 30000 # sample apps
    hostPort: 30000
  - containerPort: 30001 # hubble ui
    hostPort: 30001
- role: worker
  extraPortMappings:
  - containerPort: 30002 # sample apps
    hostPort: 30002
networking:
  podSubnet: "10.0.0.0/16"
  serviceSubnet: "10.2.0.0/16"
  disableDefaultCNI: true
  kubeProxyMode: none
EOF

# 설치 확인
kubectl get node
kubectl get pod -A

$ kubectl get node
NAME                 STATUS     ROLES           AGE   VERSION
west-control-plane   NotReady   control-plane   17s   v1.33.2
west-worker          NotReady   <none>          7s    v1.33.2
$ kubectl get pod -A
NAMESPACE            NAME                                         READY   STATUS    RESTARTS   AGE
kube-system          coredns-674b8bbfcf-b2hsv                     0/1     Pending   0          14s
kube-system          coredns-674b8bbfcf-p5fcx                     0/1     Pending   0          14s
kube-system          etcd-west-control-plane                      1/1     Running   0          21s
kube-system          kube-apiserver-west-control-plane            1/1     Running   0          19s
kube-system          kube-controller-manager-west-control-plane   1/1     Running   0          19s
kube-system          kube-scheduler-west-control-plane            1/1     Running   0          19s
local-path-storage   local-path-provisioner-7dc846544d-nhxdw      0/1     Pending   0          14s


# 노드에 기본 툴 설치
docker exec -it west-control-plane sh -c 'apt update && apt install tree psmisc lsof wget net-tools dnsutils tcpdump ngrep iputils-ping git -y'
docker exec -it west-worker sh -c 'apt update && apt install tree psmisc lsof wget net-tools dnsutils tcpdump ngrep iputils-ping git -y'

# east 클러스터 생성
kind create cluster --name east --image kindest/node:v1.33.2 --config - <<EOF
kind: Cluster
apiVersion: kind.x-k8s.io/v1alpha4
nodes:
- role: control-plane
  extraPortMappings:
  - containerPort: 31000 # sample apps
    hostPort: 31000
  - containerPort: 31001 # hubble ui
    hostPort: 31001
- role: worker
  extraPortMappings:
  - containerPort: 31002 # sample apps
    hostPort: 31002
networking:
  podSubnet: "10.1.0.0/16"
  serviceSubnet: "10.3.0.0/16"
  disableDefaultCNI: true
  kubeProxyMode: none
EOF

# 노드에 기본 툴 설치
docker exec -it east-control-plane sh -c 'apt update && apt install tree psmisc lsof wget net-tools dnsutils tcpdump ngrep iputils-ping git -y'
docker exec -it east-worker sh -c 'apt update && apt install tree psmisc lsof wget net-tools dnsutils tcpdump ngrep iputils-ping git -y'


# kind로 클러스터를 생성하면, 각 클러스터 노드가 하나의 파드 처럼 실행된다.
$ docker ps
CONTAINER ID   IMAGE                  COMMAND                  CREATED             STATUS             PORTS                                                             NAMES
92f3d35a477b   kindest/node:v1.33.2   "/usr/local/bin/entr…"   6 minutes ago       Up 6 minutes       0.0.0.0:31000-31001->31000-31001/tcp, 127.0.0.1:45365->6443/tcp   east-control-plane
5e1fbf3599d2   kindest/node:v1.33.2   "/usr/local/bin/entr…"   6 minutes ago       Up 6 minutes       0.0.0.0:31002->31002/tcp                                          east-worker
4c5e055b9538   kindest/node:v1.33.2   "/usr/local/bin/entr…"   About an hour ago   Up About an hour   0.0.0.0:30000-30001->30000-30001/tcp, 127.0.0.1:39275->6443/tcp   west-control-plane
8dc2bd93443e   kindest/node:v1.33.2   "/usr/local/bin/entr…"   About an hour ago   Up About an hour   0.0.0.0:30002->30002/tcp                                          west-worker

# 설치 확인
kubectl config get-contexts

CURRENT   NAME        CLUSTER     AUTHINFO    NAMESPACE
*         kind-east   kind-east   kind-east
          kind-west   kind-west   kind-west

kubectl config set-context kind-east
kubectl get node
kubectl get node --context kind-west
kubectl get pod -A
kubectl get pod -A --context kind-west

$ kubectl config set-context kind-east
Context "kind-east" modified.
$ kubectl get node
NAME                 STATUS     ROLES           AGE    VERSION
east-control-plane   NotReady   control-plane   118s   v1.33.2
east-worker          NotReady   <none>          109s   v1.33.2
$ kubectl get node --context kind-west
NAME                 STATUS     ROLES           AGE   VERSION
west-control-plane   NotReady   control-plane   76m   v1.33.2
west-worker          NotReady   <none>          76m   v1.33.2
$ kubectl get pod -A
NAMESPACE            NAME                                         READY   STATUS    RESTARTS   AGE
kube-system          coredns-674b8bbfcf-pwhf8                     0/1     Pending   0          119s
kube-system          coredns-674b8bbfcf-qr2dw                     0/1     Pending   0          119s
kube-system          etcd-east-control-plane                      1/1     Running   0          2m6s
kube-system          kube-apiserver-east-control-plane            1/1     Running   0          2m5s
kube-system          kube-controller-manager-east-control-plane   1/1     Running   0          2m5s
kube-system          kube-scheduler-east-control-plane            1/1     Running   0          2m6s
local-path-storage   local-path-provisioner-7dc846544d-mp7wb      0/1     Pending   0          119s
$ kubectl get pod -A --context kind-west
NAMESPACE            NAME                                         READY   STATUS    RESTARTS   AGE
kube-system          coredns-674b8bbfcf-b2hsv                     0/1     Pending   0          76m
kube-system          coredns-674b8bbfcf-p5fcx                     0/1     Pending   0          76m
kube-system          etcd-west-control-plane                      1/1     Running   0          76m
kube-system          kube-apiserver-west-control-plane            1/1     Running   0          76m
kube-system          kube-controller-manager-west-control-plane   1/1     Running   0          76m
kube-system          kube-scheduler-west-control-plane            1/1     Running   0          76m
local-path-storage   local-path-provisioner-7dc846544d-nhxdw      0/1     Pending   0          76m
kind 클러스터에 cilium을 설치하기 위해서 cilium CLI를 설치하고 이후 cilium install로 CNI Plugin을 설치합니다.
Cilium 설치 옵션을 살펴보면 --set cluster.name=west --set cluster.id=1와 같은 옵션을 사용한 것을 알 수 있습니다. 이 값을 통해서 ClusterMesh로 구성된 각 클러스터를 구분할 수 있습니다.
# cilium cli 설치
CILIUM_CLI_VERSION=$(curl -s https://raw.githubusercontent.com/cilium/cilium-cli/main/stable.txt)
CLI_ARCH=amd64
if [ "$(uname -m)" = "aarch64" ]; then CLI_ARCH=arm64; fi
curl -L --fail --remote-name-all https://github.com/cilium/cilium-cli/releases/download/${CILIUM_CLI_VERSION}/cilium-linux-${CLI_ARCH}.tar.gz{,.sha256sum}
sha256sum --check cilium-linux-${CLI_ARCH}.tar.gz.sha256sum
sudo tar xzvfC cilium-linux-${CLI_ARCH}.tar.gz /usr/local/bin
rm cilium-linux-${CLI_ARCH}.tar.gz{,.sha256sum}

# cilium cli 로 cilium cni 설치해보기 : dry-run
cilium install --version 1.17.6 --set ipam.mode=kubernetes \
--set kubeProxyReplacement=true --set bpf.masquerade=true \
--set endpointHealthChecking.enabled=false --set healthChecking=false \
--set operator.replicas=1 --set debug.enabled=true \
--set routingMode=native --set autoDirectNodeRoutes=true --set ipv4NativeRoutingCIDR=10.0.0.0/16 \
--set ipMasqAgent.enabled=true --set ipMasqAgent.config.nonMasqueradeCIDRs='{10.1.0.0/16}' \
--set cluster.name=west --set cluster.id=1 \
--context kind-west --dry-run-helm-values

# cilium cli 로 cilium cni 설치
cilium install --version 1.17.6 --set ipam.mode=kubernetes \
--set kubeProxyReplacement=true --set bpf.masquerade=true \
--set endpointHealthChecking.enabled=false --set healthChecking=false \
--set operator.replicas=1 --set debug.enabled=true \
--set routingMode=native --set autoDirectNodeRoutes=true --set ipv4NativeRoutingCIDR=10.0.0.0/16 \
--set ipMasqAgent.enabled=true --set ipMasqAgent.config.nonMasqueradeCIDRs='{10.1.0.0/16}' \
--set cluster.name=west --set cluster.id=1 \
--context kind-west

# 배포 확인
watch kubectl get pod -n kube-system --context kind-west

NAME                                         READY   STATUS    RESTARTS   AGE
cilium-2zw9h                                 1/1     Running   0          3m13s
cilium-envoy-72896                           1/1     Running   0          3m13s
cilium-envoy-dzgbf                           1/1     Running   0          3m13s
cilium-gtnns                                 1/1     Running   0          3m13s
cilium-operator-66dd84cf7c-tntlf             1/1     Running   0          3m13s
coredns-674b8bbfcf-b2hsv                     1/1     Running   0          87m
coredns-674b8bbfcf-p5fcx                     1/1     Running   0          87m
etcd-west-control-plane                      1/1     Running   0          87m
kube-apiserver-west-control-plane            1/1     Running   0          87m
kube-controller-manager-west-control-plane   1/1     Running   0          87m
kube-scheduler-west-control-plane            1/1     Running   0          87m

# dry-run
cilium install --version 1.17.6 --set ipam.mode=kubernetes \
--set kubeProxyReplacement=true --set bpf.masquerade=true \
--set endpointHealthChecking.enabled=false --set healthChecking=false \
--set operator.replicas=1 --set debug.enabled=true \
--set routingMode=native --set autoDirectNodeRoutes=true --set ipv4NativeRoutingCIDR=10.1.0.0/16 \
--set ipMasqAgent.enabled=true --set ipMasqAgent.config.nonMasqueradeCIDRs='{10.0.0.0/16}' \
--set cluster.name=east --set cluster.id=2 \ # 클러스터 구분자
--context kind-east --dry-run-helm-values

cilium install --version 1.17.6 --set ipam.mode=kubernetes \
--set kubeProxyReplacement=true --set bpf.masquerade=true \
--set endpointHealthChecking.enabled=false --set healthChecking=false \
--set operator.replicas=1 --set debug.enabled=true \
--set routingMode=native --set autoDirectNodeRoutes=true --set ipv4NativeRoutingCIDR=10.1.0.0/16 \
--set ipMasqAgent.enabled=true --set ipMasqAgent.config.nonMasqueradeCIDRs='{10.0.0.0/16}' \
--set cluster.name=east --set cluster.id=2 \ # 클러스터 구분자
--context kind-east

# 배포 확인
watch kubectl get pod -n kube-system --context kind-east

NAME                                         READY   STATUS    RESTARTS      AGE
cilium-5r7nk                                 1/1     Running   6 (62m ago)   65m
cilium-clfsn                                 1/1     Running   6 (62m ago)   65m
cilium-envoy-7tg4m                           1/1     Running   1 (61m ago)   65m
cilium-envoy-fs8w8                           1/1     Running   1 (61m ago)   65m
cilium-operator-7df4989d4b-7pb9d             1/1     Running   2 (61m ago)   65m
coredns-674b8bbfcf-pwhf8                     1/1     Running   0             100m
coredns-674b8bbfcf-qr2dw                     1/1     Running   0             100m
etcd-east-control-plane                      1/1     Running   2 (61m ago)   100m
kube-apiserver-east-control-plane            1/1     Running   2 (61m ago)   100m
kube-controller-manager-east-control-plane   1/1     Running   2 (61m ago)   100m
kube-scheduler-east-control-plane            1/1     Running   2 (61m ago)   100m

# 확인
cilium status --context kind-west
cilium status --context kind-east
cilium config view --context kind-west
cilium config view --context kind-east
kubectl --context kind-west exec -it -n kube-system ds/cilium -- cilium status --verbose
kubectl --context kind-east exec -it -n kube-system ds/cilium -- cilium status --verbose

kubectl --context kind-west -n kube-system exec ds/cilium -c cilium-agent -- cilium-dbg bpf ipmasq list
kubectl --context kind-east -n kube-system exec ds/cilium -c cilium-agent -- cilium-dbg bpf ipmasq list

# coredns 확인 : 둘 다, cluster.local 기본 도메인 네임 사용 중
kubectl describe cm -n kube-system coredns --context kind-west | grep kubernetes
    kubernetes cluster.local in-addr.arpa ip6.arpa {

kubectl describe cm -n kube-system coredns --context kind-west | grep kubernetes
    kubernetes cluster.local in-addr.arpa ip6.arpa {

# 삭제 방법 (진행하지 않음)
# cilium uninstall --context kind-west
# cilium uninstall --context kind-east


# 클러스터 삭제 (실습 종료 후)
# kind delete cluster --name west && kind delete cluster --name east && kind delete cluster --name center
참고로, WSL 환경의 kind 클러스터라면 cilium에서 failed to create fsnotify watcher: too many open files 와 같은 에러가 발생할 수 있습니다.
$ kubectl get po -A
NAMESPACE            NAME                                         READY   STATUS             RESTARTS        AGE
kube-system          cilium-5r7nk                                 0/1     CrashLoopBackOff   5 (23s ago)     3m35s
kube-system          cilium-clfsn                                 0/1     CrashLoopBackOff   5 (20s ago)     3m35s

$ kubectl logs -f -n kube-system          cilium-5r7nk
Defaulted container "cilium-agent" out of: cilium-agent, config (init), mount-cgroup (init), apply-sysctl-overwrites (init), mount-bpf-fs (init), clean-cilium-state (init), install-cni-binaries (init)
...
time="2025-08-14T06:20:54.404358872Z" level=info msg="Stopped gops server" address="127.0.0.1:9890" subsys=gops
time="2025-08-14T06:20:54.40441131Z" level=fatal msg="failed to start: unable to create config directory watcher: too many open files\nfailed to stop: unable to find controller ipcache-inject-labels" subsys=daemon
failed to create fsnotify watcher: too many open files
이 경우는 아래 문서의 known issue를 확인하시고 WSL에서 파라미터를 변경해주시기 바랍니다.
https://kind.sigs.k8s.io/docs/user/known-issues#pod-errors-due-to-too-many-open-files
$ sysctl -a |grep inotify
..
user.max_inotify_instances = 128
user.max_inotify_watches = 524288
...
$ sudo sysctl fs.inotify.max_user_instances=512
fs.inotify.max_user_instances = 512
$ sysctl -a |grep inotify
..
user.max_inotify_instances = 512
user.max_inotify_watches = 524288
$ sudo vi /etc/sysctl.conf # 영구 설정
fs.inotify.max_user_instances = 512
이후 docker restart <container name>를 통해서 각 노드에 대한 컨테이너를 재시작하면 cilium 파드가 정상화 됩니다.
2. ClusterMesh 구성
이제 두 kind 클러스터를 ClusterMesh로 구성해보겠습니다.
절차는 아래 문서를 참고하실 수 있습니다.
참고: https://docs.cilium.io/en/stable/network/clustermesh/clustermesh/
먼저 클러스터는 --set routingMode=native --set autoDirectNodeRoutes=true으로 구성되어 있으며, 다만 각 노드의 라우팅 정보에서 상대 PodCIDR에 대한 라우팅이 없음을 확인할 수 있습니다.
# 라우팅 정보 확인
docker exec -it west-control-plane ip -c route
docker exec -it west-worker ip -c route
docker exec -it east-control-plane ip -c route
docker exec -it east-worker ip -c route

$ docker exec -it west-control-plane ip -c route
default via 172.19.0.1 dev eth0
10.0.0.0/24 via 10.0.0.133 dev cilium_host proto kernel src 10.0.0.133
10.0.0.133 dev cilium_host proto kernel scope link
10.0.1.0/24 via 172.19.0.3 dev eth0 proto kernel
172.19.0.0/16 dev eth0 proto kernel scope link src 172.19.0.2

$ docker exec -it east-control-plane ip -c route
default via 172.19.0.1 dev eth0
10.1.0.0/24 via 10.1.0.224 dev cilium_host proto kernel src 10.1.0.224
10.1.0.224 dev cilium_host proto kernel scope link
10.1.1.0/24 via 172.19.0.4 dev eth0 proto kernel
172.19.0.0/16 dev eth0 proto kernel scope link src 172.19.0.5
Cilium에서 mTLS에 사용된 CA 인증서를 각 클러스터가 공유하기 위해서 아래와 같이 secret을 동일하게 맞춰주겠습니다.
# Shared Certificate Authority
kubectl get secret -n kube-system cilium-ca --context kind-east
kubectl delete secret -n kube-system cilium-ca --context kind-east

kubectl --context kind-west get secret -n kube-system cilium-ca -o yaml | \
kubectl --context kind-east create -f -
실제 두 클러스터에 cluster mesh를 활성화 합니다.
# 모니터링 : 신규 터미널 2개
cilium clustermesh status --context kind-west --wait
cilium clustermesh status --context kind-east --wait

# Enable Cluster Mesh : 실습 환경에서는 Cluster Mesh control plane 의 노출을 NodePort 로 지정함
cilium clustermesh enable --service-type NodePort --enable-kvstoremesh=false --context kind-west
cilium clustermesh enable --service-type NodePort --enable-kvstoremesh=false --context kind-east

# 모니터링 결과 확인
$ cilium clustermesh status --context kind-west --wait
⌛ Waiting (0s) for access information: unable to get clustermesh service "clustermesh-apiserver": services "clustermesh-apiserver" not found
⌛ Waiting (10s) for access information: unable to get clustermesh service "clustermesh-apiserver": services "clustermesh-apiserver" not found
⌛ Waiting (20s) for access information: unable to get clustermesh service "clustermesh-apiserver": services "clustermesh-apiserver" not found

⌛ Waiting (30s) for access information: unable to get clustermesh service "clustermesh-apiserver": services "clustermesh-apiserver" not found
Trying to get secret clustermesh-apiserver-remote-cert by deprecated name clustermesh-apiserver-client-cert
Trying to get secret clustermesh-apiserver-client-cert by deprecated name clustermesh-apiserver-client-certs
⌛ Waiting (40s) for access information: unable to get client secret to access clustermesh service: unable to get secret "clustermesh-apiserver-client-certs" and no deprecated names to try
Trying to get secret clustermesh-apiserver-remote-cert by deprecated name clustermesh-apiserver-client-cert
Trying to get secret clustermesh-apiserver-client-cert by deprecated name clustermesh-apiserver-client-certs
⚠️  Service type NodePort detected! Service may fail when nodes are removed from the cluster!
✅ Service "clustermesh-apiserver" of type "NodePort" found
✅ Cluster access information is available:
  - 172.19.0.2:32379
⌛ Waiting (0s) for deployment clustermesh-apiserver to become ready: only 0 of 1 replicas are available
⌛ Waiting (10s) for deployment clustermesh-apiserver to become ready: only 0 of 1 replicas are available
⌛ Waiting (20s) for deployment clustermesh-apiserver to become ready: only 0 of 1 replicas are available
✅ Deployment clustermesh-apiserver is ready
ℹ️  KVStoreMesh is disabled


🔌 No cluster connected

🔀 Global services: [ min:0 / avg:0.0 / max:0 ]


# 32379 NodePort 정보 : clustermesh-apiserver 서비스 정보
kubectl get svc,ep -n kube-system clustermesh-apiserver --context kind-west
NAME                            TYPE       CLUSTER-IP   EXTERNAL-IP   PORT(S)          AGE
service/clustermesh-apiserver   NodePort   10.2.26.7    <none>        2379:32379/TCP   9m9s

NAME                              ENDPOINTS        AGE
endpoints/clustermesh-apiserver   10.0.1.19:2379   9m9s # 대상 파드는 clustermesh-apiserver 파드 IP

kubectl get pod -n kube-system -owide --context kind-west | grep clustermesh

$ kubectl get pod -n kube-system -owide --context kind-west | grep clustermesh
clustermesh-apiserver-5cf45db9cc-76d2s       2/2     Running     0          9m57s   10.0.1.19    west-worker          <none>           <none>
clustermesh-apiserver-generate-certs-t5s4k   0/1     Completed   0          9m56s   172.19.0.3   west-worker          <none>           <none>


kubectl get svc,ep -n kube-system clustermesh-apiserver --context kind-east
NAME                            TYPE       CLUSTER-IP    EXTERNAL-IP   PORT(S)          AGE
service/clustermesh-apiserver   NodePort   10.3.32.115   <none>        2379:32379/TCP   10m

NAME                              ENDPOINTS         AGE
endpoints/clustermesh-apiserver   10.1.1.148:2379   10m # 대상 파드는 clustermesh-apiserver 파드 IP

kubectl get pod -n kube-system -owide --context kind-east | grep clustermesh

$ kubectl get pod -n kube-system -owide --context kind-east | grep clustermesh
clustermesh-apiserver-5cf45db9cc-zcddx       2/2     Running     0              10m    10.1.1.148   east-worker          <none>           <none>
clustermesh-apiserver-generate-certs-sf7cv   0/1     Completed   0              10m    172.19.0.4   east-worker          <none>           <none>
이제 실제 ClusterMesh가 활성화된 두 클러스터를 연결해보겠습니다.
# Connect Clusters
cilium clustermesh connect --context kind-west --destination-context kind-east

$ cilium clustermesh connect --context kind-west --destination-context kind-east
✨ Extracting access information of cluster west...
🔑 Extracting secrets from cluster west...
⚠️  Service type NodePort detected! Service may fail when nodes are removed from the cluster!
ℹ️  Found ClusterMesh service IPs: [172.19.0.2]
✨ Extracting access information of cluster east...
🔑 Extracting secrets from cluster east...
⚠️  Service type NodePort detected! Service may fail when nodes are removed from the cluster!
ℹ️  Found ClusterMesh service IPs: [172.19.0.5]
ℹ️ Configuring Cilium in cluster kind-west to connect to cluster kind-east
ℹ️ Configuring Cilium in cluster kind-east to connect to cluster kind-west
✅ Connected cluster kind-west <=> kind-east!

# 확인
cilium clustermesh status --context kind-west --wait
cilium clustermesh status --context kind-east --wait

# 사전 정보
cilium clustermesh status --context kind-west --wait
⚠️  Service type NodePort detected! Service may fail when nodes are removed from thecluster!
✅ Service "clustermesh-apiserver" of type "NodePort" found
✅ Cluster access information is available:
  - 172.19.0.2:32379
✅ Deployment clustermesh-apiserver is ready
ℹ️  KVStoreMesh is disabled


🔌 No cluster connected

🔀 Global services: [ min:0 / avg:0.0 / max:0 ]

# 사후 정보
cilium clustermesh status --context kind-west --wait
⚠️  Service type NodePort detected! Service may fail when nodes are removed from thecluster!
✅ Service "clustermesh-apiserver" of type "NodePort" found
✅ Cluster access information is available:
  - 172.19.0.2:32379
✅ Deployment clustermesh-apiserver is ready
ℹ️  KVStoreMesh is disabled

✅ All 2 nodes are connected to all clusters [min:1 / avg:1.0 / max:1]

🔌 Cluster Connections:
- east: 2/2 configured, 2/2 connected

🔀 Global services: [ min:0 / avg:0.0 / max:0 ]
ClusterMesh 연결이 완료되었고 아래와 같이 구성정보를 확인하겠습니다.
# cilium-dbg로 clustermesh에 troubleshoot 정보 확인
kubectl exec -it -n kube-system ds/cilium -c cilium-agent --context kind-west -- cilium-dbg troubleshoot clustermesh
kubectl exec -it -n kube-system ds/cilium -c cilium-agent --context kind-east -- cilium-dbg troubleshoot clustermesh

# west 클러스터에서 east 클러스터 정보가 연결된 것으로 확인됨
$ kubectl exec -it -n kube-system ds/cilium -c cilium-agent --context kind-west -- cilium-dbg troubleshoot clustermesh
Found 1 cluster configurations

Cluster "east":
📄 Configuration path: /var/lib/cilium/clustermesh/east

🔌 Endpoints:
   - https://east.mesh.cilium.io:32379
     ✅ Hostname resolved to: 172.19.0.5
     ✅ TCP connection successfully established to 172.19.0.5:32379
     ✅ TLS connection successfully established to 172.19.0.5:32379
     ℹ️  Negotiated TLS version: TLS 1.3, ciphersuite TLS_AES_128_GCM_SHA256
     ℹ️  Etcd server version: 3.5.21

🔑 Digital certificates:
   ✅ TLS Root CA certificates:
      - Serial number:       8c:d7:b9:68:5a:41:d6:15:7f:63:df:99:65:b8:30:ea
        Subject:             CN=Cilium CA
        Issuer:              CN=Cilium CA
        Validity:
          Not before:  2025-08-14 05:55:34 +0000 UTC
          Not after:   2028-08-13 05:55:34 +0000 UTC
   ✅ TLS client certificates:
      - Serial number:       19:08:b5:6b:2d:c9:59:0b:5f:ba:04:04:b1:cc:34:62:fb:66:ec:9f
        Subject:             CN=remote
        Issuer:              CN=Cilium CA
        Validity:
          Not before:  2025-08-14 08:04:00 +0000 UTC
          Not after:   2028-08-13 08:04:00 +0000 UTC
        ⚠️ Cannot verify certificate with the configured root CAs

⚙️ Etcd client:
   ✅ Etcd connection successfully established
   ℹ️  Etcd cluster ID: edd8e57410e76ac9


# 확인
cilium status --context kind-west
cilium status --context kind-east

$ cilium status --context kind-west
    /¯¯\
 /¯¯\__/¯¯\    Cilium:             OK
 \__/¯¯\__/    Operator:           OK
 /¯¯\__/¯¯\    Envoy DaemonSet:    OK
 \__/¯¯\__/    Hubble Relay:       disabled
    \__/       ClusterMesh:        OK

DaemonSet              cilium                   Desired: 2, Ready: 2/2, Available: 2/2
DaemonSet              cilium-envoy             Desired: 2, Ready: 2/2, Available: 2/2
Deployment             cilium-operator          Desired: 1, Ready: 1/1, Available: 1/1
Deployment             clustermesh-apiserver    Desired: 1, Ready: 1/1, Available: 1/1
Containers:            cilium                   Running: 2
                       cilium-envoy             Running: 2
                       cilium-operator          Running: 1
                       clustermesh-apiserver    Running: 1
                       hubble-relay
Cluster Pods:          4/4 managed by Cilium
Helm chart version:    1.17.6
Image versions         cilium                   quay.io/cilium/cilium:v1.17.6@sha256:544de3d4fed7acba72758413812780a4972d47c39035f2a06d6145d8644a3353: 2
                       cilium-envoy             quay.io/cilium/cilium-envoy:v1.33.4-1752151664-7c2edb0b44cf95f326d628b837fcdd845102ba68@sha256:318eff387835ca2717baab42a84f35a83a5f9e7d519253df87269f80b9ff0171: 2
                       cilium-operator          quay.io/cilium/operator-generic:v1.17.6@sha256:91ac3bf7be7bed30e90218f219d4f3062a63377689ee7246062fa0cc3839d096: 1
                       clustermesh-apiserver    quay.io/cilium/clustermesh-apiserver:v1.17.6@sha256:f619e97432db427e1511bf91af3be8ded418c53a353a09629e04c5880659d1df: 2

cilium clustermesh status --context kind-west
cilium clustermesh status --context kind-east

$ cilium clustermesh status --context kind-west
⚠️  Service type NodePort detected! Service may fail when nodes are removed from the cluster!
✅ Service "clustermesh-apiserver" of type "NodePort" found
✅ Cluster access information is available:
  - 172.19.0.2:32379
✅ Deployment clustermesh-apiserver is ready
ℹ️  KVStoreMesh is disabled

✅ All 2 nodes are connected to all clusters [min:1 / avg:1.0 / max:1]

🔌 Cluster Connections:
  - east: 2/2 configured, 2/2 connected

🔀 Global services: [ min:0 / avg:0.0 / max:0 ]

# helm을 통해서도 구성이 가능하며, 실제로 추가된 정보가 확인된다.
helm get values -n kube-system cilium --kube-context kind-west
...
clustermesh:
  apiserver:
    kvstoremesh:
      enabled: false
    service:
      type: NodePort
    tls:
      auto:
        enabled: true
        method: cronJob
        schedule: 0 0 1 */4 *
  config:
    clusters:
    - ips:
      - 172.19.0.5
      name: east
      port: 32379
    enabled: true
  useAPIServer: true
...
앞서 ClusterMesh 연결 전에 확인한 각 노드의 라우팅 정보를 다시 확인해보겠습니다.
# 라우팅 정보 확인 : 클러스터간 PodCIDR 라우팅 주입됨
docker exec -it west-control-plane ip -c route
docker exec -it west-worker ip -c route
docker exec -it east-control-plane ip -c route
docker exec -it east-worker ip -c route

# 사전
$ docker exec -it west-control-plane ip -c route
default via 172.19.0.1 dev eth0
10.0.0.0/24 via 10.0.0.133 dev cilium_host proto kernel src 10.0.0.133
10.0.0.133 dev cilium_host proto kernel scope link
10.0.1.0/24 via 172.19.0.3 dev eth0 proto kernel
172.19.0.0/16 dev eth0 proto kernel scope link src 172.19.0.2

$ docker exec -it east-control-plane ip -c route
default via 172.19.0.1 dev eth0
10.1.0.0/24 via 10.1.0.224 dev cilium_host proto kernel src 10.1.0.224
10.1.0.224 dev cilium_host proto kernel scope link
10.1.1.0/24 via 172.19.0.4 dev eth0 proto kernel
172.19.0.0/16 dev eth0 proto kernel scope link src 172.19.0.5

# 사후
$ docker exec -it west-control-plane ip -c route
default via 172.19.0.1 dev eth0
10.0.0.0/24 via 10.0.0.133 dev cilium_host proto kernel src 10.0.0.133
10.0.0.133 dev cilium_host proto kernel scope link
10.0.1.0/24 via 172.19.0.3 dev eth0 proto kernel
10.1.0.0/24 via 172.19.0.5 dev eth0 proto kernel # 추가됨
10.1.1.0/24 via 172.19.0.4 dev eth0 proto kernel # 추가됨
172.19.0.0/16 dev eth0 proto kernel scope link src 172.19.0.2

$ docker exec -it east-control-plane ip -c route
default via 172.19.0.1 dev eth0
10.0.0.0/24 via 172.19.0.2 dev eth0 proto kernel # 추가됨
10.0.1.0/24 via 172.19.0.3 dev eth0 proto kernel # 추가됨
10.1.0.0/24 via 10.1.0.224 dev cilium_host proto kernel src 10.1.0.224
10.1.0.224 dev cilium_host proto kernel scope link
10.1.1.0/24 via 172.19.0.4 dev eth0 proto kernel
172.19.0.0/16 dev eth0 proto kernel scope link src 172.19.0.5
3. ClusterMesh 동작 확인
이제 구성된 환경에서 통신이 어떻게 이뤄지는 지 확인해보겟습니다.
실제 동작을 가시적으로 확인해보기 위해서 hubble을 사용해보겠습니다.
# Helm repo 설정
helm repo add cilium https://helm.cilium.io/

# 설정
helm upgrade cilium cilium/cilium --version 1.17.6 --namespace kube-system --reuse-values \
--set hubble.enabled=true --set hubble.relay.enabled=true --set hubble.ui.enabled=true \
--set hubble.ui.service.type=NodePort --set hubble.ui.service.nodePort=30001 --kube-context kind-west
kubectl -n kube-system rollout restart ds/cilium --context kind-west

# 설정
helm upgrade cilium cilium/cilium --version 1.17.6 --namespace kube-system --reuse-values \
--set hubble.enabled=true --set hubble.relay.enabled=true --set hubble.ui.enabled=true \
--set hubble.ui.service.type=NodePort --set hubble.ui.service.nodePort=31001 --kube-context kind-east
kubectl -n kube-system rollout restart ds/cilium --context kind-east

# 확인
kubectl get svc,ep -n kube-system hubble-ui --context kind-west
kubectl get svc,ep -n kube-system hubble-ui --context kind-east

$ kubectl get svc,ep -n kube-system hubble-ui --context kind-west
Warning: v1 Endpoints is deprecated in v1.33+; use discovery.k8s.io/v1 EndpointSlice
NAME                TYPE       CLUSTER-IP   EXTERNAL-IP   PORT(S)        AGE
service/hubble-ui   NodePort   10.2.67.87   <none>        80:30001/TCP   89s

NAME                  ENDPOINTS         AGE
endpoints/hubble-ui   10.0.1.107:8081   89s

$ kubectl get svc,ep -n kube-system hubble-ui --context kind-east
Warning: v1 Endpoints is deprecated in v1.33+; use discovery.k8s.io/v1 EndpointSlice
NAME                TYPE       CLUSTER-IP     EXTERNAL-IP   PORT(S)        AGE
service/hubble-ui   NodePort   10.3.239.253   <none>        80:31001/TCP   63s

NAME                  ENDPOINTS         AGE
endpoints/hubble-ui   10.1.1.101:8081   63s

# hubble-ui 접속
http://localhost:30001
http://localhost:31001
Hubble UI로 정상 접속이 되면 이제 샘플 애플리케이션을 배포하여 각 클러스터 간 통신을 직접 확인해보겠습니다.
# 샘플 애플리케이션 배포
cat << EOF | kubectl apply --context kind-west -f -
apiVersion: v1
kind: Pod
metadata:
  name: curl-pod
  labels:
    app: curl
spec:
  containers:
  - name: curl
    image: nicolaka/netshoot
    command: ["tail"]
    args: ["-f", "/dev/null"]
  terminationGracePeriodSeconds: 0
EOF

cat << EOF | kubectl apply --context kind-east -f -
apiVersion: v1
kind: Pod
metadata:
  name: curl-pod
  labels:
    app: curl
spec:
  containers:
  - name: curl
    image: nicolaka/netshoot
    command: ["tail"]
    args: ["-f", "/dev/null"]
  terminationGracePeriodSeconds: 0
EOF


# 확인
kubectl get pod -owide --context kind-west  && kubectl get pod -owide  --context kind-east

$ kubectl get pod -owide --context kind-west  && kubectl get pod -owide  --context kind-east
NAME       READY   STATUS    RESTARTS   AGE    IP           NODE          NOMINATED NODE   READINESS GATES
curl-pod   1/1     Running   0          112s   10.0.1.180   west-worker   <none>           <none>
NAME       READY   STATUS    RESTARTS   AGE    IP           NODE          NOMINATED NODE   READINESS GATES
curl-pod   1/1     Running   0          106s   10.1.1.125   east-worker   <none>           <none>

# 각 파드간 ping 화인
kubectl exec -it curl-pod --context kind-west -- ping -c 1 10.1.1.125

$ kubectl exec -it curl-pod --context kind-west -- ping -c 1 10.1.1.125
PING 10.1.1.125 (10.1.1.125) 56(84) bytes of data.
64 bytes from 10.1.1.125: icmp_seq=1 ttl=62 time=0.545 ms

--- 10.1.1.125 ping statistics ---
1 packets transmitted, 1 received, 0% packet loss, time 0ms
rtt min/avg/max/mdev = 0.545/0.545/0.545/0.000 ms


# 목적지 파드에서 tcpdump 로 확인 : NAT 없이 직접 라우팅.
kubectl exec -it curl-pod --context kind-east -- tcpdump -i eth0 -nn

$ kubectl exec -it curl-pod --context kind-east -- tcpdump -i eth0 -nn
tcpdump: verbose output suppressed, use -v[v]... for full protocol decode
listening on eth0, link-type EN10MB (Ethernet), snapshot length 262144 bytes
12:48:50.769678 IP 10.0.1.180 > 10.1.1.125: ICMP echo request, id 2, seq 1, length 64
12:48:50.769738 IP 10.1.1.125 > 10.0.1.180: ICMP echo reply, id 2, seq 1, length 64
Hubble UI에서 확인해보면 클러스터에 대한 이름이 표시되며 통신이 이뤄지는 것을 볼 수 있습니다.
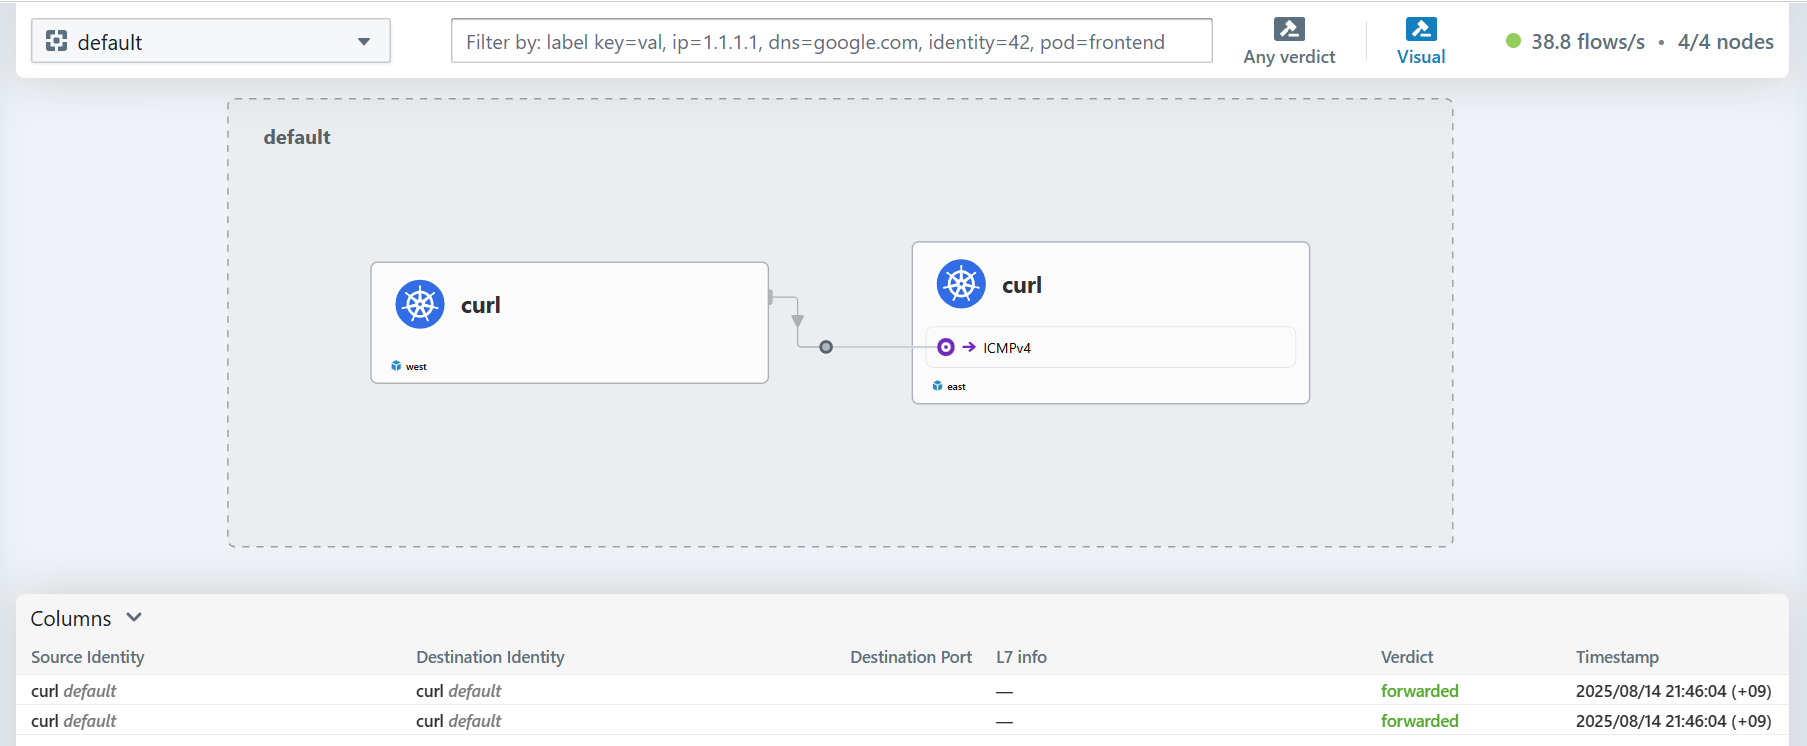
ClusterMesh로 클러스터를 연결하여 각 클러스터에 있는 파드들이 1:1로 통신하는 과정을 살펴봤습니다.
4. Global Service 생성
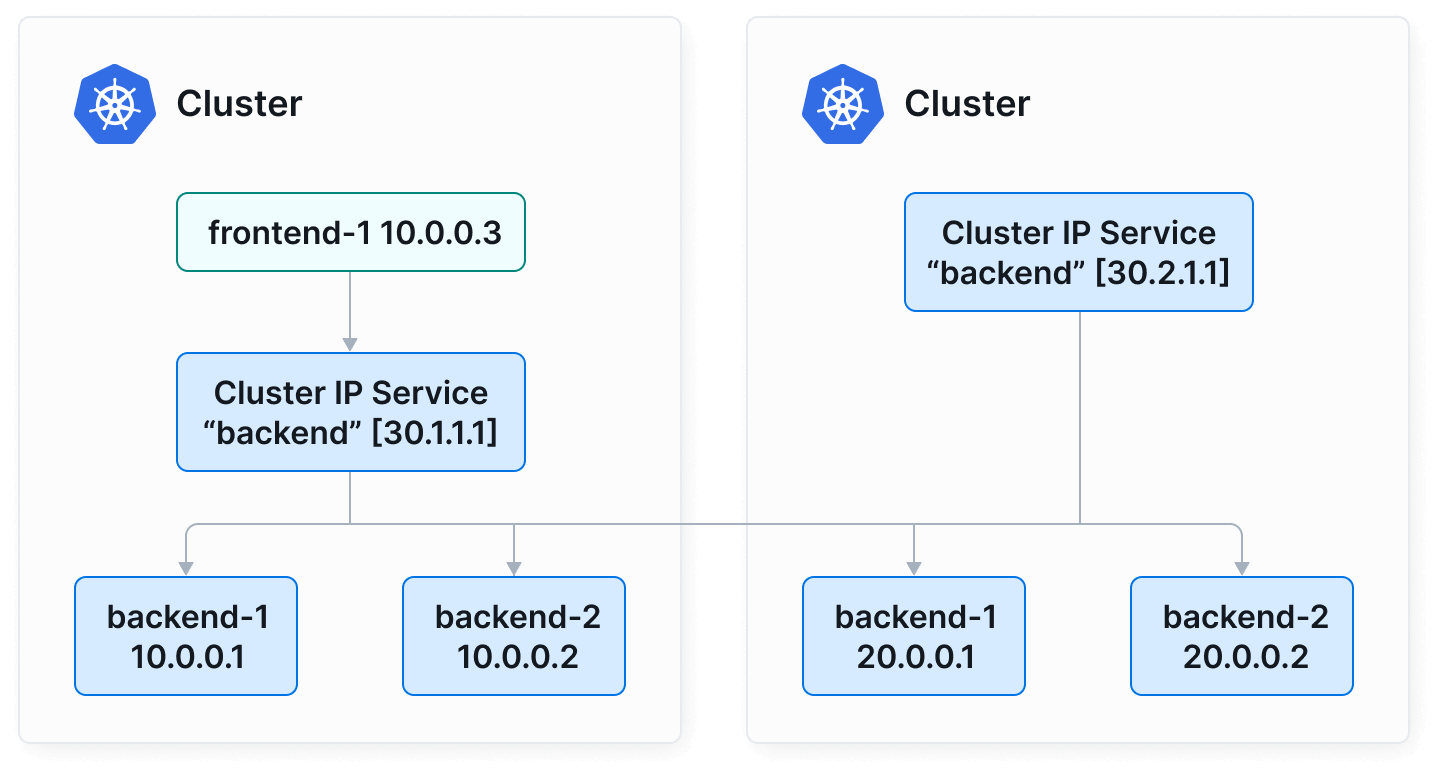
이제 ClusterMesh에서 두 클러스터의 워크로드로 로드밸런싱 서비스를 제공하는 Global Service를 구성해보겠습니다. 아래 예시와 같이 쿠버네티스의 서비스에 service.cilium.io/global: "true" 어노테이션을 사용합니다.
참고: https://docs.cilium.io/en/stable/network/clustermesh/services/
# 샘플 애플리케이션 & 서비스 배포
cat << EOF | kubectl apply --context kind-west -f -
apiVersion: apps/v1
kind: Deployment
metadata:
  name: webpod
spec:
  replicas: 2
  selector:
    matchLabels:
      app: webpod
  template:
    metadata:
      labels:
        app: webpod
    spec:
      affinity:
        podAntiAffinity:
          requiredDuringSchedulingIgnoredDuringExecution:
          - labelSelector:
              matchExpressions:
              - key: app
                operator: In
                values:
                - sample-app
            topologyKey: "kubernetes.io/hostname"
      containers:
      - name: webpod
        image: traefik/whoami
        ports:
        - containerPort: 80
---
apiVersion: v1
kind: Service
metadata:
  name: webpod
  labels:
    app: webpod
  annotations:
    service.cilium.io/global: "true"
spec:
  selector:
    app: webpod
  ports:
  - protocol: TCP
    port: 80
    targetPort: 80
  type: ClusterIP
EOF


# 샘플 애플리케이션 & 서비스 배포
cat << EOF | kubectl apply --context kind-east -f -
apiVersion: apps/v1
kind: Deployment
metadata:
  name: webpod
spec:
  replicas: 2
  selector:
    matchLabels:
      app: webpod
  template:
    metadata:
      labels:
        app: webpod
    spec:
      affinity:
        podAntiAffinity:
          requiredDuringSchedulingIgnoredDuringExecution:
          - labelSelector:
              matchExpressions:
              - key: app
                operator: In
                values:
                - sample-app
            topologyKey: "kubernetes.io/hostname"
      containers:
      - name: webpod
        image: traefik/whoami
        ports:
        - containerPort: 80
---
apiVersion: v1
kind: Service
metadata:
  name: webpod
  labels:
    app: webpod
  annotations:
    service.cilium.io/global: "true"
spec:
  selector:
    app: webpod
  ports:
  - protocol: TCP
    port: 80
    targetPort: 80
  type: ClusterIP
EOF
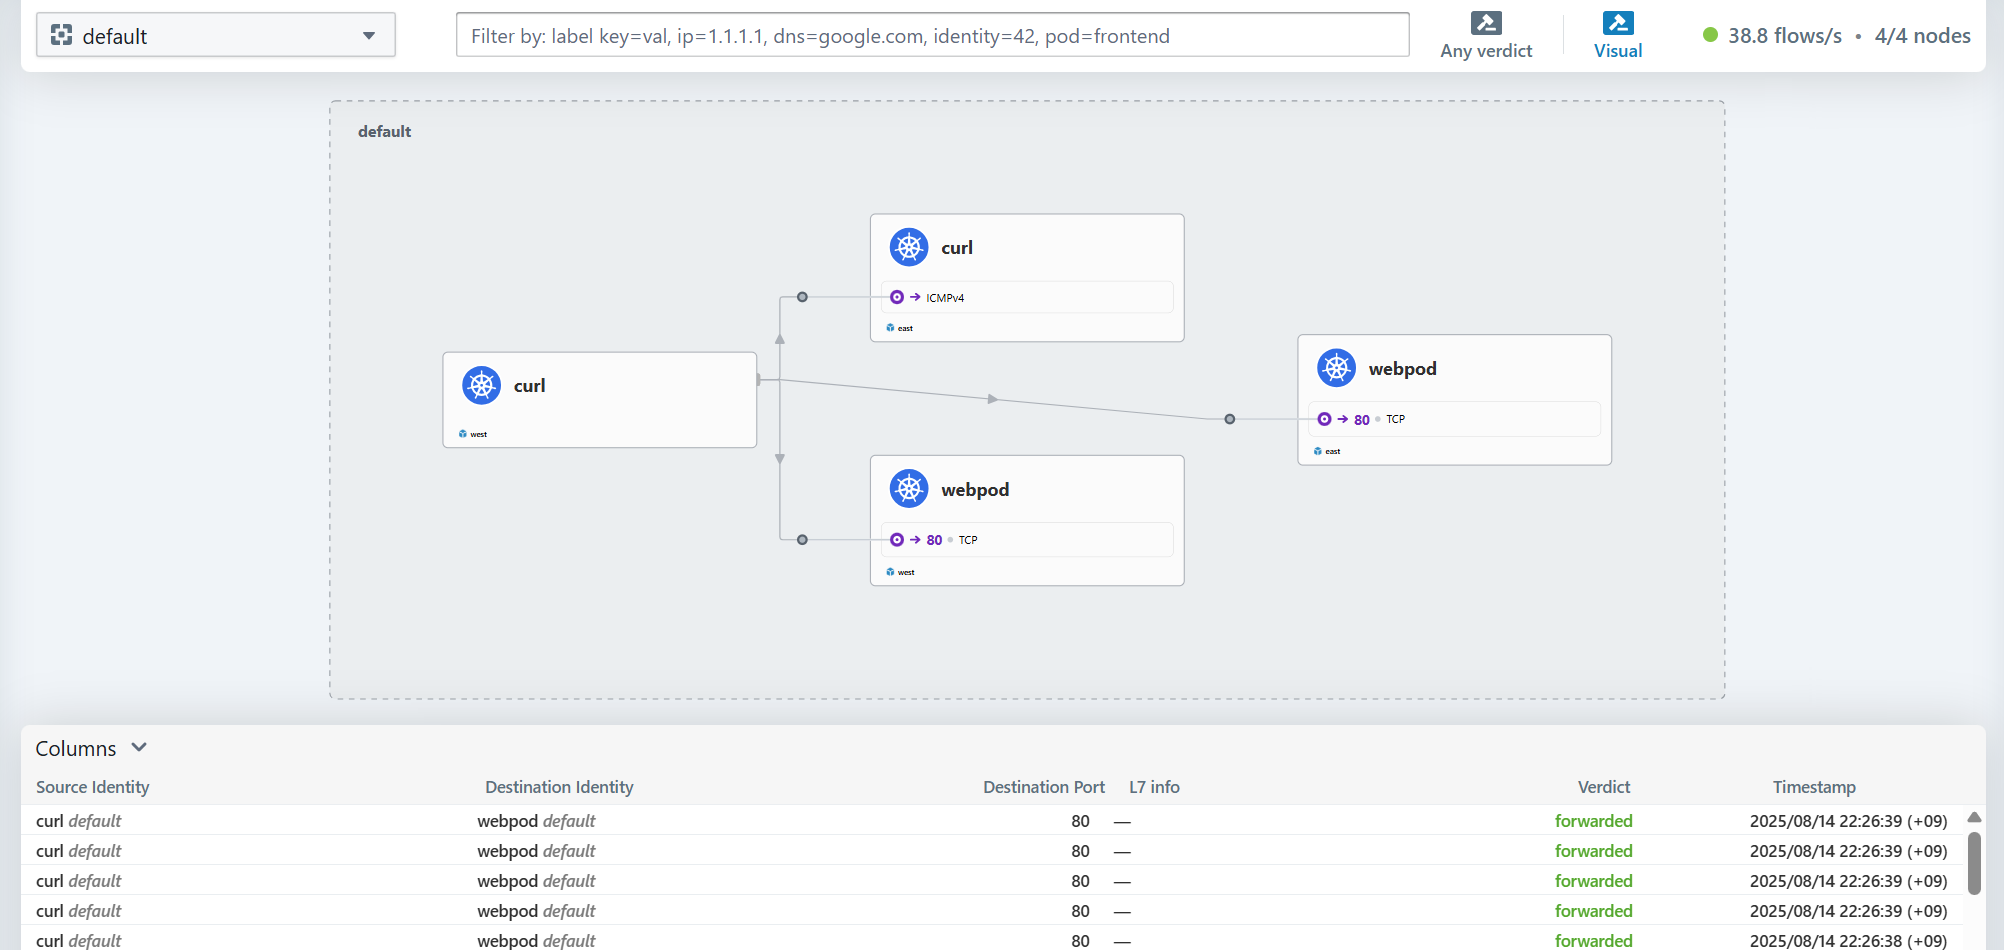
두 클러스터에 webpod 디플로이먼트를 배포하고, 각 서비스를 생성하면서 service.cilium.io/global: "true" 어노테이션을 사용했습니다.
이제 배포된 워크로드를 확인하고 서비스를 호출해보겠습니다.
# 확인
kubectl get po -owide --context kind-west && kubectl get po -owide --context kind-east
kubectl get svc,ep webpod --context kind-west && kubectl get svc,ep webpod --context kind-east

$ kubectl get po -owide --context kind-west && kubectl get po -owide --context kind-east
NAME                      READY   STATUS    RESTARTS   AGE     IP           NODE          NOMINATED NODE   READINESS GATES
curl-pod                  1/1     Running   0          36m     10.0.1.180   west-worker   <none>           <none>
webpod-697b545f57-gr2cn   1/1     Running   0          3m35s   10.0.1.86    west-worker   <none>           <none>
webpod-697b545f57-qdq9f   1/1     Running   0          3m35s   10.0.1.131   west-worker   <none>           <none>

NAME                      READY   STATUS    RESTARTS   AGE     IP           NODE          NOMINATED NODE   READINESS GATES
curl-pod                  1/1     Running   0          36m     10.1.1.125   east-worker   <none>           <none>
webpod-697b545f57-746cp   1/1     Running   0          3m36s   10.1.1.195   east-worker   <none>           <none>
webpod-697b545f57-9mnbq   1/1     Running   0          3m36s   10.1.1.35    east-worker   <none>           <none>

# 이 결과에서 endpoint는 각 클러스터에 대한 endpoint만 확인된다.
$ kubectl get svc,ep webpod --context kind-west && kubectl get svc,ep webpod --context kind-east
Warning: v1 Endpoints is deprecated in v1.33+; use discovery.k8s.io/v1 EndpointSlice
NAME             TYPE        CLUSTER-IP   EXTERNAL-IP   PORT(S)   AGE
service/webpod   ClusterIP   10.2.53.27   <none>        80/TCP    98s

NAME               ENDPOINTS                    AGE
endpoints/webpod   10.0.1.131:80,10.0.1.86:80   98s

Warning: v1 Endpoints is deprecated in v1.33+; use discovery.k8s.io/v1 EndpointSlice
NAME             TYPE        CLUSTER-IP    EXTERNAL-IP   PORT(S)   AGE
service/webpod   ClusterIP   10.3.71.163   <none>        80/TCP    90s

NAME               ENDPOINTS                    AGE
endpoints/webpod   10.1.1.195:80,10.1.1.35:80   90s


# 다만 cilium service list에서는 동일한 label을 두 클러스터의 endpoint가 모두 확인된다.
kubectl --context kind-east exec -it -n kube-system ds/cilium -c cilium-agent -- cilium service list --clustermesh-affinity

$ kubectl --context kind-east exec -it -n kube-system ds/cilium -c cilium-agent -- cilium service list --clustermesh-affinity
ID   Frontend               Service Type   Backend
...
13   10.3.71.163:80/TCP     ClusterIP      1 => 10.0.1.86:80/TCP (active)
                                           2 => 10.0.1.131:80/TCP (active)
                                           3 => 10.1.1.195:80/TCP (active)
                                           4 => 10.1.1.35:80/TCP (active)

kubectl --context kind-west  exec -it -n kube-system ds/cilium -c cilium-agent -- cilium service list --clustermesh-affinity
ID   Frontend               Service Type   Backend
...
13   10.2.53.27:80/TCP      ClusterIP      1 => 10.0.1.86:80/TCP (active)
                                           2 => 10.0.1.131:80/TCP (active)
                                           3 => 10.1.1.195:80/TCP (active)
                                           4 => 10.1.1.35:80/TCP (active)

# 서비스 호출 테스트
kubectl exec -it curl-pod --context kind-west -- sh -c 'while true; do curl -s --connect-timeout 1 webpod ; sleep 1; echo "---"; done;'
kubectl exec -it curl-pod --context kind-east -- sh -c 'while true; do curl -s --connect-timeout 1 webpod ; sleep 1; echo "---"; done;'
Hubble UI에서 확인해보면 서로 다른 클러스터의 webpod 로 호출되는 것이 확인됩니다.
5. Service Affinity 활용
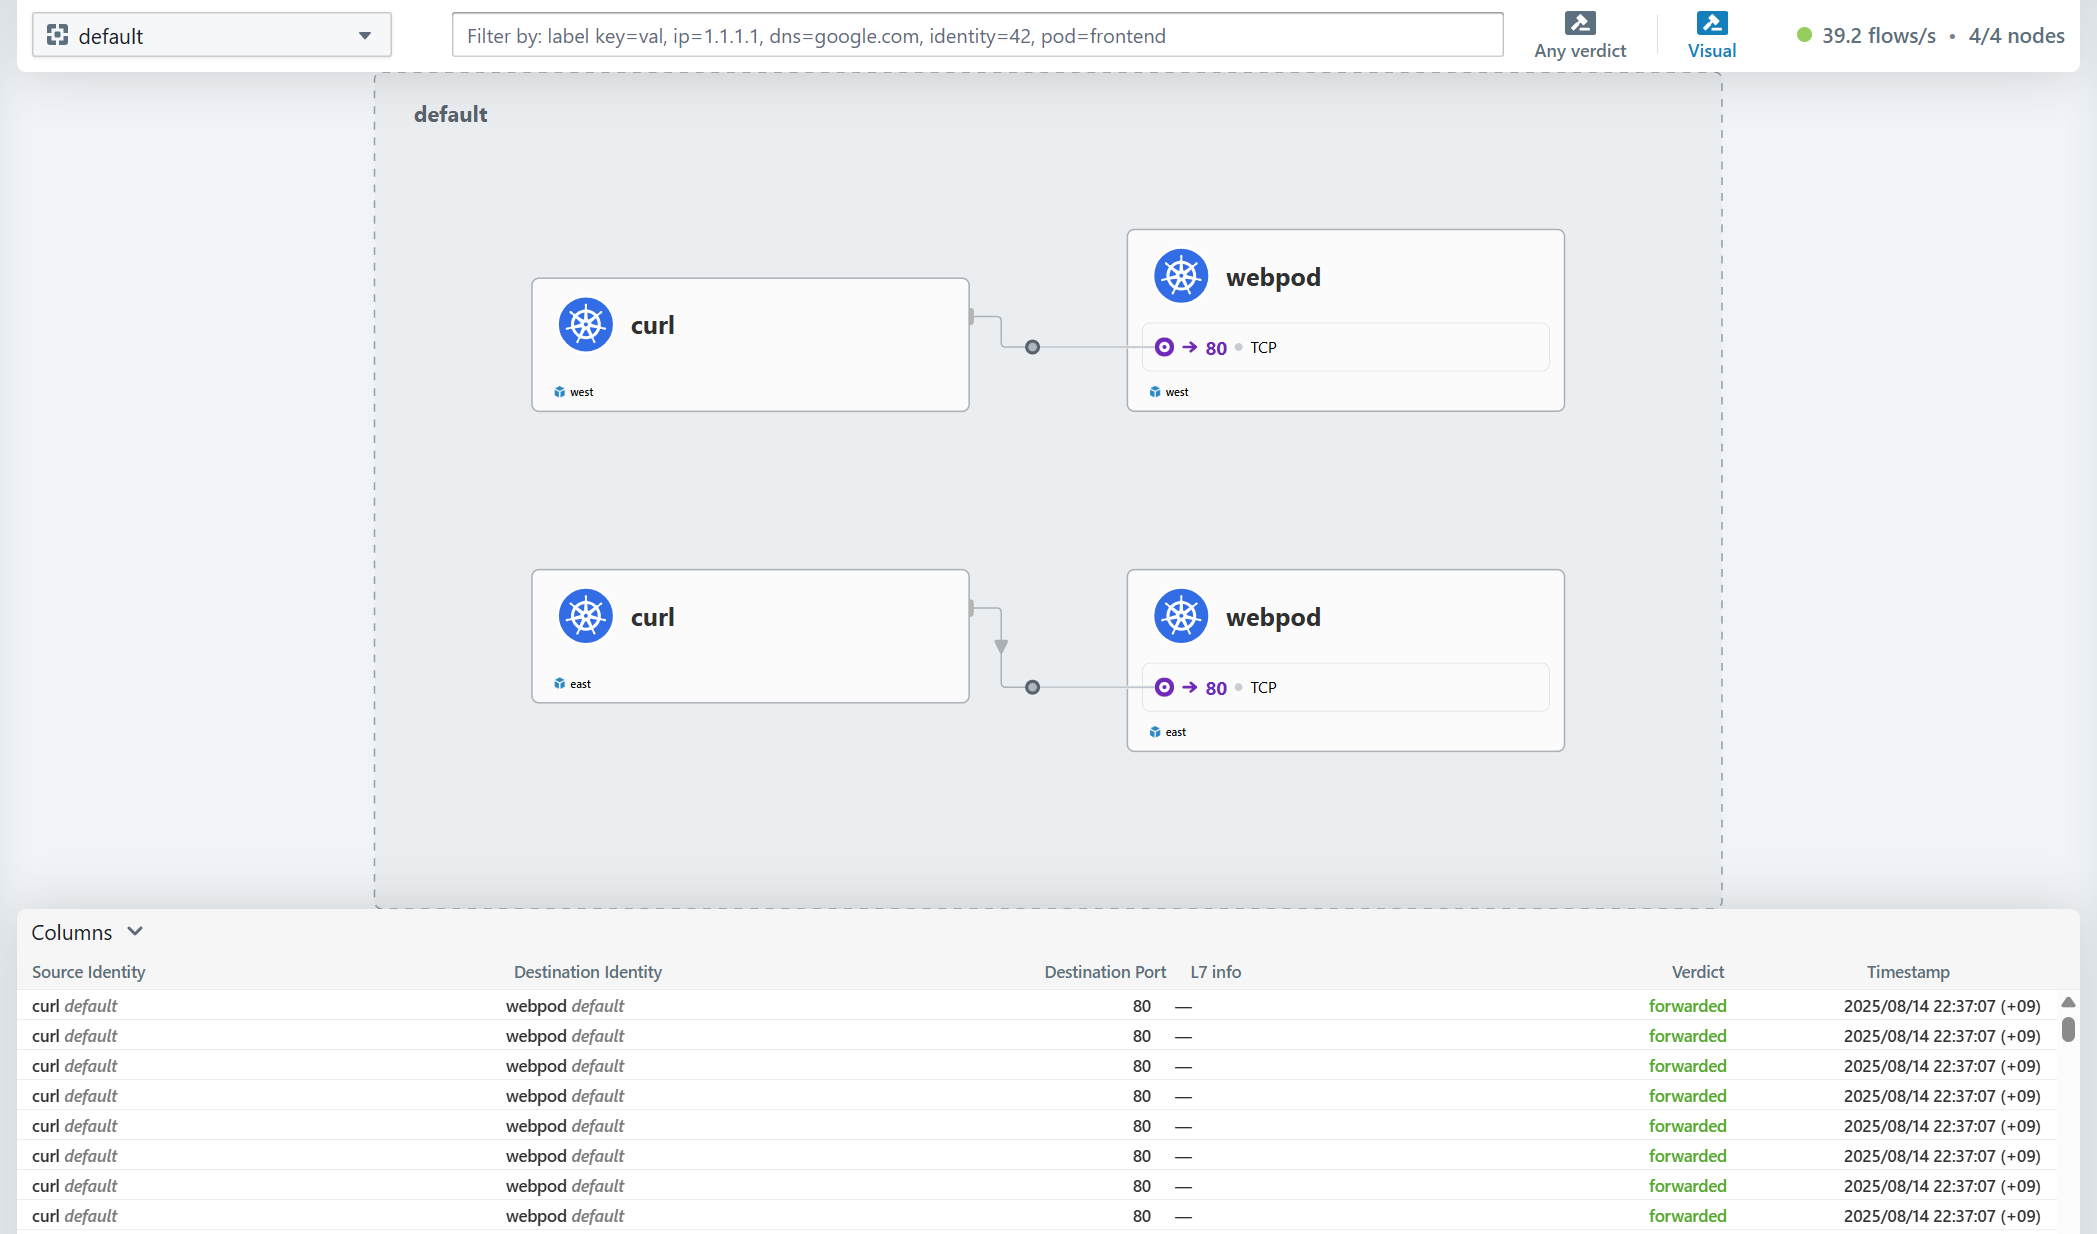
ClusterMesh와 Gloabal Service를 사용할 때, service.cilium.io/affinity: "local|remote|none" 어노테이션을 통해서 로걸 클러스터나 리포트 클러스터로 affinity를 줄 수도 있습니다.
참고: https://docs.cilium.io/en/stable/network/clustermesh/affinity/
# 모니터링 : 반복 접속해두기
kubectl exec -it curl-pod --context kind-west -- sh -c 'while true; do curl -s --connect-timeout 1 webpod ; sleep 1; echo "---"; done;'

# 현재 Service Annotations 설정
kubectl --context kind-west describe svc webpod | grep Annotations -A1
kubectl --context kind-east describe svc webpod | grep Annotations -A1


$ kubectl --context kind-west describe svc webpod | grep Annotations -A1
Annotations:              service.cilium.io/global: true
Selector:                 app=webpod
$ kubectl --context kind-east describe svc webpod | grep Annotations -A1
Annotations:              service.cilium.io/global: true
Selector:                 app=webpod


# Session Affinity Local 설정
kubectl --context kind-west annotate service webpod service.cilium.io/affinity=local --overwrite
kubectl --context kind-west describe svc webpod | grep Annotations -A3

kubectl --context kind-east annotate service webpod service.cilium.io/affinity=local --overwrite
kubectl --context kind-east describe svc webpod | grep Annotations -A3


$ kubectl --context kind-west describe svc webpod | grep Annotations -A3
Annotations:              service.cilium.io/affinity: local
                          service.cilium.io/global: true
Selector:                 app=webpod
Type:                     ClusterIP
$ kubectl --context kind-east describe svc webpod | grep Annotations -A3
Annotations:              service.cilium.io/affinity: local
                          service.cilium.io/global: true
Selector:                 app=webpod
Type:                     ClusterIP

# 확인 (로컬에 위치한 파드에 대해서 prefferred 가 붙음)
kubectl --context kind-west exec -it -n kube-system ds/cilium -c cilium-agent -- cilium service list --clustermesh-affinity
13   10.2.53.27:80/TCP      ClusterIP      1 => 10.0.1.86:80/TCP (active) (preferred)
                                           2 => 10.0.1.131:80/TCP (active) (preferred)
                                           3 => 10.1.1.195:80/TCP (active)
                                           4 => 10.1.1.35:80/TCP (active)

kubectl --context kind-east exec -it -n kube-system ds/cilium -c cilium-agent -- cilium service list --clustermesh-affinity
13   10.3.71.163:80/TCP     ClusterIP      1 => 10.0.1.86:80/TCP (active)
                                           2 => 10.0.1.131:80/TCP (active)
                                           3 => 10.1.1.195:80/TCP (active) (preferred)
                                           4 => 10.1.1.35:80/TCP (active) (preferred)

# 호출 확인
kubectl exec -it curl-pod --context kind-west -- sh -c 'while true; do curl -s --connect-timeout 1 webpod ; sleep 1; echo "---"; done;'
kubectl exec -it curl-pod --context kind-east -- sh -c 'while true; do curl -s --connect-timeout 1 webpod ; sleep 1; echo "---"; done;'
호출 테스트를 해보면 각각 preferred 처리된 파드로 접근이 되는 것을 알 수 있습니다.
마치며
이번 게시물에서는 Cilium에서 ClusterMesh를 통해서 서로 다른 클러스터를 연결하여 서비스를 구성하는 방법을 살펴봤습니다.
다음 게시물에서는 Cilium 의 ServiceMesh를 살펴보겠습니다.
'Cilium' 카테고리의 다른 글
| AKS의 Azure CNI Powered by Cilium (0) | 2025.08.29 |
|---|---|
| [9] Cilium - ServiceMesh (0) | 2025.08.23 |
| [7] Cilium - BGP Control Plane (0) | 2025.08.14 |
| [6] Cilium - LoadBalancer IPAM, L2 Announcement (0) | 2025.08.08 |
| [5] Cilium - Encapsulation 모드 (0) | 2025.08.08 |


